How To Replace a Bathtub Drain Plug
A malfunctioning bathtub drain plug can be a significant inconvenience. It can lead to water leakage, difficulty in filling the tub, and ultimately, wasted water and increased utility bills. Replacing a bathtub drain plug is often a straightforward DIY project that can save the cost of hiring a plumber. This article offers a comprehensive guide on how to identify the type of drain plug, gather necessary tools, and execute the replacement process efficiently and effectively.
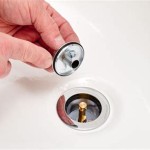
The first step in successfully replacing a bathtub drain plug involves identifying the type of drain plug currently installed. Various types exist, each with its own removal and installation nuances. Recognizing the specific mechanism in place is crucial for a smooth and damage-free replacement. Common types of bathtub drain plugs include pop-up drains, lift-and-turn drains, toe-touch drains, and chain-and-stopper drains. Ignoring this initial assessment can lead to using the wrong tools or techniques, potentially causing damage to the drain assembly or the tub itself.
Identifying the Type of Bathtub Drain Plug
The pop-up drain, characterized by a stopper that rises and lowers when a lever or handle is activated, is a prevalent design. Typically, this lever is located near the bathtub's overflow drain. When the lever is lifted, a linkage mechanism raises the stopper, allowing water to drain. Lowering the lever seals the drain. Identifying a pop-up drain involves locating this lever and observing the stopper's movement in relation to its operation.
The lift-and-turn drain, as its name suggests, requires the user to lift and turn the stopper to open or close the drain. This type is easily identified by its stopper, which usually has a small knob or handle on top. Lifting and turning this knob engages or disengages a locking mechanism that controls the stopper's position. Unlike the pop-up drain, it does not require an external lever connected to the overflow drain.
The toe-touch drain operates with a simple push of the foot. Pressing the stopper once seals the drain, and pressing it again releases it. This type is identifiable by its flush, button-like appearance. There is no external lever or knob; the entire operation is controlled by the pressure applied to the stopper itself. Due to its simplicity, the toe-touch drain is often found in modern bathroom settings.
The chain-and-stopper drain is the most basic type, consisting of a rubber or plastic stopper attached to a chain. The chain is manually placed into the drain to seal it and lifted to allow drainage. This type is easily recognizable by its visible chain extending from the stopper to the overflow drain or a nearby hook. While less common in modern bathtubs, it is frequently found in older installations.
Once the type of drain plug has been definitively identified, the next step is to gather the necessary tools and materials. Having everything readily available before starting the project streamlines the process and minimizes potential disruptions.
Gathering Tools and Materials
Essential tools for replacing a bathtub drain plug often include a flathead screwdriver, a Phillips head screwdriver (depending on the drain type), channel-lock pliers, a drain wrench (also known as a dumbbell wrench), a small bucket or container to catch debris, rags or towels for cleanup, and possibly a penetrating oil lubricant such as WD-40. A new drain plug assembly compatible with the identified drain type is also necessary.
The screwdrivers are used for loosening or tightening screws that secure the drain stopper or its components. The channel-lock pliers are helpful for gripping and turning stubborn parts of the drain assembly. The drain wrench is specifically designed to fit into the drain opening and provide leverage to loosen the drain flange. The bucket or container is crucial for catching any loose parts or debris that fall during the removal process. Rags or towels are essential for wiping up spills and protecting the bathtub surface from scratches. The penetrating oil lubricant can be applied to corroded or stuck parts to facilitate easier removal.
Selecting the correct replacement drain plug assembly is paramount. Ensure that the new assembly is compatible with the specific bathtub drain type identified earlier. Using an incompatible drain plug can lead to improper sealing, potential leaks, and further complications. Consult the manufacturer's specifications or visit a local hardware store with the old drain plug for assistance in selecting the appropriate replacement.
With the tools and materials prepared, the actual replacement process can begin. This process varies slightly depending on the type of drain plug, but the general principles remain consistent.
Replacing the Bathtub Drain Plug
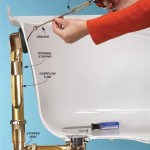
For a pop-up drain, the first step is to access the linkage mechanism located behind the overflow drain. Remove the overflow plate by unscrewing it using a screwdriver. Once the plate is removed, the linkage connected to the stopper will be visible. Typically, there is a spring clip or a screw that secures the linkage to the stopper. Disconnect this clip or screw. Once disconnected, the stopper can usually be lifted out of the drain opening. If the stopper is stuck, gently wiggle it or apply a small amount of penetrating oil lubricant to loosen it. After removing the old stopper, clean the drain opening thoroughly, removing any hair or debris. Insert the new stopper, reattach the linkage, and secure it with the clip or screw. Finally, replace the overflow plate.
Replacing a lift-and-turn drain involves unscrewing or prying off the stopper. Some lift-and-turn stoppers have a visible screw on top that can be easily unscrewed. Others may require gentle prying with a flathead screwdriver. Once the stopper is removed, clean the drain opening thoroughly. The new stopper is then installed by either screwing it into the existing threads or pushing it into place, depending on the design. Ensure that the stopper is securely in place and that the turning mechanism functions smoothly.
For a toe-touch drain, the stopper typically unscrews from the drain flange. Grasp the stopper firmly and turn it counterclockwise to loosen it. If the stopper is difficult to turn, apply a small amount of penetrating oil lubricant. Once the stopper is removed, clean the drain opening. The new toe-touch stopper is installed by screwing it into the drain flange clockwise. Ensure that the stopper is tightened securely, but avoid over-tightening, which could damage the threads.
Replacing a chain-and-stopper drain is the simplest process. Simply remove the old stopper and chain from the drain. Attach the new stopper to the chain and secure it to the overflow drain or a nearby hook. Ensure that the chain is long enough to allow the stopper to fully seal the drain but not so long that it interferes with the overflow drain.
After installing the new drain plug, testing the drain's functionality is crucial. Fill the bathtub with a few inches of water and observe whether the drain plug effectively seals the drain. If water leaks out, double-check the installation and ensure that all components are properly secured. If the leak persists, it may be necessary to adjust the stopper's position or replace any worn-out parts of the drain assembly.
In addition to the specific steps for each drain type, several general precautions should be observed during the replacement process. These include wearing appropriate eye protection to prevent debris from entering the eyes, avoiding excessive force when removing or installing parts to prevent damage to the drain assembly or the bathtub, and thoroughly cleaning the drain opening before installing the new drain plug to ensure a proper seal.
Furthermore, proper disposal of the old drain plug and any associated components is essential. Some materials may be recyclable, while others may require disposal as household waste. Check local regulations for proper disposal guidelines.
By carefully following these steps and taking the necessary precautions, replacing a bathtub drain plug can be a manageable DIY project that saves time and money. A properly functioning drain plug ensures a comfortable and efficient bathing experience.

Replacing A Tub Drain Bathtub Removal And Replacement

Diy How To Replace A Bathtub Drain Stopper With Common Household Tools

How To Remove A Bathtub Drain The Home Depot

How To Remove 6 Diffe Bath Drain Types
How To Remove 6 Diffe Kinds Of Drain Stoppers

How To Replace Bathtub Drain Stopper With A Lift And Turn Diy

Remove A Bathtub Drain Stopper To Unclog The Quick Easy
How To Remove 6 Diffe Kinds Of Drain Stoppers

How To Remove A Bathtub Drain Stopper

How To Easily Remove Bathtub Drain Plug Stopper Unclog In 1 Minute Jonny Diy
Related Posts