How to Replace a Bathtub and Wall Surround Kit: A Comprehensive Guide
Replacing a bathtub and wall surround kit is a significant home improvement project that can dramatically enhance the aesthetics and functionality of a bathroom. While it requires a considerable investment of time and effort, completing the task oneself can result in substantial cost savings compared to hiring a professional contractor. This guide provides a detailed, step-by-step process for replacing a bathtub and installing a new wall surround kit, empowering homeowners to undertake this project with confidence.
Before commencing the project, it is crucial to gather all necessary tools and materials. A well-prepared workspace minimizes delays and ensures a smoother installation process. This includes safety equipment, demolition tools, plumbing tools, and the new bathtub and wall surround kit. The specific tools and materials required may vary depending on the existing plumbing configuration and the type of surround kit chosen.
Key Point 1: Preparation and Demolition
The initial phase involves meticulous preparation and careful demolition of the existing bathtub and wall surround. This stage is critical as it lays the foundation for a successful installation. Proper planning and execution during demolition prevent damage to surrounding structures and ensure a clean and accessible workspace.
Step 1: Gather Tools and Materials. Essential tools include a utility knife, pry bar, screwdriver set, adjustable wrench, channel-lock pliers, reciprocating saw (with metal-cutting blade), hammer, safety glasses, gloves, dust mask, drop cloths, and trash bags. Additional materials may include wood shims, construction adhesive, silicone sealant, and plumber's putty.
Step 2: Protect the Work Area. Cover the bathroom floor with drop cloths to protect it from debris and damage. Ensure adequate ventilation by opening windows or using a fan. Disconnect the power supply to the bathroom circuit breaker as a safety precaution.
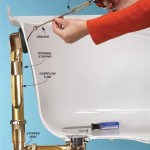
Step 3: Disconnect Plumbing. Turn off the water supply to the bathroom at the main shut-off valve. Disconnect the drain stopper linkage and the overflow plate from the bathtub. Carefully detach the faucet handles and spout. If necessary, disconnect the water supply lines to the faucet using adjustable wrenches. Have a bucket and towels readily available to catch any residual water.
Step 4: Remove the Existing Wall Surround. Using a utility knife, carefully cut along the seams of the existing wall surround. A heat gun on a low setting can soften old caulk for easier removal. A pry bar and scraper can then be used to gently detach the surround panels from the wall. Exercise caution to avoid damaging the underlying wall material.
Step 5: Remove the Existing Bathtub. This is often the most challenging part of the process. First, remove the bathtub drain assembly using channel-lock pliers or a specialized drain wrench. Inspect the bathtub for any hidden fasteners or screws. If present, remove them. If the bathtub is cast iron, it may be extremely heavy. Consider using a reciprocating saw to cut the bathtub into smaller, more manageable pieces for easier removal. Again, exercise caution and wear safety glasses and gloves. If the bathtub is acrylic or fiberglass, it will be lighter, but still requires careful handling to prevent damage.
Step 6: Clean the Area. Once the old bathtub and surround are removed, thoroughly clean the exposed wall studs and floor. Remove any remaining adhesive, caulk, or debris. Inspect the studs for signs of water damage or rot. Replace any damaged studs before proceeding.
Step 7: Level the Subfloor. Ensure the subfloor is level and structurally sound. Use shims to level any low spots. A level subfloor is essential for proper bathtub installation and prevents future problems such as leaks or instability.
Key Point 2: Bathtub Installation
Proper bathtub installation is crucial for ensuring a watertight seal and long-term durability. This involves carefully positioning the bathtub, connecting the drain, and ensuring it is level and secure. Accurate installation at this stage will prevent potential plumbing issues and structural problems in the future.
Step 1: Position the New Bathtub. Carefully maneuver the new bathtub into place. Ensure it is properly aligned with the drain and overflow openings. Take care not to scratch or damage the bathtub surface during installation.
Step 2: Level the Bathtub. Use a level to check the bathtub's level in all directions. Shim the bathtub as needed to ensure it is perfectly level. The shims should be placed under the bathtub's support feet or along the bottom edge. Secure the shims with construction adhesive to prevent them from shifting.
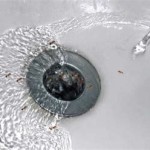
Step 3: Connect the Drain and Overflow. Apply plumber's putty to the drain flange and carefully insert it into the bathtub drain opening. Tighten the drain nut from underneath the bathtub using channel-lock pliers. Connect the overflow pipe to the bathtub overflow opening, ensuring a tight seal. These connections are critical for a watertight bathtub.
Step 4: Connect the Drain to the Existing Plumbing. This typically involves connecting the bathtub drain to the P-trap and the main drain line. Follow local plumbing codes and use appropriate fittings and connectors. Apply pipe dope to threaded connections to ensure a leak-proof seal. Test the drain connection by filling the bathtub with a small amount of water and checking for leaks.
Step 5: Secure the Bathtub. Depending on the bathtub model, it may be necessary to secure it to the wall studs using screws or nails. Check the manufacturer's instructions for specific installation recommendations. This will prevent the bathtub from shifting or moving during use.
Key Point 3: Wall Surround Installation
Installing the wall surround kit involves adhering the panels to the walls, ensuring a watertight seal, and finishing the edges. Precise installation of the wall surround kit protects the walls from water damage and creates a seamless, aesthetically pleasing finish. This step requires careful attention to detail and adherence to the manufacturer's instructions.
Step 1: Prepare the Walls. Ensure the walls are clean, dry, and free of any debris. If necessary, apply a thin layer of construction adhesive to the wall studs. This will provide additional adhesion for the surround panels.
Step 2: Dry-Fit the Surround Panels. Before applying adhesive, dry-fit the surround panels to ensure they fit properly. Trim the panels as needed using a utility knife or a fine-tooth saw. Pay close attention to the corners and edges to ensure a seamless fit.
Step 3: Apply Adhesive. Apply construction adhesive to the back of each surround panel according to the manufacturer's instructions. Use a notched trowel to spread the adhesive evenly. Avoid applying too much adhesive, as this can make it difficult to position the panels.
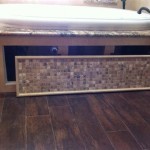
Step 4: Install the Surround Panels. Carefully position each surround panel against the wall, pressing firmly to ensure it adheres properly. Use a level to ensure the panels are straight and plumb. Secure the panels with painter's tape to hold them in place while the adhesive dries.
Step 5: Install the Corner and Edge Trim. Install the corner and edge trim pieces to conceal the seams between the surround panels and the walls. Apply a bead of silicone sealant to the back of the trim pieces before installing them. Secure the trim pieces with construction adhesive or small nails.
Step 6: Apply Silicone Sealant. Apply a bead of silicone sealant along all seams and edges of the wall surround kit. This will create a watertight seal and prevent water from penetrating behind the panels. Smooth the sealant with a wet finger to create a clean, professional finish.
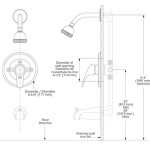
Step 7: Reinstall Plumbing Fixtures. Reinstall the faucet handles, spout, and showerhead. Connect the water supply lines to the faucet. Ensure all connections are tight and leak-free.
Step 8: Install the Drain Stopper Linkage and Overflow Plate. Reinstall the drain stopper linkage and the overflow plate to the bathtub. Test the drain to ensure it is functioning properly.
Step 9: Clean Up. Remove all tools, materials, and debris from the bathroom. Clean the bathtub and wall surround kit with a mild detergent. Allow the sealant to cure completely before using the bathtub.
Replacing a bathtub and wall surround kit is a challenging but rewarding home improvement project. By carefully following these steps and adhering to the manufacturer's instructions, homeowners can successfully complete this project and enjoy a newly renovated bathroom.

Semi Diy Bathroom Remodel Replacing A Tub Surround The Bathtub Tile

How To Install An Acrylic Bathtub And Surround

How To Install A Shower Surround The Home Depot

Removing A Fiberglass Bath And Surround

How To Install A Bath And Shower Surround Delta Classic 400

How To Install A Bath Tub Surround

Semi Diy Bathroom Remodel Replacing A Tub Surround The Bathtub Tile

How To Install A Bath Tub Surround

How To Install A Bathtub And Shower Wall Set

How To Install A Glue Up Shower Enclosure The Home Depot