How to Repair a Bathtub Faucet Diverter
It can be frustrating to find that your bathtub faucet diverter is not working correctly. The diverter is responsible for directing water from the spout to the showerhead, and when it malfunctions, you may not be able to use your shower. Fortunately, repairing a bathtub faucet diverter is relatively easy and can be done with a few simple tools.
Materials Needed:
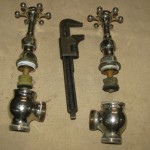
- Adjustable wrench
- Phillips head screwdriver
- Flat head screwdriver
- New bathtub faucet diverter
Step-by-Step Instructions:
- Turn off the water supply. This is essential to prevent water from spraying everywhere when you remove the diverter.
- Remove the handle. Most bathtub faucet handles are held in place by a screw on the underside. Use a Phillips head screwdriver to remove the screw, and then pull the handle straight off.
- Loosen the packing nut. The packing nut is located behind the handle and secures the diverter to the faucet body. Use an adjustable wrench to loosen the packing nut, but do not remove it completely.
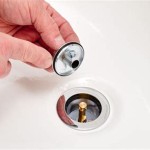
- Remove the diverter. Once the packing nut is loose, you can pull the diverter straight out of the faucet body.
- Replace the diverter. Take the new diverter and insert it into the faucet body. Hand-tighten the packing nut, and then use the adjustable wrench to further tighten it.
- Replace the handle. Slide the handle back onto the faucet body and tighten the screw with a Phillips head screwdriver.
- Turn on the water supply. Check for leaks around the diverter. If there are any leaks, tighten the packing nut further.
Conclusion
Repairing a bathtub faucet diverter is a simple process that can be completed in a few minutes. By following these instructions, you can ensure that your shower is up and running again in no time.

Repair Leaking Tub Spout Diverter Pull In Shower Mode

Repair Leaking Tub Spout Diverter Pull In Shower Mode

Tub Spout Diverter How To Fix From Beginning The End Using Danco Repair Kit

Repair Leaking Tub Spout Diverter Pull In Shower Mode

Tub Faucet Spout Diverter Pull Lever Broke Off Diy Fix

Shower Tub Diverter Quick Fix Pull Spout Repair For Sticky Leaky

How To Repair A Shower Diverter Mr Rooter Blog

How To Fix A Shower Diverter Repair Or Replace

How To Replace A Bathtub Spout Diy Family Handyman

Diy How To Fix Shower Tub Stuck Spout Vinegar Diverter Bathtub
Related Posts