How To Repair A Bathtub Faucet
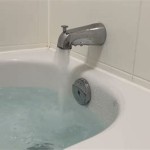
A dripping or malfunctioning bathtub faucet is a common household annoyance that can lead to wasted water and increased water bills. Repairing a bathtub faucet, rather than replacing it entirely, is often a cost-effective and environmentally conscious solution. This article provides a comprehensive guide to diagnosing and repairing various types of bathtub faucets. Understanding the different types of faucets and their potential problems is crucial before attempting any repairs. Safety precautions should always be prioritized.
Identifying the Type of Bathtub Faucet
Before initiating any repair work, it is essential to identify the type of bathtub faucet installed. Different faucet types require different repair approaches and replacement parts. The most common types of bathtub faucets include compression faucets, ball faucets, cartridge faucets, and ceramic disc faucets. Each type possesses a unique design and internal mechanism, influencing the diagnostic and repair procedures.
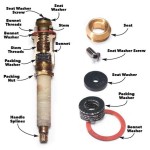
Compression Faucets: Compression faucets are the oldest and simplest type of faucet. They operate by compressing a rubber washer against a valve seat to shut off the water flow. These faucets typically have two separate handles, one for hot water and one for cold water. Leaks in compression faucets are often caused by worn-out washers or damaged valve seats.
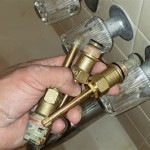
Ball Faucets: Ball faucets are characterized by a single handle that controls both the water temperature and flow. Inside the faucet, a ball-shaped component with slots and openings regulates the water mixing and flow. Common issues with ball faucets include leaks around the handle and stiff handle movement. These problems often stem from worn-out O-rings and springs within the faucet assembly.
Cartridge Faucets: Cartridge faucets also use a single handle to control water temperature and flow. However, instead of a ball, they utilize a cartridge containing internal seals and waterways to regulate the water. Cartridge faucets are known for their smooth operation and relatively easy repair. Leaks and restricted water flow are common problems, often caused by a damaged or worn-out cartridge.
Ceramic Disc Faucets: Ceramic disc faucets are the most modern type of faucet, known for their durability and drip-free performance. They employ two ceramic discs that slide against each other to control water flow. These faucets provide a wide range of temperature and flow control. Leaks in ceramic disc faucets are less common but can occur due to mineral buildup or damage to the ceramic discs.
Essential Tools and Safety Precautions
Before commencing any faucet repair, gathering the necessary tools and implementing safety precautions is paramount. Having the right tools will streamline the repair process and prevent damage to the faucet or surrounding plumbing. Safety precautions are essential to protect oneself from potential hazards such as electric shock or water damage.
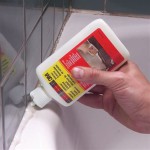
Essential Tools: The following tools are typically required for bathtub faucet repairs: * Screwdrivers (Phillips and flathead) * Adjustable wrench * Pliers * Allen wrench set * Penetrating oil * Faucet handle puller (optional) * Plumber's grease * Towels or rags * Bucket * Replacement parts (washers, O-rings, cartridges, etc.)
Safety Precautions: Prior to beginning any repair, the following safety precautions must be observed: * Turn Off the Water Supply: Locate the shut-off valves for both hot and cold water lines leading to the bathtub faucet. Turn both valves completely off. This is the most crucial safety step to prevent flooding. * Drain the Pipes: After turning off the water supply, open the faucet to relieve any remaining pressure in the pipes. Allow the water to drain completely. * Protect the Bathtub Finish: Place towels or rags over the bathtub surface to protect it from scratches or damage during the repair process. * Wear Eye Protection: Wear safety glasses to protect eyes from debris or splashes. * Work in a Well-Ventilated Area: If using penetrating oil or other chemicals, ensure adequate ventilation in the work area.
Step-by-Step Repair Procedures for Different Faucet Types
The following sections outline the specific repair procedures for each type of bathtub faucet. It is important to consult the faucet's manufacturer's instructions or online resources for more detailed guidance if needed. Always start by disassembling the faucet carefully and inspecting the internal components for wear or damage.
Repairing a Compression Faucet: 1. Remove the Handles: Use a screwdriver to remove the screws holding the handles in place. Some handles may require a handle puller to remove them. 2. Remove the Stem: Use an adjustable wrench to loosen and remove the valve stem. 3. Inspect and Replace the Washer: Examine the rubber washer at the end of the stem. If it is worn, cracked, or flattened, replace it with a new washer of the same size and type. 4. Inspect and Repair the Valve Seat: The valve seat is the area where the washer presses to shut off the water. If the seat is corroded or damaged, it can be repaired with a valve seat wrench or replaced entirely. 5. Reassemble the Faucet: Apply plumber's grease to the stem threads and reassemble the faucet in reverse order. Turn on the water supply and check for leaks.
Repairing a Ball Faucet: 1. Loosen the Set Screw: Locate the set screw on the side of the faucet handle and loosen it with an Allen wrench. 2. Remove the Handle and Cap: Pull the handle off the faucet. Then, unscrew the cap beneath the handle. 3. Loosen the Adjusting Ring: Use an adjustable wrench to loosen the adjusting ring. 4. Remove the Ball and Seats/Springs: Lift out the ball, seats, and springs. 5. Inspect and Replace Worn Parts: Examine the O-rings on the ball and the seats and springs. Replace any worn or damaged parts. A repair kit containing all the necessary O-rings and springs is often available. 6. Reassemble the Faucet: Apply plumber's grease to the O-rings and reassemble the faucet in reverse order. Turn on the water supply and check for leaks.
Repairing a Cartridge Faucet: 1. Remove the Handle: Some handles have a set screw, while others are held on by a cap that needs to be pried off. Locate and remove the screw or cap. 2. Remove the Retaining Clip: Once the handle is removed, locate the retaining clip that holds the cartridge in place. Use pliers to remove the clip. 3. Remove the Cartridge: Grasp the cartridge and pull it straight out. It may be necessary to use pliers to grip the cartridge firmly. 4. Inspect the Cartridge: Examine the cartridge for cracks, wear, or mineral buildup. Replace the cartridge with a new one of the same type and size. 5. Reassemble the Faucet: Apply plumber's grease to the new cartridge and reassemble the faucet in reverse order. Turn on the water supply and check for leaks.
Repairing a Ceramic Disc Faucet: 1. Remove the Handle: Similar to cartridge faucets, remove the handle by loosening a set screw or prying off a cap. 2. Remove the Escutcheon: The escutcheon is the decorative cover plate beneath the handle. Unscrew or pry off the escutcheon. 3. Remove the Ceramic Disc Cylinder: Unscrew the ceramic disc cylinder. 4. Inspect the Ceramic Discs: Examine the ceramic discs for cracks, chips, or mineral buildup. Clean the discs with a soft cloth and mild cleaner. If the discs are damaged, replace them. Replacement discs may be difficult to find; a complete cartridge replacement is often the best option. 5. Reassemble the Faucet: Apply plumber’s grease sparingly to the cylinder and reassemble the faucet in reverse order. Turn on the water supply and check for leaks.
Diagnosing Common Bathtub Faucet Problems
Accurate diagnosis is crucial for effective faucet repair. Understanding the symptoms and their potential causes will guide the repair process and ensure that the correct parts are replaced. Common bathtub faucet problems include drips, leaks around the handle, low water pressure, and noisy operation.
Dripping Faucet: A dripping faucet is the most common problem. The cause of a dripping faucet can vary depending on the faucet type. In compression faucets, a worn-out washer is usually the culprit. In ball and cartridge faucets, worn O-rings or seals can cause drips. In ceramic disc faucets, mineral buildup or damaged ceramic discs may be the cause. To diagnose the problem, disassemble the faucet and inspect the internal components for wear or damage.
Leaks Around the Handle: Leaks around the handle typically indicate worn O-rings or seals within the faucet assembly. In ball faucets, the O-rings on the ball can deteriorate over time. In cartridge faucets, the seals within the cartridge can become damaged. Disassemble the faucet and replace the worn O-rings or seals.
Low Water Pressure: Low water pressure can be caused by several factors, including mineral buildup in the faucet aerator, clogged water lines, or a faulty cartridge. Start by cleaning the aerator to remove any mineral deposits. If the problem persists, inspect the water lines for any obstructions and consider replacing the cartridge.
Noisy Operation: Noisy operation, such as squealing or hissing sounds, can be caused by vibrations within the faucet assembly or mineral buildup. Tighten any loose screws or components within the faucet. If the noise persists, try cleaning the faucet and aerator to remove any mineral deposits.
Repairing a bathtub faucet can be a straightforward process when approached systematically. By identifying the faucet type, gathering the necessary tools, implementing safety precautions, and following the appropriate repair procedures, most common faucet problems can be resolved effectively. When in doubt, consult a qualified plumbing professional.

How To Fix A Leaking Bathtub Faucet Diy Family Handyman

How To Fix A Leaking Bathtub Faucet The Home Depot

How To Fix A Leaky Bathtub Faucet 6 Ways Stop Drips

Diy Bathtub Faucet Repair

How To Change A Bathtub Faucet 14 Steps With Pictures Wikihow

How To Fix A Leaking Bathtub Faucet The Home Depot

How To Fix A Leaking Bathtub Faucet The Home Depot

How To Fix A Leaking Bathtub Faucet The Home Depot

How To Fix A Leaky Bathtub Faucet 6 Ways Stop Drips

Plumbing How To Replace A Jacuzzi Bathtub Faucet Home Improvement Stack Exchange
Related Posts