How To Remove The Stopper From Bathtub
Bathtub stoppers, while seemingly simple devices, can become a source of frustration when they malfunction or require removal for cleaning or repair. Understanding the different types of stoppers and the techniques for their removal is essential for homeowners and maintenance personnel. This article provides a comprehensive guide on how to remove various bathtub stopper types, addressing common issues and offering practical solutions.
Before attempting any removal process, it is crucial to identify the type of stopper installed in the bathtub. Common types include lift-and-turn stoppers, pop-up stoppers, toe-touch stoppers, trip-lever stoppers, and chain-and-plug stoppers. Each type has a unique mechanism, and using the wrong removal technique can damage the stopper or the drain assembly. Furthermore, safety precautions should always be observed. Turn off the water supply to the bathtub to prevent accidental flooding. Wear appropriate gloves to protect hands from debris and potential contaminants. Have necessary tools readily available, such as screwdrivers (Phillips and flathead), pliers, a small bucket, and a flashlight.
Identifying the Bathtub Stopper Type
Correctly identifying the type of bathtub stopper is the first crucial step toward successful removal. Misidentification can lead to using the wrong tools and techniques, potentially damaging the stopper or the drain assembly. Each stopper type operates on a different principle, and their external appearance provides key clues to their mechanism.
Lift-and-Turn Stoppers: These stoppers are characterized by a knob or lever on the top that is rotated to either open or close the drain. They typically have a screw located beneath the knob. The entire stopper usually sits flush with the drain when in the open position. The rotation of the knob either raises or lowers a lower component that seals the drain.
Pop-Up Stoppers: Pop-up stoppers are identified by a button or plunger in the center that is pressed to stop the water flow and pressed again to release it. They are often found in more modern bathtubs. The mechanism is usually connected to a rocker arm located within the drain pipe, which lifts and lowers the stopper.
Toe-Touch Stoppers: Similar in appearance to pop-up stoppers, toe-touch stoppers are activated by pressing the top with a toe. The first press seals the drain, while the second press releases it. These stoppers generally have a more robust feel than pop-up stoppers and often have a visible rubber seal around the edge.
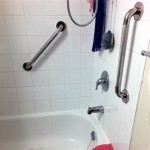
Trip-Lever Stoppers: Trip-lever stoppers are easily identified by a lever located on the overflow plate, usually situated below the faucet on the bathtub wall. When the lever is moved, it activates a linkage system that extends or retracts the stopper within the drainpipe. This type is one of the more complex designs.
Chain-and-Plug Stoppers: The simplest of the types, chain-and-plug stoppers consist of a rubber or metal plug attached to a chain. The chain is usually connected to a small handle that rests on the overflow plate. The plug is manually inserted into the drain to stop the water flow and lifted to release it.
Removing Specific Bathtub Stopper Types
Once the stopper type is identified, the appropriate removal technique can be applied. Each stopper type requires a specific approach, often involving simple tools and precise maneuvers. Patience and careful observation are key to avoiding damage.
Removing Lift-and-Turn Stoppers: The process usually involves unscrewing the knob or lever on top of the stopper. First, inspect the knob for a visible screw. If present, use a screwdriver (usually a Phillips-head) to remove it. Once the screw is removed, the knob should lift off, revealing the inner mechanism. Sometimes, the stopper may be stuck due to mineral buildup. Gently wiggle the stopper while pulling upwards. If it remains stuck, try applying a penetrating oil around the base and allowing it to sit for a few minutes before attempting to remove it again. Once the knob is removed, the rest of the stopper assembly can usually be unscrewed from the drain. Use pliers if necessary to grip the assembly but be careful not to damage the threads.
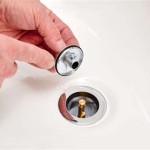
Removing Pop-Up Stoppers: Removing a pop-up stopper typically involves gripping the stopper and pulling it straight up. Often, these stoppers are secured with an O-ring or other friction-based mechanism. Gently rotate the stopper while pulling upward to help break the seal. If the stopper is stuck, try using a rubber glove for a better grip. In some cases, the stopper may have a small screw or release button on the side. Inspect closely for any such features and disengage them before attempting to pull the stopper out. Once removed, inspect the drain opening for debris or obstructions that may have caused the stopper to malfunction.
Removing Toe-Touch Stoppers: Toe-touch stoppers are often removed by unscrewing them. The top portion of the stopper usually rotates. Grip the stopper firmly and turn it counterclockwise. If it doesn't turn easily, try applying a penetrating oil to the threads and letting it sit for a few minutes. Once the stopper is unscrewed, it can be lifted out. Be mindful of any small parts, such as washers or seals, that may come loose during the removal process. Keep these parts organized to ensure proper reassembly.
Removing Trip-Lever Stoppers: Removing trip-lever stoppers involves accessing the stopper mechanism through the overflow plate. First, remove the screws holding the overflow plate in place. Once the plate is removed, carefully pull out the linkage connected to the stopper. The stopper is usually connected to the linkage by a spring or a series of levers. You may need to manipulate the linkage to disengage the stopper. Sometimes the stopper is a simple plug, while other times it is a more complex assembly with a plunger and rubber seal. Observe how the stopper is connected before fully disconnecting it to aid in reassembly. Be prepared for a gush of water or debris to come out with the linkage, so have a bucket ready.
Removing Chain-and-Plug Stoppers: Removing chain-and-plug stoppers is generally the simplest process. Simply lift the plug out of the drain using the attached chain. If the plug is stuck, gently rock it back and forth while pulling upwards. Avoid pulling too hard, as the chain may break. Once the plug is removed, inspect it for any damage or wear that may be preventing it from sealing properly. Check the drain opening for any obstructions or debris.
Troubleshooting Common Stopper Removal Problems
Various problems can arise during stopper removal, often stemming from corrosion, mineral buildup, or damage to the stopper itself. Addressing these issues effectively requires a systematic approach and the proper tools.
Stopper Stuck Due to Corrosion or Mineral Buildup: This is a common problem, especially in areas with hard water. The first step is to apply a penetrating oil or a vinegar solution around the base of the stopper. Allow the solution to sit for at least 15-30 minutes to help dissolve the buildup. After soaking, try gently wiggling the stopper while pulling upwards. Avoid using excessive force, as this can damage the stopper or the drain assembly. If the stopper remains stuck, try using a rubber mallet to gently tap around the base. The vibrations can help loosen the corrosion. As a last resort, a specialized plumbing tool, such as a stopper removal wrench, may be required.
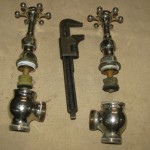
Stripped Screws: Stripped screws can make it difficult to remove the stopper knob or overflow plate. Try using a rubber band or steel wool between the screwdriver and the screw head to provide better grip. Alternatively, a screw extractor tool can be used to remove stripped screws. These tools grip the damaged screw head and allow it to be turned out. In severe cases, the screw may need to be drilled out, but this should only be attempted by someone with experience using power tools.
Broken Stopper Components: Sometimes, a stopper may break during the removal process. If a piece of the stopper breaks off inside the drain, it can be difficult to retrieve. Try using a pair of long-nose pliers to carefully extract the broken piece. If the piece is too far down the drain, a drain snake or a wet/dry vacuum cleaner may be necessary. Be careful not to force the snake too far down the drain, as this could damage the drainpipe.
Difficulty Reassembling the Stopper: After cleaning or repairing the stopper, reassembly can sometimes be challenging. Take photos or make notes during the disassembly process to aid in reassembly. Ensure all parts are clean and free of debris before reassembling. If the stopper is not sealing properly after reassembly, check for worn or damaged seals. Replace any worn parts to ensure a tight seal. Make sure all screws are tightened securely but not over-tightened, as this can damage the stopper or the drain assembly.
By understanding the different types of bathtub stoppers, applying the appropriate removal techniques, and troubleshooting common problems, individuals can effectively maintain and repair their bathtub drains. This knowledge can prevent costly plumbing repairs and ensure the continued functionality of the bathtub.

4 Easy Ways To Remove A Tub Drain Stopper Wikihow

How To Remove A Bathtub Drain Stopper Mr Rooter

How To Remove A Bathtub Drain The Home Depot

Bathtub How Can I Remove A Stuck Bath Stopper Assembly Home Improvement Stack Exchange

4 Easy Ways To Remove A Tub Drain Stopper Wikihow

How To Remove A Bathtub Drain Stopper

How To Remove A Bathtub Drain The Home Depot

How To Remove A Bathtub Drain Forbes Home

How To Remove Bathtub Drain Stopper That Spins Freely

How To Easily Remove Bathtub Drain Plug Stopper Unclog In 1 Minute Jonny Diy