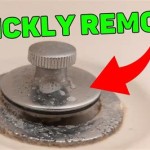
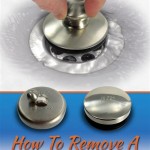
How To Remove a Pop-Up Bathtub Stopper
The pop-up bathtub stopper is a common feature in modern bathrooms, designed to provide a convenient and effective way to seal the drain for filling the tub. However, these stoppers can sometimes become clogged with hair, soap scum, and other debris, leading to slow drainage or complete blockage. Furthermore, accessing the drain beneath the stopper for cleaning or repair necessitates its removal. Understanding the mechanisms of different pop-up stoppers and the appropriate techniques for their removal is essential for maintaining a functional and hygienic bathroom.
Various designs of pop-up stoppers exist, each with its own removal process. The most common types include lift-and-turn stoppers, toe-touch stoppers, and push-and-pull stoppers. Identifying the specific type of stopper installed in the bathtub is the first and most crucial step in ensuring a successful and damage-free removal. Attempting to force a stopper out without understanding its mechanism can result in damage to the stopper itself, the drain assembly, or the tub's finish.
Identifying Your Pop-Up Stopper Type
Before attempting any removal procedure, carefully examine the stopper. A lift-and-turn stopper typically features a small knob or lever on the top that allows it to be raised or lowered. A toe-touch stopper, as its name suggests, operates with a simple push of the foot or toe to open and close the drain. Push-and-pull stoppers, often found in older tubs, require a simple up-and-down motion to control the drain. Some stoppers may even be secured with a small setscrew, usually located on the side of the stopper. A visual inspection with a flashlight can quickly reveal the presence of such a screw. Understanding the specific design will dictate the tools and techniques required for removal.
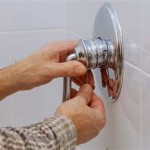
Once the type of stopper has been identified, the next step involves gathering the necessary tools. These tools will vary depending on the stopper type, but generally include items such as a flathead screwdriver, a Phillips head screwdriver (if a setscrew is present), pliers, a small container for loose parts, and possibly a drain cleaning tool like a bent wire or a specialized drain snake. A soft cloth or towel should also be available to protect the tub's finish from scratches during the removal process.
Removing a Lift-and-Turn Stopper
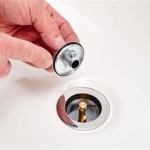
Lift-and-turn stoppers are among the easiest to remove. The typical process involves holding the stopper firmly with one hand while turning the knob or lever counterclockwise with the other. This action should unscrew the stopper from the drain assembly. If the stopper is stuck or difficult to turn, applying a small amount of penetrating oil around the base of the stopper and allowing it to sit for a few minutes can help loosen any accumulated grime or corrosion. After unscrewing, carefully lift the stopper out of the drain. Inspect the stopper for any signs of damage or wear and tear. If necessary, clean any debris from the stopper and the drain opening before reassembling or replacing the stopper.
Some lift-and-turn stoppers may not unscrew directly. Instead, they may have a separate stopper body and a cap that lifts and turns. In these cases, the cap may need to be pried off carefully with a flathead screwdriver. Insert the screwdriver under the edge of the cap and gently lift upwards. Once the cap is removed, the stopper body can usually be pulled straight out of the drain. Again, ensure that the screwdriver is used carefully to prevent scratching the tub's surface.
Occasionally, lift-and-turn stoppers can become corroded or seized within the drain assembly. If the stopper refuses to budge after applying penetrating oil and gentle turning, avoid using excessive force. Excessive force can break the stopper or damage the drain assembly, leading to more significant repairs. In such cases, it may be necessary to call a professional plumber who has specialized tools and expertise to safely remove the stuck stopper.
Removing a Toe-Touch Stopper
Toe-touch stoppers operate on a spring-loaded mechanism, and their removal typically involves a few more steps compared to lift-and-turn stoppers. The first step is to gently depress the stopper to its closed position. This will expose the top of the stopper mechanism. Many toe-touch stoppers have a small threaded section or a setscrew located on the side. If a setscrew is present, use a small Allen wrench or screwdriver to loosen it. If there is a threaded section, grip the stopper firmly and turn it counterclockwise to unscrew it from the drain assembly.
Once the stopper is unscrewed or the setscrew is loosened, the entire stopper assembly can be carefully lifted out of the drain. Note the order of any washers, springs, or other components that come out with the stopper. This will be helpful during reassembly. If the stopper is stuck, try wiggling it gently back and forth while pulling upwards. As with lift-and-turn stoppers, penetrating oil can be applied to help loosen any corrosion or debris. If the stopper still refuses to come out, avoid forcing it and consider seeking professional assistance.
Toe-touch stoppers can be particularly prone to accumulating hair and soap scum within their internal mechanisms. After removing the stopper, thoroughly clean all its components using a brush and a suitable cleaning solution. Pay close attention to any crevices or small openings where debris may be lodged. Reassemble the stopper in the reverse order of disassembly, ensuring that all components are properly aligned and secured. Test the stopper’s operation before fully closing the drain to confirm that it is functioning correctly.
Removing a Push-and-Pull Stopper
Push-and-pull stoppers, while less common in newer installations, often present a unique challenge for removal. These stoppers typically feature a central knob that is pulled up to close the drain and pushed down to open it. The removal process generally involves unscrewing the entire stopper assembly from the drain. Sometimes, the knob itself unscrews from the stem of the stopper. Examine the stopper carefully for any visible screws or threaded sections.
If the knob appears to be a separate piece, try unscrewing it counterclockwise. If the entire stopper assembly needs to be removed, grip the base of the stopper firmly and turn it counterclockwise. As with other types of stoppers, applying penetrating oil can help loosen any stubborn connections. Once the stopper is unscrewed, carefully lift it out of the drain. Be aware that push-and-pull stoppers often have a more complex internal mechanism compared to other types. Note the arrangement of any springs, levers, or other components as they are removed.
Push-and-pull stoppers can be more challenging to reassemble than other types. If the stopper is disassembled for cleaning, take pictures or make detailed notes of the arrangement of its components. This will serve as a valuable reference during reassembly. Thoroughly clean all parts of the stopper before reassembling it. Ensure that all components are properly lubricated and that the stopper operates smoothly after reassembly. If difficulty is encountered, consulting a diagram or seeking professional guidance may be necessary.
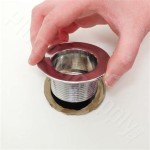
After the stopper has been removed, regardless of type, thorough cleaning of the drain opening is crucial. Use a drain cleaning tool to remove any hair, soap scum, or other debris that may be lodged in the drainpipe. Flushing the drain with hot water can also help to dislodge any remaining residue. This will ensure proper drainage and prevent future clogs. Inspect the drain assembly for any signs of damage, such as cracks or corrosion. If any damage is detected, it should be addressed promptly to prevent leaks or further deterioration.
When reassembling the stopper, ensure that all components are properly aligned and secured. Tighten any screws or threaded connections to the appropriate torque. Avoid over-tightening, as this can damage the stopper or the drain assembly. Test the stopper’s operation by filling the tub with a small amount of water and then opening the drain. Observe the flow of water to ensure that the drain is functioning correctly. If any problems are encountered, such as slow drainage or leaks, re-examine the stopper assembly and make any necessary adjustments. If the problem persists, professional assistance may be required.
Regular maintenance of the pop-up bathtub stopper can help prevent clogs and extend its lifespan. Periodically remove the stopper and clean it thoroughly. Avoid using harsh chemicals or abrasive cleaners, as these can damage the stopper’s finish or internal mechanisms. A simple solution of warm water and dish soap is often sufficient for cleaning. Consider using a drain strainer to catch hair and other debris before they enter the drainpipe. This can significantly reduce the frequency of clogs and the need for stopper removal.

How To Remove Pop Up Tub Stopper Easy Method

Bathroom Repair How To A Pop Up Tub Drain Stopper

How To Remove A Bathtub Drain Stopper

How To Remove A Bathtub Drain The Home Depot

Remove Pop Up Bath Tub Drain Stopper 3 Ways

So Easy How To Remove A Watco Pop Up Drain Plug

How To Remove A Bathtub Drain Stopper

How To Remove Pop Up Tub Stopper Easy Method

Bathroom Repair How To A Pop Up Tub Drain Stopper

How To Remove A Bathtub Drain Stopper
Related Posts