How To Remove Old Sealant From a Bathtub
Removing old sealant from a bathtub is a necessary task for maintaining bathroom hygiene and preventing water damage. Over time, sealant, also known as caulk, can become cracked, discolored, or even harbor mold and mildew. Removing the old sealant and applying fresh sealant creates a waterproof barrier, preventing water from seeping behind the bathtub and causing structural issues or fostering unhealthy conditions.
The process, while requiring patience and attention to detail, is manageable for most homeowners. Proper preparation and the use of appropriate tools are essential for achieving a clean and professional result. Successfully removing old sealant involves weakening its bond, carefully detaching it from the surfaces, and thoroughly cleaning the area before applying new sealant. This article will provide a detailed guide on how to effectively remove old sealant from a bathtub.
Gathering the Necessary Tools and Materials
Before beginning the removal process, it is crucial to assemble the appropriate tools and materials. This ensures efficiency and minimizes the risk of damaging the bathtub or surrounding surfaces. The following items are generally required:
- Utility Knife or Caulk Removal Tool: A utility knife with a sharp blade or a specialized caulk removal tool is necessary for scoring and cutting through the old sealant. Caulk removal tools often feature angled blades or notched edges designed to easily lift and separate the sealant from the surfaces.
- Heat Gun or Hair Dryer: Applying heat to the old sealant softens it, making it easier to remove. A heat gun, used cautiously on a low setting, is ideal for this purpose. Alternatively, a hair dryer can be used, although it may require more time to achieve the desired softening effect.
- Putty Knife or Scraper: A stiff putty knife or scraper is used to pry and scrape away the softened sealant. Ensure the scraper is not overly sharp or abrasive to avoid scratching the bathtub or tile surface. Plastic putty knives or scrapers are often preferred to minimize the risk of damage.
- Pliers or Needle-Nose Pliers: These tools are useful for gripping and pulling away larger pieces of sealant once it has been loosened. Needle-nose pliers are particularly helpful for reaching into tight corners and crevices.
- Cleaning Solutions: A variety of cleaning solutions will be needed to remove sealant residue and prepare the surface for new sealant. These include:
- Mineral Spirits or Isopropyl Alcohol: These solvents effectively dissolve sealant residue and grease.
- Bleach Solution: A diluted bleach solution (e.g., 1 part bleach to 10 parts water) is used to kill any remaining mold or mildew. Apply with caution and ensure good ventilation.
- Mild Detergent: Dish soap or a mild all-purpose cleaner can be used for a final cleaning to remove any lingering residue.
- Scrub Brush or Sponge: A scrub brush or sponge is used to apply and work the cleaning solutions into the surface, removing any remaining sealant residue or mold.
- Rags or Paper Towels: Clean rags or paper towels are necessary for wiping away cleaning solutions and drying the surfaces.
- Safety Glasses and Gloves: Safety glasses protect the eyes from debris and cleaning solutions, while gloves protect the hands from harsh chemicals and sharp tools.
- Ventilation: Ensure adequate ventilation of the bathroom during the removal process, especially when using solvents or bleach. Opening windows and using a fan can help to dissipate fumes.
The Removal Process: Step-by-Step Instructions
With the necessary tools and materials assembled, the process of removing the old sealant can begin. The following steps provide a detailed guide:
- Preparation: Begin by protecting the surrounding areas. Place drop cloths or newspapers around the bathtub to catch any falling debris. Ensure the bathroom is well-ventilated.
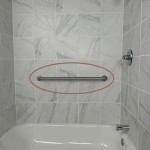
- Scoring the Sealant: Use a utility knife or caulk removal tool to score along both edges of the sealant. Apply firm, even pressure to cut through the sealant without damaging the bathtub or tile surface. Scoring the sealant weakens its bond and makes it easier to remove. Make multiple passes if necessary.
- Softening the Sealant: Apply heat to the sealant using a heat gun or hair dryer. Hold the heat source a few inches away from the sealant and move it slowly back and forth to avoid overheating any one area. The goal is to soften the sealant, not to melt it. If using a heat gun, start on the lowest setting and gradually increase the heat if needed. Softening the sealant makes it more pliable and easier to peel away.
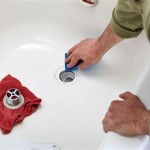
- Prying and Scraping: Use a putty knife or scraper to gently pry up the softened sealant. Begin at one end and work your way along the entire length of the sealant. Apply steady pressure and avoid forcing the scraper, which can damage the surface. If the sealant is difficult to remove, apply more heat and try again. In some cases, the sealant may come off in long strips, while in others, it may break into smaller pieces.
- Gripping and Pulling: For larger pieces of loosened sealant, use pliers or needle-nose pliers to grip the edge and pull it away. This can be particularly helpful for removing sealant from corners and crevices. Pull slowly and steadily to avoid tearing the sealant and leaving behind residue.
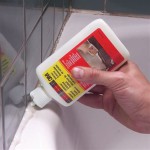
- Removing Remaining Residue: After removing the bulk of the sealant, residue may remain on the surface. Use mineral spirits or isopropyl alcohol to dissolve the residue. Apply the solvent to a clean rag and wipe the affected areas. Allow the solvent to sit for a few minutes to soften the residue before scrubbing with a scrub brush or sponge. Repeat as necessary until the surface is clean and free of sealant residue.
- Cleaning and Disinfecting: Once the sealant residue is removed, clean the area with a diluted bleach solution to kill any remaining mold or mildew. Apply the bleach solution to the surface and allow it to sit for 10-15 minutes before scrubbing with a scrub brush or sponge. Rinse thoroughly with clean water. Follow with a final cleaning using a mild detergent to remove any lingering bleach residue. Rinse again and dry the surface completely with a clean rag or paper towel.
- Inspection: Carefully inspect the area to ensure that all old sealant and residue have been removed. Any remaining sealant can compromise the adhesion of the new sealant. If necessary, repeat the cleaning process.
Important Considerations and Safety Precautions
While removing old sealant is a straightforward process, there are several important considerations and safety precautions to keep in mind:
- Surface Material: Different bathtub materials (e.g., acrylic, porcelain, fiberglass) require different levels of care. Avoid using abrasive tools or harsh chemicals that could damage the surface of the bathtub. Always test cleaning solutions in an inconspicuous area before applying them to the entire surface.
- Mold and Mildew: If mold or mildew is present, take extra precautions to prevent its spread. Wear a mask to avoid inhaling spores and dispose of contaminated materials in a sealed bag. Ensure thorough cleaning and disinfection to prevent future growth.
- Ventilation: Adequate ventilation is crucial when working with solvents or bleach. Open windows and use a fan to circulate fresh air and prevent the buildup of fumes.
- Tool Safety: Exercise caution when using sharp tools such as utility knives and scrapers. Always cut away from yourself and keep your fingers clear of the blade. Wear safety glasses to protect your eyes from debris.
- Heat Gun Usage: Use a heat gun with care, as it can easily overheat and damage surfaces. Keep the heat gun moving and avoid holding it in one place for too long. Start on the lowest setting and gradually increase the heat if needed.
- Patience: Removing old sealant can be a time-consuming process. Do not rush the job, as forcing the sealant or using excessive force can damage the bathtub or tile. Work slowly and methodically, and take breaks as needed.
- Professional Assistance: If you are uncomfortable performing this task yourself or if you encounter significant mold or water damage, consider hiring a professional contractor.
Following these steps and precautions will help ensure a successful and safe removal of old sealant from your bathtub, preparing it for the application of fresh sealant and a renewed watertight seal.
:max_bytes(150000):strip_icc()/how-to-remove-old-caulk-1824827-hero-4863fcf5169e426da8f822429ed46301.jpg?strip=all "How To Remove Old Caulk From A Tub Shower Or Sink")
How To Remove Old Caulk From A Tub Shower Or Sink

How To Remove Caulk Ace Hardware

How To Remove Silicone Sealant Diy Guide Removing Old Beginners Removal

How To Remove Old Caulk Dap Global

Here S How Remove And Replace Mildewed Bathroom Caulk
:max_bytes(150000):strip_icc()/how-to-remove-old-caulk-1824827-01-3d0370c59e124dbbaa6560c68bab111c.jpg?strip=all "How To Remove Old Caulk From A Tub Shower Or Sink")
How To Remove Old Caulk From A Tub Shower Or Sink

How To Remove And Replace Old Tub Caulk

How To Remove Bathroom Sealant Sanctuary Bathrooms

Remove Caulking Caulk Remover Tool
:max_bytes(150000):strip_icc()/how-to-remove-old-caulk-1824827-03-a975b3e5382848b481b3832a1d2906a2.jpg?strip=all "How To Remove Old Caulk From A Tub Shower Or Sink")
How To Remove Old Caulk From A Tub Shower Or Sink
Related Posts