How to Remove an Old Bathtub Drain
Removing an old bathtub drain can seem like a daunting task, especially if it’s corroded or stuck. However, with the right tools, techniques, and patience, it's a manageable DIY project that can save you money on plumbing costs. This article provides a comprehensive guide to safely and effectively removing old bathtub drains, covering different types of drains and common problems encountered during the process.
Before starting any plumbing project, it is crucial to prioritize safety. Turn off the water supply to the bathtub. This is typically accomplished by closing the shut-off valves located near the bathtub or, if these are unavailable, turning off the main water supply to the house. Gather the necessary tools and materials. A well-prepared workspace minimizes frustration and ensures the job is completed efficiently. Protective eyewear and gloves are highly recommended to protect against debris and potential exposure to harmful substances. Good ventilation is also important.
The process involves several steps, each requiring careful attention to detail. Understanding the different types of bathtub drains and the potential challenges involved is vital for a successful outcome. Replacing a bathtub drain is often necessary when the existing drain is damaged, corroded, or no longer functioning correctly. This may include issues such as leaks, clogs that cannot be easily cleared, or visible signs of wear and tear.
Identifying the Type of Bathtub Drain
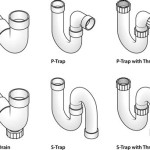
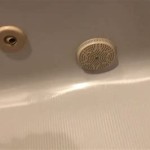
Bathtub drains come in various designs, each with its removal method. Recognizing the specific type of drain in your bathtub is the first step in determining the appropriate removal strategy. Common types include lift-and-turn drains, pop-up drains, toe-touch drains, and trip-lever drains. Understanding the mechanics of each type helps in selecting the correct tools and techniques for removal.
Lift-and-turn drains are identified by a knob or cylindrical piece that lifts and turns to open or close the drain. These drains typically have a set screw that needs to be loosened before the drain stopper can be removed. Pop-up drains feature a stopper that is pushed down to close and pops up when pushed again to open. These drains may have a linkage mechanism located beneath the tub that needs to be disconnected. Toe-touch drains operate similarly to pop-up drains but are activated by pressing the stopper with a toe. Trip-lever drains are controlled by a lever located on the overflow plate near the top of the bathtub. This lever operates a plunger or stopper within the drainpipe.
Accurately identifying the drain type will streamline the tool selection process and prevent damage to the drain or the bathtub. Visual inspection and, if necessary, referencing the bathtub manufacturer's manual can help in confirming the drain type.
Gathering the Necessary Tools and Materials
Having the correct tools is essential for removing an old bathtub drain efficiently and safely. The specific tools required will depend on the type of drain being removed, but the following list covers most common scenarios:
- Bathtub Drain Wrench (also known as a Dumbbell Wrench or Spider Wrench): This specialized tool is designed to grip the crossbars inside the drain and provide leverage for turning it.
- Adjustable Pliers or Channel-Lock Pliers: These are useful for gripping and loosening various parts of the drain assembly.
- Screwdrivers (Phillips and Flathead): Needed for removing screws from drain stoppers, overflow plates, and other components.
- Penetrating Oil: Applied to corroded threads to help loosen the drain.
- Putty Knife or Utility Knife: Used to score and remove old plumber's putty or caulk around the drain flange.
- Hammer: May be needed to gently tap the drain wrench to help loosen a stuck drain. Use with caution to avoid damaging the tub.
- Clean Rags or Paper Towels: For cleaning up spills and debris.
- Gloves and Safety Glasses: To protect hands and eyes from dirt and debris.
- New Bathtub Drain Assembly: If replacing the drain, ensure you have a compatible replacement drain assembly.
- Plumber's Putty or Silicone Caulk: For sealing the new drain to the bathtub.
Preparing all the tools beforehand will ensure a smooth and efficient removal process, minimizing interruptions and potential delays.
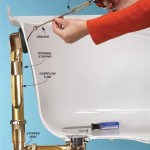
Step-by-Step Drain Removal Process
With the necessary tools and materials gathered, the drain removal process can begin. Each type of drain will have slightly different steps, but the following provides a general guideline:
- Preparation: Turn off the water supply to the bathtub and protect the bathtub surface with a towel or drop cloth to prevent scratches.
- Remove the Drain Stopper: Depending on the type of drain, remove the stopper. For lift-and-turn drains, loosen the set screw and unscrew the stopper. For pop-up or toe-touch drains, try to lift the stopper straight out. If it doesn't come out easily, there may be a linkage mechanism below the tub that needs to be disconnected first. For trip-lever drains, remove the overflow plate and pull out the linkage mechanism.
- Clean Around the Drain Flange: Use a putty knife or utility knife to carefully score and remove any old plumber's putty or caulk around the drain flange (the exposed metal ring around the drain opening). Be careful not to scratch the bathtub surface.
- Insert the Bathtub Drain Wrench: Insert the bathtub drain wrench into the drain opening. The crossbars of the wrench should grip the internal fins of the drain.
- Loosen the Drain: Turn the wrench counterclockwise to loosen the drain. If the drain is stuck, apply penetrating oil around the drain flange and let it sit for 15-30 minutes. Gently tap the wrench with a hammer to help break the corrosion.
- Remove the Drain: Once the drain is loosened, continue turning it counterclockwise until it is completely removed. Be prepared for water to drain out as you remove the old drain.
- Clean the Drain Opening: Clean the drain opening thoroughly, removing any remaining debris, old putty, or corrosion. This will ensure a good seal when installing the new drain.
If the drain is extremely stubborn and will not budge, consider using a drain removal tool designed to provide extra leverage. These tools are available at most hardware stores and can be very helpful for dealing with heavily corroded drains.
Troubleshooting Common Problems
Despite careful preparation, some common problems might arise during drain removal. Knowing how to address these challenges can prevent frustration and ensure a successful outcome.
Stripped Drain Interior: If the internal fins of the drain are stripped or damaged, the bathtub drain wrench may not be able to grip effectively. In this case, a specialized drain removal tool that expands inside the drain can be used. Alternatively, carefully cutting the drain with a reciprocating saw may be necessary, although this should be done with extreme caution to avoid damaging the tub.
Severely Corroded Drain: Heavy corrosion can make it very difficult to loosen the drain. Applying penetrating oil multiple times and allowing it to soak for an extended period can help. Heat from a heat gun or hair dryer (used carefully) can also help to break down corrosion. If all else fails, a professional plumber may be needed to remove the drain without damaging the tub.
Broken Drain Components: During the process, parts of the drain assembly may break, especially if they are old and brittle. If small pieces break off, carefully remove them to avoid obstructing the drainpipe. Larger pieces may require more specialized extraction techniques.
Access Problems: Limited access to the drain from below the bathtub can make removal difficult. This is more common in tubs with enclosed bases. If access is restricted, consider using tools with long handles or flexible extensions. In extreme cases, it might be necessary to create an access panel in the wall or flooring adjacent to the tub.
Preventing Damage to the Bathtub: Protecting the bathtub's surface is crucial. Use padding around the work area and avoid excessive force when using tools. If cutting the drain becomes necessary, use a fine-tooth blade designed for cutting metal and proceed with extreme caution. Consider applying painter's tape around the drain flange to protect the tub's finish.
Once the old drain has been successfully removed, the drain opening should be cleaned and prepared for the installation of a new drain. Follow the manufacturer’s instructions for your chosen drain assembly for a proper and leak-free installation.
Regular maintenance, such as using drain screens to prevent hair and debris from entering the drainpipe and periodically cleaning the drain with a drain cleaner, can help extend the life of the bathtub drain and prevent future clogs and corrosion. Promptly addressing any leaks or drainage issues can also prevent more significant problems from developing over time.

How To Remove Bathtub Drain With Broken Cross Members Missing Bars

How To Remove A Bathtub Drain Forbes Home

How To Remove A Bathtub Drain The Home Depot

How To Unclog A Shower Drain Without Chemicals Diy Family Handyman

How To Remove A Drain From Tub 13 Steps With Pictures

How To Remove A Bathtub Drain Stopper

How To Remove A Bathtub Drain Stopper Mr Rooter

How To Remove 6 Diffe Bath Drain Types

How To Remove A Bathtub Drain The Home Depot

The Easiest Way To Remove An Old Bathtub Drain
Related Posts