How to Remove a Moen Bathtub Drain Cover
Removing a Moen bathtub drain cover is a task that homeowners often encounter when cleaning, repairing, or replacing the bathtub drain assembly. While Moen drain covers are designed for secure and reliable function, their removal can sometimes be challenging. This article provides a comprehensive guide on how to remove various types of Moen bathtub drain covers safely and effectively, outlining the necessary tools and step-by-step instructions.
Understanding the specific type of Moen drain cover in the bathtub is essential before attempting removal. Moen offers several different designs, each requiring a unique approach. Attempting to force or improperly remove a drain cover can damage the drain assembly or the bathtub finish. Careful observation and the correct method are crucial for a successful and damage-free removal.
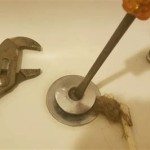
Prior to beginning any work on the drain, it is advisable to gather the necessary tools and materials. These typically include a flathead screwdriver, a Phillips head screwdriver, a drain removal tool (also known as a bathtub drain wrench or a dumbbell wrench), penetrating oil (such as WD-40), pliers, and a soft cloth to protect the bathtub surface. Proper preparation will streamline the process and minimize the risk of scratching or marring the tub.
Identifying the Type of Moen Bathtub Drain Cover
The first step in removing a Moen bathtub drain cover is to accurately identify the type installed. Moen drain covers generally fall into a few common categories: lift-and-turn drains, push-and-seal drains, toe-touch drains, and pop-up drains. Each type has a distinct mechanism for opening and closing the drain, and consequently, a unique method for removal.
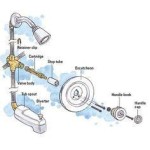
Lift-and-turn drains are characterized by a knob or lever on the drain cover that is lifted and turned to open or close the drain. These are among the older and more common types of bathtub drains. Push-and-seal drains, as the name suggests, operate by pushing down on the drain cover to seal or release the drain. Toe-touch drains function similarly, but are designed to be operated with a tap of the toe. Pop-up drains typically have a lever located near the overflow drain that controls the drain stopper; removing these often involves accessing the linkage behind the overflow plate.
Visually inspecting the drain cover and attempting to operate it will usually reveal the type of drain mechanism in place. Once the type is identified, the appropriate removal method can be determined.
Removing a Moen Lift-and-Turn Bathtub Drain Cover
Removing a Moen lift-and-turn drain cover often involves a relatively straightforward process. However, age and mineral buildup can sometimes make the drain cover difficult to remove. Proper technique and the use of penetrating oil can help overcome these challenges.
The first step is to loosen the set screw that secures the drain cover to the drain flange. This set screw is typically located on the side of the drain cover, near the base. Using a small flathead screwdriver, carefully turn the set screw counterclockwise to loosen it. Avoid stripping the screw head by applying gentle, consistent pressure.
Once the set screw is loosened or removed, attempt to lift the drain cover straight up. If the drain cover is stuck due to mineral buildup or corrosion, apply penetrating oil around the base of the drain cover and allow it to soak for several minutes. This will help to loosen any deposits that are binding the cover to the flange.
After the penetrating oil has had time to work, try lifting the drain cover again. If it is still stuck, gently wiggle the cover back and forth while applying upward pressure. Avoid using excessive force, as this could damage the drain flange or the drain cover itself. If necessary, use a soft cloth to protect the drain cover and carefully use pliers to grip the cover and gently twist it while lifting.
Once the drain cover is removed, inspect the drain flange and clean any debris or mineral buildup that may be present. This will ensure a proper seal when reinstalling the drain cover or installing a new one.
Removing a Moen Push-and-Seal Bathtub Drain Cover
Moen push-and-seal drain covers offer a convenient and modern design. Removing these drain covers can be slightly more intricate than lift-and-turn drains, but with the correct method, it can be accomplished without difficulty.
Many Moen push-and-seal drain covers have a central button that can be unscrewed. Start by examining the center of the drain cover for a small indentation or slot. This indicates the location of the screw or locking mechanism. Using a small flathead screwdriver or a specialized drain removal tool, carefully insert it into the indentation and turn counterclockwise to loosen the center button.
If the center button is difficult to turn, apply penetrating oil around the edge of the button and allow it to soak for a few minutes. This can help to loosen any mineral deposits that may be preventing the button from turning freely.
Once the center button is loosened, it can usually be removed by unscrewing it completely. After the center button is removed, the drain cover can typically be lifted straight up. If the drain cover is still stuck, gently wiggle it back and forth while applying upward pressure.
Some Moen push-and-seal drains may have a different removal mechanism. In some cases, the entire drain cover may need to be rotated a quarter turn before it can be lifted out. Refer to the manufacturer's instructions or online resources for specific information on the particular model.
Addressing Stubborn Drain Covers
In some cases, removing a Moen bathtub drain cover can be particularly challenging due to corrosion, mineral buildup, or damage to the drain assembly. When faced with a stubborn drain cover, patience and persistence are key. Employing a combination of techniques and taking precautions to avoid damage can often lead to a successful removal.
Applying heat can sometimes help to loosen a stuck drain cover. Use a hair dryer to gently heat the drain cover and the surrounding drain flange. The heat can help to expand the metal and break down any mineral deposits that are binding the cover to the flange. Be cautious not to overheat the drain assembly, as this could damage the finish or the underlying plumbing.
If penetrating oil alone is not sufficient, consider using a specialized rust remover or lime scale remover. Apply the remover according to the manufacturer's instructions and allow it to soak for the recommended time. This can help to dissolve stubborn mineral deposits and make the drain cover easier to remove.
When using tools such as pliers or screwdrivers, always protect the bathtub surface with a soft cloth or towel. This will prevent scratches or other damage to the tub. Be particularly careful when applying force, as excessive force can damage the drain assembly or the bathtub.
If all other methods fail, consider consulting a professional plumber. A plumber has the experience and specialized tools necessary to remove stubborn drain covers without causing damage to the plumbing or the bathtub. Attempting to force a drain cover that is severely stuck can result in costly repairs, so it is often best to seek professional assistance in such cases.
Maintaining the bathtub drain regularly can help to prevent drain covers from becoming stuck. Cleaning the drain and drain cover periodically will remove hair, soap scum, and other debris that can contribute to mineral buildup and corrosion. This can make future removals much easier and extend the life of the drain assembly.
In addition to cleaning, consider using a drain strainer to catch hair and other debris before they enter the drain. This will further reduce the risk of clogs and mineral buildup, making it easier to remove the drain cover when necessary.
By understanding the different types of Moen bathtub drain covers and employing the appropriate removal techniques, homeowners can effectively maintain and repair their bathtub drains without causing damage. Regular maintenance and careful attention to detail are key to ensuring the long-term functionality and appearance of the bathtub.

How To Remove Moen Popup Bathtub Drain Stopper

How Remove Moen Tub Stopper And Unclog Drain

How To Remove Moen Popup Bathtub Drain Stopper

How To Remove A Bathtub Drain Stopper

How To Remove A Moen Bathtub Drain Stopper Hunker

How To Remove A Bathtub Drain Stopper

How To Remove Bathtub Drain Stopper

How To Remove A Bathtub Drain Stopper

How Remove Moen Tub Stopper And Unclog Drain Shower Drains Bathtub Bathroom Sink

How To Remove A Bathtub Drain Stopper Clogged
Related Posts