How To Remove a Corroded Bathtub Drain
Removing a corroded bathtub drain can be a challenging plumbing task, often requiring patience and the right tools. Corrosion, the gradual destruction of materials (usually metals) by chemical reaction with their environment, weakens the drain’s structure, making it difficult to loosen and remove. This article provides a detailed guide on how to safely and effectively remove a corroded bathtub drain, covering various methods and precautions necessary for a successful outcome.
Before beginning any plumbing project, it's crucial to prioritize safety. Always wear safety glasses and gloves to protect eyes and hands from debris, sharp edges, and potential exposure to harmful substances. Ensure adequate ventilation in the work area, especially if using chemical solvents. Turn off the water supply to the bathtub to prevent flooding during the drain removal process. Gather all necessary tools and materials beforehand to streamline the process and minimize downtime.
Identifying the Type of Bathtub Drain
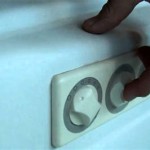
The first step is to identify the type of bathtub drain in place. The most common types include pop-up drains, lift-and-turn drains, and toe-touch drains. Pop-up drains feature a lever that controls a stopper. Lift-and-turn drains require lifting and turning the stopper to open or close the drain. Toe-touch drains operate with a simple push of the foot. Understanding the specific type of drain is essential because each type has a unique removal procedure.
Examine the drain closely to determine the extent of the corrosion. Light surface corrosion may be removable with cleaning, while severe corrosion can significantly weaken the drain components, increasing the difficulty of removal. Note any visible damage, such as cracks or breaks, which may require extra care during the process.
Tools and Materials Required
Having the right tools and materials on hand is essential for efficiently removing a corroded bathtub drain. The following list includes the tools and materials commonly required:
- Flathead screwdriver: Used for prying and loosening drain components.
- Phillips head screwdriver: Needed for removing screws on certain drain types.
- Adjustable wrench: Provides leverage for turning and loosening drain nuts.
- Drain wrench (also known as a dumbbell wrench or drain key): Specifically designed for gripping and turning drain flanges.
- Penetrating oil: Helps to loosen corroded connections.
- Heat gun or hair dryer: Can assist in loosening corroded parts by expanding the metal.
- Hacksaw or reciprocating saw with a metal-cutting blade: For cutting through severely corroded parts as a last resort.
- Hammer: Used for gently tapping to loosen stuck components.
- Pliers: Provides gripping power for manipulating small parts.
- Safety glasses and gloves: Essential for eye and hand protection.
- Old rags or towels: To protect the bathtub surface and clean up spills.
- Plumber’s putty: For resealing the new drain.
Step-by-Step Removal Process
The removal process can vary depending on the type and condition of the drain, but the following steps outline a general approach:
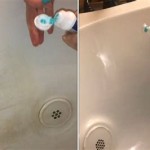
1. Preparation: Begin by thoroughly cleaning the area around the drain. Remove any hair, soap scum, or debris that might be obstructing access. Apply penetrating oil to the drain flange and the nut underneath the bathtub. Allow the oil to soak for at least 30 minutes, or preferably several hours, to help loosen the corroded connections.
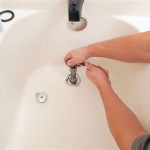
2. Removing the Stopper: For a pop-up drain, detach the linkage connecting the stopper to the lever. This typically involves unscrewing a nut or releasing a clip. For a lift-and-turn drain, simply lift the stopper and unscrew it from the drain body. Toe-touch drains usually require unscrewing the stopper by hand after pressing it down slightly.
3. Loosening the Drain Flange: Insert the drain wrench into the drain flange. Ensure that the wrench is securely seated in the flange slots. Apply steady pressure and turn the wrench counterclockwise to loosen the flange. If the flange is severely corroded and difficult to turn, try tapping the wrench with a hammer to help break the corrosion. Repeatedly apply penetrating oil as needed.
4. Accessing the Drain Nut: Gain access to the drain nut located beneath the bathtub. This may require removing an access panel or working in a confined space. Use an adjustable wrench to grip the nut. If the nut is heavily corroded, apply more penetrating oil and allow it to soak. Try heating the nut gently with a heat gun or hair dryer to expand the metal and aid in loosening it.
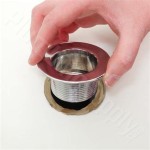
5. Removing the Drain Nut: Once the drain nut is loosened, carefully unscrew it. Be prepared for water and debris to spill out as the nut is removed. Have a bucket or container ready to catch any runoff. As the nut is unscrewed, the drain assembly should begin to separate from the bathtub. If the assembly remains stuck, gently tap the drain flange from above with a hammer and a block of wood to avoid damaging the bathtub surface.
6. Cutting the Drain (If Necessary): If the drain is severely corroded and cannot be loosened using the methods described above, cutting the drain may be necessary. Use a hacksaw or reciprocating saw with a metal-cutting blade to carefully cut through the drain pipe below the drain flange. Exercise extreme caution to avoid damaging the bathtub or surrounding plumbing. Make multiple shallow cuts rather than attempting to cut through the drain in one pass. After cutting through the drain, use pliers or a screwdriver to carefully remove the remaining pieces.
7. Cleaning the Drain Opening: Once the old drain is removed, thoroughly clean the drain opening in the bathtub. Remove any remaining plumber’s putty, corrosion, or debris. Use a wire brush or sandpaper to smooth the surface and ensure a clean, even area for the new drain to seal against.
Dealing with Severely Corroded Drains
Severely corroded drains present unique challenges, requiring a more aggressive approach. The following techniques can be employed when dealing with stubborn corrosion:
Chemical Solvents: Specialized chemical solvents designed to dissolve rust and corrosion can be used. These solvents are often corrosive themselves, so it's crucial to use them with extreme caution. Wear appropriate protective gear, including gloves and eye protection, and follow the manufacturer's instructions carefully. Apply the solvent liberally to the corroded areas and allow it to soak for the recommended time before attempting to loosen the drain.
Heat Application: Applying heat can help to expand the metal and break the bonds of corrosion. A heat gun or hair dryer can be used to gently heat the corroded areas. Avoid using an open flame, as this can damage the bathtub and surrounding materials. Be careful not to overheat the metal, as this can also cause damage.
Mechanical Force: In some cases, applying mechanical force may be necessary to break the corrosion. This can involve using a hammer and chisel to carefully chip away at the corrosion or using a pipe wrench to apply additional leverage. Exercise caution to avoid damaging the bathtub or surrounding plumbing.
Installing the New Bathtub Drain
After the old drain is removed and the drain opening is cleaned, installing the new bathtub drain is the next step. This process typically involves the following:
1. Applying Plumber’s Putty: Roll a rope of plumber’s putty and apply it to the underside of the new drain flange. Ensure that the putty forms a continuous seal around the flange to prevent leaks.
2. Inserting the Drain Flange: Carefully insert the new drain flange into the drain opening from above. Press down firmly to ensure that the putty makes good contact with the bathtub surface.
3. Attaching the Drain Nut: From beneath the bathtub, attach the drain nut to the drain assembly. Tighten the nut by hand until it is snug.
4. Tightening the Drain Nut: Use an adjustable wrench to tighten the drain nut securely. Avoid over-tightening, as this can damage the drain assembly or the bathtub. Tighten the nut until the plumber’s putty is slightly squeezed out from under the drain flange.
5. Removing Excess Putty: Remove any excess plumber’s putty that has squeezed out from under the drain flange. Smooth the putty with your finger to create a clean, watertight seal.
6. Testing for Leaks: Turn on the water supply to the bathtub and fill the tub with a few inches of water. Check for leaks around the drain flange and the drain nut. If leaks are present, tighten the drain nut slightly and recheck. If leaks persist, the drain may need to be removed and reinstalled with fresh plumber’s putty.
Successfully removing a corroded bathtub drain requires careful planning, the right tools, and a patient approach. By following these steps and taking the necessary precautions, the task can be accomplished effectively. Always prioritize safety and consult with a professional plumber if you encounter difficulties or are unsure about any aspect of the process.

Remove Old Corroded Tub Drain No Tools Needed

Fix And Prevent Corrosion On A Bath Tub Drain Hometalk

How To Remove A Corroded Bathtub Drain

How To Remove Broken Bathtub Drain Without Special Removal Tool Cross Members

How To Remove A Corroded Bathtub Drain

Plumbing How Do I Replace A Broken Bathtub Drain Home Improvement Stack Exchange

How To Remove A Bathtub Drain The Home Depot

Problems Removing Tub Drain Diy Home Improvement Forum

Remove Old Corroded Tub Drain No Tools Needed

3 Easy Ways To Remove Rust From A Bathtub Wikihow
Related Posts