How To Remove Bathtub Stopper
A bathtub stopper is a necessary part of any bathroom, but it can be frustrating when it gets stuck or broken. If you're having trouble removing your bathtub stopper, don't worry—it's actually a pretty simple process. Here are the steps you need to follow:
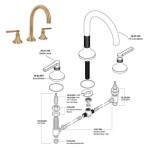
Step 1: Gather your tools You'll need a few tools to remove your bathtub stopper. These include a pair of pliers, a screwdriver, and a pair of needle-nose pliers. If you don't have any of these tools, you can usually find them at your local hardware store.
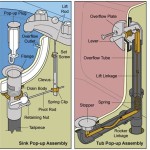
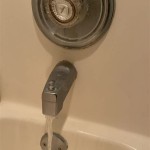
Step 2: Remove the drain cover The first step is to remove the drain cover. This is usually held in place by a few screws. Use your screwdriver to remove the screws, and then lift the drain cover off.
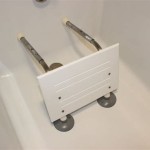
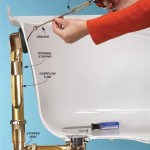
Step 3: Locate the stopper Once you've removed the drain cover, you'll be able to see the stopper. The stopper is usually held in place by a few clips or screws. Use your pliers to remove the clips or screws, and then lift the stopper out.
Step 4: Clean the stopper and drain Once you've removed the stopper, it's a good idea to clean it and the drain. This will help to prevent clogs and other problems. Use a mild detergent and a sponge to clean the stopper and drain. Rinse the stopper and drain thoroughly with water, and then dry them with a clean cloth.
Step 5: Reinstall the stopper Once you've cleaned the stopper and drain, it's time to reinstall the stopper. First, insert the stopper into the drain. Then, use your pliers to secure the clips or screws that hold the stopper in place. Finally, replace the drain cover.
Troubleshooting If you're having trouble removing your bathtub stopper, there are a few things you can try. First, try using a pair of needle-nose pliers to grip the stopper. If that doesn't work, you can try using a pair of channel-lock pliers. If you're still having trouble, you may need to call a plumber.

How To Remove A Bathtub Drain The Home Depot

4 Easy Ways To Remove A Tub Drain Stopper Wikihow

How To Remove A Bathtub Drain Stopper Mr Rooter

How To Remove 6 Diffe Bath Drain Types

4 Easy Ways To Remove A Tub Drain Stopper Wikihow

How To Remove A Pop Up Shower Drain Unclog Hair

How To Easily Remove Bathtub Drain Plug Stopper Unclog In 1 Minute Jonny Diy

How To Remove A Bathtub Drain Forbes Home

How To Remove A Bathtub Drain Stopper

4 Easy Ways To Remove A Tub Drain Stopper Wikihow
Related Posts