How to Remove a Bathtub Overflow Plate: A Comprehensive Guide
The bathtub overflow plate, a seemingly minor component, plays a critical role in preventing water from overflowing and potentially causing water damage. Removing this plate may become necessary for various reasons, including cleaning, repair, or replacement. While the process is generally straightforward, it's essential to understand the different types of overflow plates and the appropriate techniques for their removal. This article provides a detailed guide on how to safely and effectively remove a bathtub overflow plate.
Before commencing any work, it's important to gather the necessary tools. These typically include a screwdriver (usually Phillips or flathead), a small container to hold any removed screws, and potentially a pair of pliers or a putty knife if the plate is stuck or corroded. Wearing gloves is recommended to protect hands and maintain hygiene.
Identifying the Overflow Plate Type
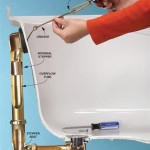
Bathtub overflow plates are not universally designed. Understanding the specific type installed is crucial for a successful removal process. The most common types include:
*Standard Screw-In Plate:
This is the most prevalent type. It's characterized by one or two visible screws fastening the plate to the bathtub. Removal typically involves simply unscrewing these screws. *Lift-and-Turn Plate:
This type features a lever or knob that, when turned, operates the drain stopper. It usually has a small set screw, often hidden, that secures the lever to the plate. Locating and loosening this set screw is essential before attempting to remove the plate. *Toe-Touch Overflow Plate:
These plates often integrate the overflow with the drain stopper operation. Pressing the center of the plate opens and closes the drain. Removal can be more complex, potentially involving unscrewing the plate or disengaging a spring mechanism. *Snap-On Plate:
This type relies on friction and a snap-fit mechanism to stay in place. There are no visible screws. Removal requires gently prying the plate off, often with a putty knife or similar tool.Careful visual inspection will usually identify the type of overflow plate installed. Consulting the bathtub's installation manual, if available, can also provide valuable information.
Removing a Standard Screw-In Overflow Plate
The standard screw-in overflow plate is the easiest to remove. The following steps outline the process:
1.Locate the Screws:
Identify the screws securing the plate. These are typically located on the face of the plate, either one screw in the center or two screws spaced apart. 2.Select the Appropriate Screwdriver:
Choose a screwdriver that fits the screw head properly. Using the wrong size can damage the screw head, making removal difficult. Phillips head screws are most common, but flathead screws are sometimes used. 3.Unscrew the Screws:
Carefully unscrew the screws, turning the screwdriver counterclockwise. Apply consistent pressure to prevent stripping the screw head. 4.Store the Screws:
Place the screws in the small container to prevent them from being lost. 5.Remove the Plate:
Once the screws are removed, the plate should detach easily. If the plate is stuck, gently wiggle it back and forth or use a putty knife to carefully pry it loose. Be careful not to damage the bathtub finish.Sometimes, the screws may be corroded or overly tightened, making them difficult to remove. In such cases, applying a penetrating oil lubricant (like WD-40) to the screw heads and allowing it to sit for a few minutes can help loosen the screws. Using a screw extractor may be necessary if the screw heads are stripped.
Removing a Lift-and-Turn Overflow Plate
Removing a lift-and-turn overflow plate requires a slightly different approach due to the integrated lever mechanism. The following procedure details the process:
1.Locate the Set Screw:
The set screw is typically a small screw located on the side or underside of the lever. It may be hidden or require the lever to be turned to a specific position to be visible. 2.Loosen the Set Screw:
Use a small Allen wrench or a small screwdriver to loosen the set screw. Do not remove the set screw completely, as it can be difficult to reinsert. Loosening it sufficiently allows the lever to be detached from the plate. 3.Remove the Lever:
Once the set screw is loosened, gently pull or rotate the lever to detach it from the overflow plate. 4.Locate and Remove the Mounting Screws:
Beneath the lever, there will usually be one or two mounting screws similar to those found on a standard screw-in plate. Unscrew these screws using the appropriate screwdriver. 5.Remove the Plate:
After removing the mounting screws, the overflow plate should come loose. If it's stuck, gently wiggle it or use a putty knife to pry it free.The connecting rod that extends from the overflow plate down to the drain stopper may also come out during this process. Take note of its orientation for reassembly. If the rod is difficult to remove, gently pull and twist it simultaneously.
Removing a Toe-Touch Overflow Plate
Toe-touch overflow plates can be more intricate to remove, as their design often integrates the overflow and the drain stopper mechanism. The steps involved depend on the specific design of the plate. A general approach is as follows:
1.Inspect the Plate for Screws:
Some toe-touch overflow plates have a visible screw on the face of the plate, often hidden beneath a decorative cover. If a screw is present, remove it. 2.Try Unscrewing the Plate:
Many toe-touch overflow plates are threaded and simply screw into the overflow tube. Try gripping the outer edge of the plate and turning it counterclockwise. If it turns, continue unscrewing it until it comes loose. 3.Pry the Plate Off (If No Screws or Threads are Visible):
If there are no screws and the plate doesn't unscrew, it may be held in place by friction or a snap-fit mechanism. Gently insert a putty knife or thin screwdriver between the plate and the bathtub, and carefully pry the plate off. Work around the perimeter of the plate to avoid damaging the bathtub finish. 4.Handle the Spring Mechanism (If Applicable):
Some toe-touch plates have a spring mechanism that may become exposed during removal. Take note of how this mechanism is assembled for reassembly.Photographing the assembly before disassembly can be helpful to ensure correct reinstallation. If the plate is difficult to remove, avoid applying excessive force, as this can damage the plate or the bathtub.
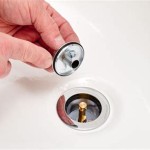
Removing a Snap-On Overflow Plate
Snap-on overflow plates are the simplest to remove in terms of the number of steps involved. However, care must be taken to avoid damaging the surrounding bathtub surface.
1.Locate the Seam:
Identify the small seam where the plate meets the bathtub surface. 2.Insert a Putty Knife or Thin, Flat Tool:
Gently insert a putty knife, thin screwdriver, or similar tool into the seam. 3.Pry the Plate Off:
Carefully pry the plate away from the bathtub. Work around the perimeter of the plate, applying gentle pressure. The plate should snap off.Protecting the bathtub surface is paramount when removing a snap-on plate. Taping the area around the plate with painter's tape can help prevent scratches. Applying heat from a hairdryer can sometimes soften the adhesive and make the plate easier to remove.
Dealing with Difficult Removals
Regardless of the overflow plate type, certain situations can make removal challenging. These include corrosion, stripped screws, and plates that are simply stuck due to years of accumulated grime and mineral deposits. Here are some tips for addressing these issues:
*Corrosion:
Apply a penetrating oil lubricant to the affected area and allow it to soak for several hours or even overnight. This can help break down the corrosion and loosen the screws or plate. *Stripped Screws:
If the screw head is stripped, a screw extractor can be used to remove the screw. Alternatively, a rubber band or steel wool can be placed between the screwdriver and the screw head to provide better grip. As a last resort, the screw head can be carefully drilled out. *Stuck Plates:
Gently tapping around the perimeter of the plate with a rubber mallet can help loosen it. Applying heat from a hairdryer can also soften any adhesive or grime that is holding the plate in place. Avoid using excessive force, as this can damage the bathtub finish or the overflow plate itself.After successfully removing the overflow plate, it's advisable to clean the area around the overflow tube before reinstallation. Use a mild detergent and a soft cloth to remove any accumulated grime or mineral deposits. Inspect the overflow tube for any signs of damage or corrosion. If necessary, replace the overflow tube before reinstalling the plate.

How To Replace Bathtub Overflow Plate With Trip Lever Easy Simple

Plumbing Can T Remove Twist Style Turn Knob Cap On Overflow Drain In Tub Home Improvement Stack Exchange

How To Install A New Bathtub Overflow Plate Assembly

Here S The Best Way To Replace Your Tub Overflow Plate Eagle Mountain Woodford Watco Blog

Bathtub How Can I Remove A Stuck Bath Stopper Assembly Home Improvement Stack Exchange

How To Replace Bathtub Drain Stopper With A Lift And Turn Diy

Guide To Removing A Bathtub Drain Family Handyman

Watco Innovator Snap On Overflow Installation

4 Easy Ways To Remove A Tub Drain Stopper Wikihow

How To Remove A Bathtub Drain The Home Depot