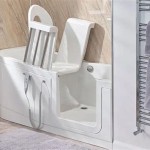
How to Remove Bathtub Fixtures
Removing bathtub fixtures is a common task often undertaken during bathroom renovations, plumbing repairs, or when replacing worn-out components. A systematic approach, coupled with the right tools and safety precautions, is essential for a successful and damage-free removal process. This article provides a comprehensive guide to removing various bathtub fixtures, covering essential preparation steps and detailed instructions for specific fixture types.
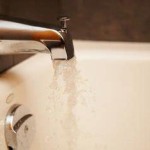
Before commencing any work, it is imperative to prioritize safety. This includes turning off the water supply to the bathroom to prevent accidental flooding or water damage. Locate the shut-off valves, typically found under the sink or near the water heater, and turn them off clockwise. After turning off the water, open the bathtub faucet to relieve any residual pressure in the pipes. Additionally, wearing safety glasses and gloves is recommended to protect eyes and skin from debris, sharp edges, and potential exposure to mildew or other contaminants.
Gathering the necessary tools is a crucial step in ensuring a smooth removal process. Essential tools for removing bathtub fixtures often include: an adjustable wrench, a pipe wrench, a screwdriver (both flathead and Phillips head), a putty knife or utility knife, pliers, a basin wrench (also known as a faucet wrench), penetrating oil, a rag or sponge, and a container to catch any water that may still be present in the pipes. Having these tools readily available will minimize interruptions and expedite the task.
Identifying Bathtub Fixture Types
Bathtub fixtures vary in design and functionality, requiring different removal techniques. Common types of bathtub fixtures include: faucets (single-handle and two-handle), diverter spouts, showerheads, drain stoppers (pop-up, lift-and-turn, and toe-touch), and overflow plates. Understanding the specific type of fixture being removed is crucial for choosing the appropriate tools and techniques to avoid causing damage to the fixture or the surrounding plumbing.
Faucets are responsible for controlling the flow and temperature of water. Single-handle faucets typically have a single lever that controls both the hot and cold water supply, while two-handle faucets have separate handles for hot and cold water. Diverter spouts are used to divert water from the tub faucet to the showerhead. Showerheads come in various styles, including fixed, handheld, and rain showerheads. Drain stoppers prevent water from draining out of the bathtub, and they come in various mechanisms, such as pop-up, lift-and-turn, and toe-touch. Finally, overflow plates prevent the bathtub from overflowing by providing an outlet for excess water.
Careful observation of the fixture's design and functionality will provide valuable insights into its installation and, consequently, the most effective removal method. Look for visible screws, retaining clips, or other fasteners that may need to be loosened or removed before attempting to detach the fixture. Consulting the manufacturer's instructions, if available, can provide valuable information about the fixture's specific installation and removal procedures.
Removing a Bathtub Faucet
Removing a bathtub faucet involves a systematic approach to disconnect the water supply lines and detach the faucet body from the bathtub. Before commencing, ensure the water supply has been turned off and any residual pressure has been released.
Begin by locating the water supply connections beneath the faucet. These connections are typically located behind the bathtub wall or under the sink. Use an adjustable wrench to loosen the nuts connecting the water supply lines to the faucet tailpieces. It may be necessary to use penetrating oil to loosen stubborn nuts. Once the nuts are loosened, carefully disconnect the water supply lines from the faucet tailpieces. Have a container ready to catch any remaining water in the pipes.
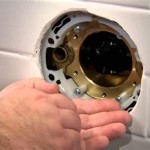
Next, identify the method by which the faucet is secured to the bathtub. Some faucets are held in place by mounting nuts accessible from beneath the bathtub, while others are secured by screws or retaining clips visible from above. For faucets secured by mounting nuts, use a basin wrench to loosen and remove the nuts from the faucet tailpieces. For faucets secured by screws or retaining clips, use a screwdriver or pliers to remove the fasteners. With the water supply lines disconnected and the mounting hardware removed, the faucet should be free to lift away from the bathtub. If the faucet is stuck, gently rock it back and forth to break any seal or corrosion that may be preventing its removal.
When removing a two-handle faucet, repeat the process for each handle and spout individually. Be sure to label or mark the hot and cold water supply lines to ensure proper reconnection when installing a new faucet. Pay attention to any washers or O-rings that may be present on the faucet tailpieces, and replace them if they are damaged or worn.
Removing a Bathtub Drain Stopper
Removing a bathtub drain stopper requires understanding the mechanism of the specific stopper type installed. Common types include pop-up, lift-and-turn, and toe-touch stoppers, each having a distinct removal process.
For a pop-up drain stopper, the first step is to locate the pivot rod under the bathtub. This rod is connected to the stopper mechanism and is responsible for raising and lowering the stopper. Loosen the pivot rod nut using pliers or an adjustable wrench. Once the nut is loosened, carefully remove the pivot rod from the drain assembly. With the pivot rod removed, the stopper should be free to lift out of the drain opening. If the stopper is stuck, gently wiggle it back and forth to break any seal or corrosion that may be present.
For a lift-and-turn drain stopper, locate the screw on top of the stopper. Use a screwdriver to unscrew and remove the screw. Once the screw is removed, the stopper should lift straight out of the drain opening. If the stopper is stuck, try twisting it gently while pulling upwards. In some cases, a small amount of penetrating oil may help to loosen the stopper.
For a toe-touch drain stopper, depress the stopper and then rotate the stopper counterclockwise until it is released from the drain assembly. Once released, the stopper should lift out of the drain opening. If the stopper is difficult to rotate, try applying penetrating oil around the base of the stopper.
Regardless of the stopper type, thoroughly clean the drain opening after removing the stopper. Remove any hair, debris, or buildup that may be present. This will help to prevent clogs and ensure proper drainage when installing a new stopper.
When removing any type of drain stopper, be prepared for potential water drips. Place a container beneath the drain to catch any water that may still be present in the drainpipe.
Removing a Showerhead and Diverter Spout
Removing a showerhead and diverter spout is typically a straightforward process, although stubborn connections may require the use of penetrating oil and appropriate tools.
To remove a showerhead, simply unscrew it from the shower arm. Most showerheads can be unscrewed by hand, but if the connection is tight, use an adjustable wrench. Wrap the wrench with a rag to protect the finish of the showerhead. Turn the showerhead counterclockwise to loosen it. If the showerhead is particularly difficult to remove, apply penetrating oil to the threads and allow it to sit for a few minutes before attempting to unscrew it again. Once the showerhead is removed, clean the threads of the shower arm to remove any old Teflon tape or debris.
To remove a diverter spout, identify the type of connection securing it to the water supply pipe. Some diverter spouts are threaded and screw onto the pipe, while others are held in place by a set screw located on the underside of the spout. For threaded spouts, turn the spout counterclockwise to unscrew it from the pipe. Use a pipe wrench for added leverage if necessary. For spouts held in place by a set screw, loosen the set screw using an Allen wrench or screwdriver. Once the set screw is loosened, the spout should slide off the pipe. If the spout is stuck, apply penetrating oil to the connection and allow it to sit for a few minutes before attempting to remove it. Protect the finish with a rag when using wrench.
When removing either a showerhead or diverter spout, be careful not to damage the water supply pipe. Apply even pressure and avoid excessive force. If the pipe is corroded or fragile, it may be necessary to reinforce it before attempting to remove the fixture. After removing the showerhead, also remove any Teflon tape from the shower arm. The Teflon tape should be reapplied prior to installing the new showerhead.
After removing these fixtures, it's advisable to inspect the exposed plumbing for any signs of corrosion or damage. Addressing these issues proactively can prevent future problems and ensure the longevity of the plumbing system.

How To Fix A Leaking Bathtub Faucet Diy Family Handyman

How To Change A Bathtub Faucet 14 Steps With Pictures Wikihow

How To Remove Tub Spout Without Set Bostingner

How To Change A Bathtub Faucet 14 Steps With Pictures Wikihow

How To Replace Shower Faucet Trim

How To Replace A Bathtub Faucet

Plumbing How To Replace A Jacuzzi Bathtub Faucet Home Improvement Stack Exchange

Replacing A Tub Faucet Bathtub Spout Replacement

How To Replace A Bathroom Faucet Removal And Installation

Bathtub Spout With Diverter Replacement Fix Leaking Tub Jonny Diy
Related Posts