How to Remove a Bathtub Faucet Handle: A Comprehensive Guide
Removing a bathtub faucet handle might appear daunting, but with the correct tools and a systematic approach, it can be a manageable task for many homeowners. The necessity to remove a bathtub faucet handle commonly arises from various scenarios, including replacing worn-out washers, addressing leaks, upgrading the faucet fixture, or performing general plumbing maintenance. This article provides a detailed, step-by-step guide to safely and effectively remove various types of bathtub faucet handles.
Before initiating the removal process, it's crucial to gather the necessary tools and ensure the safety of the surrounding area. The tools required can vary depending on the specific type of faucet handle, but a typical toolkit should include: a flathead screwdriver, a Phillips head screwdriver, an Allen wrench set, a channel-lock pliers (optional), penetrating oil (optional), rags or towels, and a small container for storing removed screws and parts. Additionally, turning off the water supply to the bathtub is paramount to prevent flooding or water damage during the removal process. The shut-off valves are usually located near the bathtub or in the basement.
Identifying the Faucet Type
The initial step involves identifying the type of bathtub faucet handle installed. Faucet handles come in various designs, each requiring a specific removal technique. Common types include handles with visible screws, handles with hidden screws beneath decorative caps, and handles that are held in place by friction or a threaded connection. Accurate identification of the handle type will streamline the removal process and minimize the risk of damage.
Handles with visible screws are often the easiest to remove. These typically feature a screw located directly on the face of the handle. For handles with hidden screws, a decorative cap, button, or plate conceals the screw. Friction-fit handles lack visible screws or caps and are typically pulled directly off the faucet stem, while threaded handles are screwed onto the stem and require unscrewing to remove.
Removing Handles with Visible Screws
The procedure for removing a bathtub faucet handle with a visible screw is relatively straightforward. First, carefully inspect the handle to locate the screw. It is generally located in the center of the handle's face or on the side. Using the appropriate screwdriver (either flathead or Phillips head), carefully loosen the screw. Turn the screwdriver counterclockwise until the screw is completely detached.
Once the screw is removed, gently pull the handle directly away from the faucet stem. If the handle is stuck, avoid using excessive force, as this could damage the faucet stem or the handle itself. Instead, try gently wiggling the handle from side to side while pulling it outwards. Apply a small amount of penetrating oil around the base of the handle and allow it to sit for a few minutes to help loosen any corrosion or build-up that may be causing the handle to stick.
After the handle is removed, carefully inspect the internal components, such as the valve stem and any washers or O-rings. If any of these components appear worn or damaged, consider replacing them to prevent leaks or other issues. Store the removed screw in a safe place to prevent it from getting lost. If planning to replace the handle, ensure the new handle is compatible with the existing faucet stem before installing it.
Removing Handles with Hidden Screws
Bathtub faucet handles with hidden screws require a slightly different approach. The first step is to locate and remove the decorative cap or button that conceals the screw. The cap is often located on the face of the handle or on the side. Depending on the design, the cap may be pried off with a flathead screwdriver, unscrewed by hand, or detached using a small Allen wrench.
When using a flathead screwdriver to pry off the cap, exercise extreme caution to avoid scratching or damaging the handle's finish. Wrap the tip of the screwdriver with a soft cloth or tape to protect the surface. Gently insert the screwdriver between the cap and the handle, and carefully pry the cap away. Apply even pressure to avoid breaking the cap or the handle.
Once the decorative cap is removed, the screw beneath will be visible. Use the appropriate screwdriver (either flathead or Phillips head) to loosen and remove the screw. As with handles with visible screws, turn the screwdriver counterclockwise until the screw is completely detached. After the screw is removed, gently pull the handle directly away from the faucet stem. If the handle is stuck, apply penetrating oil and wiggle it gently to loosen it.
Inspect the internal components for wear and tear, and replace any damaged parts. Store the removed screw and decorative cap in a safe place. When replacing the handle, ensure that it is compatible with the existing faucet stem and that the decorative cap fits securely.
Removing Friction-Fit Handles
Friction-fit bathtub faucet handles are typically the simplest to remove, as they are held in place solely by friction. These handles lack visible screws or caps, and they are typically pulled directly off the faucet stem. To remove a friction-fit handle, grip the handle firmly and pull it straight away from the faucet stem. It may require a significant amount of force to overcome the friction holding the handle in place.
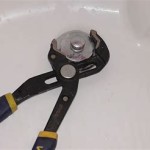
If the handle is particularly stubborn, try gently wiggling it from side to side while pulling it outwards. This can help to loosen the handle and break any seal that may have formed between the handle and the stem. Avoid using excessive force, as this could damage the faucet stem or the handle itself. A channel-lock pliers, padded with a cloth to protect the finish, can be employed to grip the handle more firmly if needed.
If the handle still refuses to budge, apply penetrating oil around the base of the handle and allow it to sit for a few minutes. The penetrating oil will help to lubricate the connection and loosen any corrosion or build-up that may be causing the handle to stick. After applying the penetrating oil, try wiggling and pulling the handle again. Once the handle is removed, inspect the faucet stem for any signs of damage or wear. Replace the handle by firmly pushing it back onto the faucet stem until it is securely in place.
Removing Threaded Handles
Threaded bathtub faucet handles are screwed onto the faucet stem and require unscrewing to remove. First, identify the point where the handle meets the faucet escutcheon (the decorative plate behind the handle). Grip the handle firmly and turn it counterclockwise. It should begin to unscrew from the stem. If the handle is difficult to turn, apply penetrating oil around the threaded connection and allow it to sit for a few minutes.
Continue unscrewing the handle until it is completely detached from the faucet stem. Be careful not to cross-thread the handle during removal, as this could damage the threads on the stem or the handle. If the handle is particularly tight, use a channel-lock pliers to grip the handle more firmly, but be sure to pad the pliers with a cloth to protect the handle's finish.
Once the handle is removed, inspect the threads on both the handle and the faucet stem for any signs of damage or wear. If the threads are damaged, consider replacing the faucet stem or the entire faucet fixture. To reinstall the handle, align the threads and screw the handle onto the faucet stem, turning it clockwise until it is securely in place. Avoid overtightening the handle, as this could damage the threads.
Regardless of the specific type of bathtub faucet handle removed, proper care and maintenance of the underlying faucet components are crucial for ensuring the longevity and proper functioning of the faucet system. Regularly inspect the valve stems, washers, and O-rings for signs of wear or damage, and replace them as needed. Lubricate the moving parts with a silicone-based grease to prevent corrosion and ensure smooth operation. By following these tips, it's possible to maintain a properly functioning bathtub faucet system.

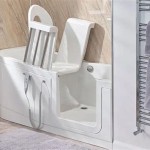
Replace Upgrade Your Shower And Bath Handle

How To Replace Bathtub Faucet Handles
:max_bytes(150000):strip_icc()/how-to-replace-a-bathtub-faucet-5210836-09-018c0bd035424eae9f9b55faff2d7605.jpg?strip=all "How To Replace A Bathtub Faucet")
How To Replace A Bathtub Faucet

How To Replace Bathtub Faucet Handles
:max_bytes(150000):strip_icc()/how-to-replace-a-bathtub-faucet-5210836-08-dde7e85413a9421cb4414bb4655e49e3.jpg?strip=all "How To Replace A Bathtub Faucet")
How To Replace A Bathtub Faucet
:max_bytes(150000):strip_icc()/how-to-replace-a-bathtub-faucet-5210836-hero-dbea72550ab646829a3fb289eb4e9a65.jpg?strip=all "How To Replace A Bathtub Faucet")
How To Replace A Bathtub Faucet

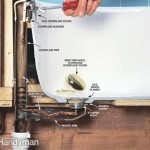
How To Fix A Leaking Bathtub Faucet Diy Family Handyman

3 Ways To Remove A Tub Faucet Wikihow
:max_bytes(150000):strip_icc()/how-to-replace-a-bathtub-faucet-5210836-04-7b7d953ade8141c1a4750f082aad38d4.jpg?strip=all "How To Replace A Bathtub Faucet")
How To Replace A Bathtub Faucet

How To Replace A Bathtub Faucet
Related Posts