How to Remove and Replace a Bathtub Drain
Replacing a bathtub drain is a common plumbing task that can be accomplished by a homeowner with basic DIY skills and the right tools. Over time, bathtub drains can become corroded, leaky, or simply unsightly, necessitating replacement. This article will provide a detailed guide on how to safely and effectively remove an old bathtub drain and install a new one, ensuring a watertight seal and a functional plumbing system.
Before beginning any plumbing project, safety precautions must be observed. The water supply to the bathroom should be shut off at the main valve or the individual shut-off valves located near the bathtub, if available. This prevents accidental flooding during the drain removal process. Additionally, wearing safety glasses and gloves is recommended to protect against debris and potential irritants.
Gathering the necessary tools and materials is crucial for a smooth and efficient drain replacement. The tools required typically include: a flathead screwdriver, a pliers, a drain wrench (also known as a bathtub drain removal tool), plumber's putty, a rag, a bucket, and possibly a penetrating oil. The new bathtub drain assembly should be selected based on the existing drain type and the desired finish. Ensure the new drain includes all necessary components, such as the drain flange, strainer, rubber gasket, and connecting hardware.
Identifying the Type of Bathtub Drain
Bathtub drains come in various types, each with its own removal and installation method. The most common types include: the pop-up drain, the lift-and-turn drain, the toe-tap drain, and the trip-lever drain. Understanding which type of drain is present is the first step in the removal process.
Pop-up drains typically have a lever near the overflow plate that controls a plunger inside the drainpipe. This plunger is connected to an assembly located behind the tub. Lift-and-turn drains feature a knob on the drain flange that is twisted to open and close the drain. Toe-tap drains are operated by pressing down on the drain flange to close and release it to open. Trip-lever drains use a lever on the overflow plate linked by a rod to a plunger within the drain pipe.
The removal technique will vary depending on the drain type. For pop-up and trip-lever drains, accessing the linkage behind the tub is necessary before removing the drain flange. For lift-and-turn and toe-tap drains, the disassembly can usually be done directly from the tub itself.
Removing the Old Bathtub Drain
Once the type of drain is identified, the removal process can begin. Starting with pop-up or trip-lever drains, access the overflow plate on the bathtub wall. This plate is usually held in place by screws. Remove the screws and carefully pull out the overflow plate, along with the connecting linkage.
The linkage typically consists of a rod and a plunger. Detach the rod from the plunger. In some cases, the rod may have a ball joint or a clip that needs to be released. Once the linkage is disconnected, the drain flange in the tub can be addressed. Often, it is advisable to clean the area around the drain flange to remove any debris or sealant which can impede removal.
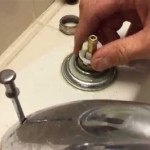
For all drain types, the next step involves loosening and removing the drain flange. The drain flange is the visible part of the drain located inside the bathtub. Insert the drain wrench into the drain flange. The drain wrench has internal grips that are designed to grip the crossbars inside the drain flange. Rotate the wrench counterclockwise to loosen the flange. If the flange is particularly stubborn, apply a penetrating oil around the edge of the flange and let it sit for a few minutes before attempting to loosen it again.
If a drain wrench is unavailable or ineffective, an alternative method involves using a flathead screwdriver and a hammer. Place the screwdriver at an angle against one of the crossbars inside the drain flange and gently tap the screwdriver with the hammer to encourage the flange to rotate. Continue this process around the flange until it begins to loosen. This method requires caution to avoid damaging the tub surface.
Once the drain flange is loose, continue unscrewing it by hand until it is completely removed. With the drain flange removed, the remaining portion of the drain assembly, typically a drain shoe, will be visible underneath the tub. This component connects the drain to the drainpipe.
The drain shoe is usually connected to the drainpipe with a large nut. This nut may be made of metal or plastic. Use pliers or an adjustable wrench to loosen and remove the nut. If the nut is corroded or difficult to turn, penetrating oil may be helpful. Once the nut is removed, the drain shoe can be detached from the drainpipe. Be prepared for some residual water to drain out when the connections are broken, so have a bucket readily available.
After the drain shoe is removed, inspect the drainpipe for any damage or corrosion. If any issues are found, they should be addressed before installing the new drain. Clean the drainpipe opening thoroughly to remove any old sealant or debris.
Installing the New Bathtub Drain
Before installing the new drain, thoroughly clean the area around the drain opening in the tub. Remove any old caulk, sealant, or debris that could prevent a proper seal. Ensure the surface is clean and dry.
Apply a generous amount of plumber's putty to the underside of the new drain flange. Roll the putty into a rope shape and press it firmly against the flange, ensuring it completely fills the gap between the flange and the tub surface. This putty will create a watertight seal.
Insert the new drain flange into the drain opening of the tub. Press down firmly to ensure the putty makes good contact with the tub surface. From underneath the tub, attach the new drain shoe to the drain flange. Ensure that the rubber gasket is properly positioned between the drain shoe and the underside of the tub. This gasket is essential for preventing leaks.
Tighten the nut that secures the drain shoe to the drainpipe. Use pliers or an adjustable wrench to tighten the nut securely, but avoid over-tightening, which could damage the drain shoe or the drainpipe. The goal is to achieve a tight, watertight connection without stressing the components.
For pop-up or trip-lever drains, reassemble the linkage between the overflow plate and the plunger. Insert the plunger into the drainpipe from above and connect the rod to the plunger. Adjust the length of the rod as needed to ensure the plunger operates correctly. Reattach the overflow plate to the bathtub wall with the screws.
After the drain is installed, test for leaks. Fill the bathtub with a few inches of water and check for any leaks around the drain flange and the drain shoe connection. If any leaks are detected, tighten the connections or reapply plumber's putty as needed. Repeat the testing process until no leaks are observed.
Once the installation is complete and leaks are addressed, clean up any excess plumber's putty from around the drain flange. Use a damp rag to wipe away the excess putty, leaving a clean and professional-looking finish.
Allow the plumber's putty to cure according to the manufacturer's instructions before using the bathtub extensively. This curing time ensures the putty sets properly and creates a durable, watertight seal. Generally, it is advisable to wait at least 24 hours before using the bathtub regularly.
By following these steps carefully, a homeowner can confidently remove and replace a bathtub drain, ensuring a functional and leak-free plumbing system. Remember to prioritize safety, use the correct tools, and take the time to ensure a proper seal to avoid future problems.

How To Remove A Bathtub Drain The Home Depot

Easy Replacement Of A Bathtub Drain

How To Remove A Bathtub Drain The Home Depot

How To Remove A Bathtub Drain The Home Depot

Replacing A Tub Drain Bathtub Removal And Replacement

How To Remove A Bathtub Drain

How To Remove Broken Bathtub Drain Without Special Removal Tool Cross Members

Guide To Removing A Bathtub Drain Family Handyman

How To Replace A Bathtub Drain

How To Replace Bathtub Drain Stopper With A Lift And Turn Diy
Related Posts