How To Remove and Install a Bathtub Drain
Bathtub drains can become clogged, corroded, or damaged over time, necessitating removal and replacement. This process, while requiring some plumbing knowledge, is manageable for most homeowners with the right tools and a methodical approach.
Before beginning, gather the necessary tools. These typically include a drain key, also known as a drum key or plumbing wrench, pliers, a screwdriver (Phillips or flathead, depending on the drain stopper), a putty knife, plumber's putty, and a bucket or container to catch any residual water.
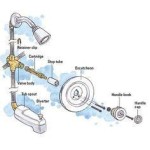
The first step is to identify the type of drain stopper. Two common types are the trip-lever drain and the push-and-pull stopper. Trip-lever drains have a lever on the overflow plate that controls a linkage connected to the stopper. Push-and-pull stoppers operate by pressing down on the stopper to close the drain and pulling up to open it.
For a trip-lever drain, removal begins by unscrewing the two screws holding the overflow plate in place. Carefully remove the plate, exposing the linkage and stopper. Disconnect the linkage from the drain stopper. The stopper can then typically be lifted out of the drain opening. If it’s stuck, the drain key can be inserted into the crossbars in the drain and turned counterclockwise to loosen and remove the stopper assembly.
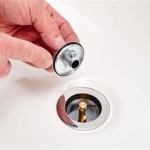
Removing a push-and-pull stopper is generally simpler. Grasp the stopper top and gently rock it back and forth while pulling upwards. The stopper should come free. Some push-and-pull stoppers have a setscrew located underneath the cap. If present, this screw must be loosened or removed first to release the stopper.
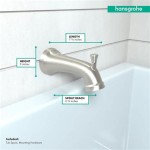
Once the stopper is removed, the drain flange needs attention. The drain flange is the metal ring that secures the drain assembly to the bathtub. Inspect the flange for any damage or corrosion. If the flange is in good condition, proceed to installing the new drain. If the flange is damaged or corroded, it should be replaced. This often involves removing the old flange from underneath the tub, which might require access from below.
Before installing the new drain, clean the drain opening thoroughly. Remove any old plumber's putty or sealant. Installing the new drain assembly begins with applying a thick rope of plumber's putty around the underside of the new drain flange. Press the flange firmly into the drain opening, ensuring a good seal. Remove any excess putty that squeezes out from the top side.
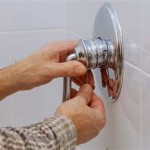
For trip-lever drains, insert the new stopper into the drain opening and reconnect the linkage to the stopper. Reattach the overflow plate and tighten the screws. For push-and-pull stoppers, insert the stopper into the drain opening and ensure it seals properly. If the stopper has a setscrew, tighten it securely.
After installing the new drain, run water into the tub to check for leaks. Observe the drain flange area and the connections to the stopper. If any leaks are detected, tighten connections or reapply plumber's putty as needed.
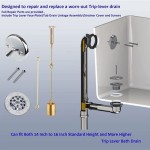
Replacing a bathtub drain often involves addressing the strainer body, which sits below the tub and connects to the drain pipe. Accessing the strainer body usually requires access from below the tub, typically through a basement or crawl space. If the strainer body is damaged or leaking, it should be replaced.
Removing the strainer body involves loosening the large nut that connects it to the drain pipe. This nut can sometimes be difficult to reach and may require specialized tools, such as a deep socket wrench or basin wrench. Once the nut is loosened, the strainer body can be removed. Apply plumber’s tape to the threads of the new strainer body before installing it, and tighten the nut securely.
While this process provides general guidance, specific drain assemblies can vary. Consulting the manufacturer’s instructions for the new drain assembly is always recommended for detailed and specific guidance. If significant plumbing repairs are necessary or if access to the underside of the tub is difficult, contacting a qualified plumber is advisable.
Regular maintenance can prevent future drain problems. Avoid pouring grease or oil down the drain. Periodically flush the drain with hot water to prevent buildup. If clogs do occur, use a plunger or a drain snake to clear them before they become severe.

Easy Replacement Of A Bathtub Drain

How To Remove A Bathtub Drain The Home Depot

How To Remove A Bathtub Drain The Home Depot

Replacing A Tub Drain Bathtub Removal And Replacement

How To Remove A Bathtub Drain The Home Depot

How To Replace A Bathtub Drain

How To Remove Broken Bathtub Drain Without Special Removal Tool Cross Members

How To Replace Bathtub Drain Stopper With A Lift And Turn Diy

Plumbing How Do I Replace A Broken Bathtub Drain Home Improvement Stack Exchange

How To Replace Bathtub Drain Stopper With A Lift And Turn Diy
Related Posts