How To Remove a Pop-Up Bathtub Drain
A pop-up bathtub drain provides a convenient method for opening and closing the drain, but like all mechanical components, it can require maintenance or replacement. Removing a pop-up bathtub drain typically becomes necessary due to clogs, damage, or when installing a new tub or drain assembly. The process, while seemingly straightforward, can be complicated by corrosion, stubborn parts, and variations in drain designs. Therefore, understanding the steps involved and having the correct tools is crucial for a successful removal.
This article provides a comprehensive guide to removing a pop-up bathtub drain. It covers the necessary tools, step-by-step instructions, and potential challenges encountered, allowing homeowners to tackle this task with confidence. Attention to detail, careful execution, and adherence to safety precautions are vital throughout the process.
Identifying the Type of Pop-Up Drain
Before commencing the removal process, identifying the specific type of pop-up drain installed is essential. While the basic function remains the same – to seal and unseal the drain opening – the mechanisms vary. This variation influences the removal technique. Common types of pop-up bathtub drains include:
* Rocker Arm Drains: These drains utilize a lever or rocker arm positioned near the overflow drain to control the stopper's movement. The lever connects to a linkage that raises or lowers the stopper, sealing or unsealing the drain. Removal necessitates accessing this linkage, usually through the overflow drain opening. * Lift-and-Turn Drains: Characterized by a stopper that is lifted and turned to either lock open or seal the drain, these drains are often simpler to remove. They typically involve unscrewing the stopper or the entire assembly from the drain body. * Push-and-Pull Drains: With this type, pressing the stopper down engages or disengages the seal. Removal usually requires unscrewing the stopper after manipulating it into a specific position. * Toe-Touch Drains: Similar to push-and-pull drains, toe-touch drains are activated with foot pressure. The removal process often involves unscrewing the stopper assembly after a specific manipulation.Identifying the specific type of pop-up drain will inform the subsequent steps, ensuring the correct tools and techniques are employed, minimizing the risk of damage during removal.
Gathering the Necessary Tools and Materials
Having the right tools and materials readily available is paramount for efficient and effective removal of a pop-up bathtub drain. This preparation minimizes delays and reduces the likelihood of damaging the drain or the surrounding tub surface. Essential tools and materials include:
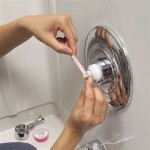
* Flathead Screwdriver: A flathead screwdriver is often needed to pry off caps, loosen screws, or manipulate levers within the drain assembly. * Phillips Head Screwdriver: In certain cases, Phillips head screws secure parts of the drain mechanism. Having both a standard size and potentially a stubby version is helpful in tight spaces. * Needle-Nose Pliers: Needle-nose pliers are useful for grabbing small parts, removing linkages, and reaching into tight areas within the drain assembly. * Adjustable Wrench or Basin Wrench: An adjustable wrench or, preferably, a basin wrench is typically needed to loosen the drain flange nut located underneath the bathtub. A basin wrench is specifically designed for accessing hard-to-reach plumbing fixtures. * Channel-Lock Pliers: Channel-lock pliers can provide additional leverage for loosening stubborn nuts or pipes. * Drain Removal Tool (Optional): Specific drain removal tools are available. These tools are designed to grip the inside of the drain flange and allow for easy turning. These are especially helpful for removing corroded or tightly sealed drains. * Penetrating Oil: For corroded or stubborn drain assemblies, penetrating oil can help loosen stuck parts. Apply penetrating oil generously and allow it to soak for at least 30 minutes before attempting to remove the drain. * Putty Knife or Utility Knife: A putty knife or utility knife can be used to carefully score around the drain flange to break any sealant or caulk that is adhering it to the tub. * Rags or Towels: Rags or towels are essential for cleaning up spills, protecting the tub surface, and providing a better grip on tools. * Bucket: Place a bucket underneath the drain assembly to catch any water or debris that may fall during the removal process. * Safety Glasses and Gloves: Safety glasses and gloves are crucial for protecting eyes and hands from debris, sharp edges, and potential exposure to bacteria or mold.Step-by-Step Removal Process
The removal process will vary slightly depending on the type of pop-up drain, but the following steps provide a general guideline. Always consult the manufacturer's instructions if available, as they may provide specific guidance for your particular drain model.
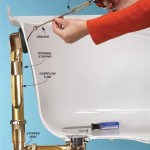
1. Prepare the Work Area: Place a bucket underneath the drain assembly to catch any water or debris. Protect the bathtub surface around the drain with rags or towels to prevent scratches. 2. Remove the Stopper: The method for removing the stopper depends on the drain type. * Rocker Arm Drains: Access the linkage mechanism through the overflow drain. Use a flathead screwdriver to disconnect the linkage from the stopper. The stopper can then be lifted out. * Lift-and-Turn Drains: Turn the stopper counterclockwise to loosen it. It may unscrew directly. If not, look for a small screw on the side of the stopper and loosen it to release the stopper. * Push-and-Pull or Toe-Touch Drains: Depress the stopper and turn it counterclockwise to loosen it. It may require several attempts to find the correct position for unscrewing. If a set screw is present, loosen it first. 3. Access the Drain Flange Nut: This large nut is located underneath the bathtub, directly below the drain opening. Accessing it may require removing an access panel, if present, or working in a confined space. 4. Loosen the Drain Flange Nut: Use an adjustable wrench or basin wrench to grip the drain flange nut. Turn the nut counterclockwise to loosen it. If the nut is heavily corroded, apply penetrating oil and allow it to soak for at least 30 minutes before attempting to loosen it. 5. Break the Seal: Before completely removing the drain flange nut, use a putty knife or utility knife to carefully score around the drain flange where it meets the bathtub surface. This will break any caulk or sealant that is holding the flange in place. 6. Remove the Drain Flange Nut and Drain Body: Once the drain flange nut is loosened and the seal broken, carefully remove the nut completely. While holding the drain body from above, gently push the drain body upward from below. The entire drain assembly should now be free. 7. Clean the Drain Opening: After removing the old drain assembly, thoroughly clean the drain opening in the bathtub. Remove any remaining sealant, caulk, or debris. This will ensure a proper seal when installing the new drain.Troubleshooting Common Problems
Removing a pop-up bathtub drain can sometimes present challenges. Addressing these issues effectively is important for a smooth removal process.
* Corroded Drain Flange Nut: Corrosion can make the drain flange nut extremely difficult to loosen. Applying penetrating oil liberally and allowing it to soak for an extended period is often the first step. In severe cases, using a heat gun (carefully, to avoid damaging the tub) can help loosen the corrosion. As a last resort, a nut splitter can be used to break the nut apart, but this requires caution to avoid damaging the drain pipe. * Stripped Drain Flange Nut: If the drain flange nut is stripped, a standard wrench may not be able to grip it properly. In this case, consider using a pipe wrench or channel-lock pliers for a stronger grip. Alternatively, a specialized nut extractor tool can be used to grip the damaged nut. * Stuck Stopper: A stopper that is stuck in the closed position can prevent access to the drain mechanism. Try using a small suction cup to pull the stopper up. Alternatively, carefully insert a flathead screwdriver around the edges of the stopper to try to loosen it. Avoid using excessive force, as this can damage the stopper or the drain body. * Limited Access: Accessing the drain flange nut underneath the bathtub can be challenging due to limited space or obstructions. A basin wrench is specifically designed for this purpose. Consider using a flexible inspection camera to get a better view of the drain assembly.Addressing these challenges with patience and the appropriate tools will increase the likelihood of a successful drain removal.
Safety Precautions
Prioritizing safety is crucial throughout the drain removal process. Incorporating these precautions minimizes the risk of injury or damage.
* Wear Safety Glasses: Safety glasses protect the eyes from debris that may fall during the removal process. * Wear Gloves: Gloves protect the hands from sharp edges, plumbing chemicals, and potential exposure to bacteria or mold. * Turn Off the Water Supply: While not always necessary for drain removal, turning off the water supply to the faucet can prevent accidental water flow. * Protect the Bathtub Surface: Cover the bathtub surface around the drain with rags or towels to prevent scratches or damage. * Use Caution with Heat Gun (if applicable): If using a heat gun to loosen corrosion, exercise extreme caution to avoid overheating the area and damaging the tub or surrounding materials. * Work in a Well-Ventilated Area: When using penetrating oil or other chemicals, ensure adequate ventilation to avoid inhaling fumes. * Dispose of Old Parts Properly: Dispose of the old drain assembly and any used materials according to local regulations.By adhering to these safety precautions, individuals can minimize the risk of accidents and ensure a safe working environment.

How To Remove Pop Up Tub Stopper Easy Method

So Easy How To Remove A Watco Pop Up Drain Plug

How To Remove A Pop Up Tub Drain Plug Stopper Easy No Tools Needed
How To Remove 6 Diffe Kinds Of Drain Stoppers
How To Remove 6 Diffe Kinds Of Drain Stoppers

How To Remove A Bathtub Drain The Home Depot

How To Remove A Bathtub Drain Stopper

Remove Pop Up Bath Tub Drain Stopper 3 Ways

How To Remove A Pop Up Tub Drain Plug Stopper Easy No Tools Needed

How To Fix A Bathtub Or Sink Pop Up Stopper
Related Posts