How To Remove a Bathtub Faucet Stem
The bathtub faucet stem, a critical component within the faucet assembly, controls the flow of water from the supply pipes to the tub. Over time, these stems can become corroded, damaged, or simply worn out, leading to drips, leaks, or difficulty adjusting the water temperature. Replacing a faulty stem often requires its careful removal, a task that can be accomplished by homeowners with the right tools and understanding of the process.
This article provides a comprehensive guide to removing a bathtub faucet stem, covering essential preparation, step-by-step instructions, and troubleshooting tips. The procedures outlined herein are applicable to most common bathtub faucet types; however, variations in design may exist, requiring adjustments to the approach.
Preparation and Safety Precautions
Prior to commencing any plumbing repair, safety is paramount. Water and electricity present potential hazards, necessitating careful precautions. The first and most important step is to shut off the water supply to the bathtub faucet. This is typically achieved by locating the shut-off valves for the hot and cold water lines serving the fixture. These valves are often located under the sink in the adjacent bathroom, in the basement, or near the water heater. If individual shut-off valves are not present, the main water supply to the entire house must be turned off. After shutting off the water supply, it is advisable to open the bathtub faucet to relieve any remaining pressure in the pipes.
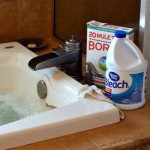
The next crucial step is to gather the necessary tools and materials. Essential tools include a screwdriver set (both flathead and Phillips head), a faucet stem wrench (also known as a faucet valve socket wrench), penetrating oil, pliers (needle-nose and regular), adjustable wrench, rags, and a flashlight. A replacement faucet stem, matching the make and model of the existing one, should also be readily available. Having the correct replacement stem on hand minimizes downtime and ensures a proper fit.
Protecting the bathtub surface from scratches and damage is also crucial. Placing a towel or drop cloth in the tub basin prevents tools from directly contacting the porcelain or acrylic surface. This simple precaution helps to preserve the appearance of the bathtub during the repair process.
Step-by-Step Removal Procedure
After completing the preparation and safety steps, the actual removal of the faucet stem can begin. This process involves several key steps, each requiring careful attention to detail:
1. Removing the Handle: The initial step involves removing the faucet handle. This is generally accomplished by locating and removing a setscrew, typically found on the front or underside of the handle. The setscrew may be concealed beneath a decorative cap, which can be carefully pried off using a flathead screwdriver. Once the setscrew is removed, the handle should pull straight off the faucet stem. In some cases, the handle may be tightly secured due to corrosion or mineral buildup. Applying penetrating oil to the base of the handle and gently wiggling it back and forth can help to loosen it. Avoid using excessive force, as this can damage the handle or the faucet stem.
2. Removing the Sleeve or Escutcheon: After removing the handle, the next step is to remove the sleeve or escutcheon, which is the decorative trim piece that covers the faucet body. The escutcheon is typically threaded onto the faucet body and can be unscrewed by hand. In some cases, the escutcheon may be secured with a setscrew or other fastening mechanism. If the escutcheon is difficult to remove, penetrating oil can be applied to the threads to help loosen it. Once the escutcheon is loose, it can be carefully pulled away from the wall and set aside.
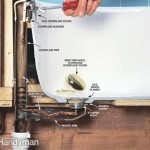
3. Accessing the Faucet Stem: With the handle and escutcheon removed, the faucet stem is now accessible. The stem is typically located within a brass housing that is threaded into the faucet body. Before attempting to remove the stem, it is advisable to apply penetrating oil around the base of the stem and allow it to soak for several minutes. This helps to loosen any corrosion or mineral buildup that may be preventing the stem from turning.
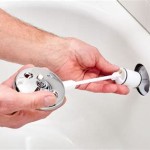
4. Removing the Faucet Stem: The faucet stem is removed using a faucet stem wrench or a socket wrench. The faucet stem wrench is specifically designed to fit over the stem and provide leverage for turning it. The correct size wrench must be used to avoid damaging the stem. Place the wrench over the stem and apply gentle, steady pressure in a counter-clockwise direction. If the stem is particularly stubborn, tapping the wrench with a hammer can help to break it free. Once the stem begins to turn, continue unscrewing it until it is completely removed from the faucet body.
5. Inspecting the Faucet Seat: After removing the faucet stem, inspect the faucet seat for damage or corrosion. The faucet seat is the surface against which the rubber washer on the faucet stem seals. If the seat is damaged, it can be resurfaced using a faucet seat dressing tool or replaced entirely. Replacing the faucet seat is a more complex task that may require specialized tools and expertise.
Troubleshooting Common Problems
Removing a bathtub faucet stem can sometimes present challenges. Several common problems may arise during the process, requiring specific troubleshooting techniques.
1. Stuck Handle: As mentioned earlier, a stuck handle can be a common issue. The cause is typically corrosion or mineral buildup. Applying penetrating oil and gently wiggling the handle are the first steps to take. If these methods are unsuccessful, a handle puller tool can be used to apply more force without damaging the handle or faucet stem. The handle puller is attached to the handle and used to exert a controlled pulling force, freeing the handle from the stem.
2. Stripped Setscrew: A stripped setscrew can prevent the handle from being removed. If the screw head is damaged, it may be difficult to grip with a screwdriver. Several techniques can be used to remove a stripped setscrew. One method involves using a rubber band or steel wool to improve the grip of the screwdriver. Another method involves using a screw extractor tool, which is designed to bite into the stripped screw head and allow it to be turned. In severe cases, the setscrew may need to be drilled out.
3. Stuck Faucet Stem: A stuck faucet stem is often caused by corrosion or mineral buildup within the faucet body. Again, penetrating oil is the first line of defense. Apply penetrating oil liberally around the base of the stem and allow it to soak for an extended period, preferably overnight. Tapping the faucet stem wrench with a hammer can also help to break the corrosion. Applying heat to the faucet body using a heat gun or hair dryer can also help to loosen the stem. Caution should be exercised when applying heat to avoid damaging the faucet or surrounding surfaces. If the stem remains stuck, a specialized faucet stem puller tool may be required. This tool provides additional leverage and pulling force to remove the stem.
4. Broken Faucet Stem: In some cases, the faucet stem may break during the removal process. This can occur if the stem is severely corroded or if excessive force is applied. If the stem breaks off inside the faucet body, it may be difficult to remove the remaining portion. Needle-nose pliers or a screw extractor tool can be used to attempt to grip and remove the broken stem. In severe cases, the entire faucet body may need to be replaced.
5. Identifying the Correct Replacement: Ensuring the correct replacement stem is crucial for a successful repair. Take the old stem to a plumbing supply store for comparison. Match the length, thread type, and valve seat configuration to the original. If the original manufacturer and model number are known, researching and ordering the part online may be possible. Online resources often provide detailed specifications and compatibility information.
Properly identifying and addressing these potential issues during the faucet stem removal process ensures a smoother and more efficient repair. Rushing the process or using excessive force can lead to further damage and complications.
The successful removal of a bathtub faucet stem requires careful preparation, the right tools, and a methodical approach. By following the steps outlined in this guide and taking necessary safety precautions, homeowners can effectively address common faucet issues and maintain their plumbing fixtures.

How To Remove Bathtub Faucet Stems Quick And Easy

How To Fix A Leaking Bathtub Faucet Diy Family Handyman

Faucet Stem Valve Repair And Replacement

How To Change A Bathtub Faucet 14 Steps With Pictures Wikihow

Fixing Faucets How To Replace A Difficult Tub Faucet Cartridge

Diy Bathtub Faucet Repair

How To Repair Replace 3 Handle Shower Valve

Plumbing How To Un Faucet Valve Stem When It S Stuck Home Improvement Stack Exchange

Tub Spout Diverter How To Fix From Beginning The End Using Danco Repair Kit

How To Replace A Bathtub Spout Family Handyman
Related Posts