How To Remove a Bathtub Drain Stopper: Lift and Turn Style
The bathtub drain stopper is a crucial component in any bathroom, responsible for retaining water within the tub during bathing or showering. While various types of stoppers exist, the lift and turn style is a common design found in many homes. This type typically utilizes a knob or lever that, when lifted and turned, engages or disengages a mechanism that either seals or opens the drain. Over time, these stoppers can become clogged with hair, soap scum, and other debris, hindering their functionality. Furthermore, the stopper itself may require replacement due to wear and tear or damage. Understanding how to properly remove a lift and turn bathtub drain stopper is essential for maintenance, cleaning, and replacement purposes. This article provides a comprehensive guide on how to accomplish this task effectively and safely.
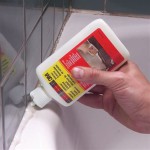
Before commencing any work related to plumbing, it is paramount to prioritize safety. The bathtub area may be slippery, especially when wet. Therefore, non-slip mats or adequate footwear should be employed to prevent accidental falls. Additionally, working in a well-lit environment is crucial for optimal visibility, minimizing the risk of errors or injuries. Gathering the necessary tools and materials beforehand ensures a smooth and efficient removal process. This proactive approach not only safeguards personal well-being but also contributes to the successful completion of the task at hand.
The tools typically required for removing a lift and turn bathtub drain stopper are relatively basic and commonly found in most household toolkits. A flathead screwdriver is often necessary for prying or loosening certain components. A pair of pliers or adjustable wrench may be needed to grip and turn stubborn parts. Cleaning supplies, such as a soft cloth or brush, are beneficial for removing accumulated debris. Finally, a container or receptacle is essential for catching any loose parts or debris that may fall out during the removal process. Having these tools readily available will streamline the procedure and minimize potential interruptions.
Identifying the Specific Lift and Turn Stopper Design
Lift and turn stoppers, while sharing a common operating principle, can exhibit variations in their specific designs. Some models feature a simple knob that is lifted and turned to engage or disengage the drain. Others may incorporate a more elaborate lever mechanism. Prior to attempting removal, it is essential to carefully examine the stopper to identify its specific design characteristics. This careful inspection will provide valuable insights into the disassembly process and help avoid potential damage to the stopper or drain assembly.
Observe the visible components of the stopper, noting any screws, notches, or other features that might indicate how the stopper is secured. Try gently manipulating the knob or lever to understand how it interacts with the drain. If possible, consult the manufacturer's documentation or search online resources for diagrams or instructions specific to the stopper model. Understanding the unique features of the stopper is crucial for a successful and damage-free removal.
Ignoring this preliminary step can lead to applying inappropriate force or attempting to disassemble the stopper in the wrong manner, potentially resulting in damage to the stopper, the drain assembly, or even the bathtub itself. A thorough understanding of the stopper's design is a prerequisite for a safe and effective removal process.
Step-by-Step Removal Procedure
The removal of a lift and turn bathtub drain stopper typically involves a sequence of steps designed to systematically disassemble the stopper assembly. While the specific steps may vary slightly depending on the stopper design, the general principles remain consistent. The following provides a generalized guide to the removal procedure.
Begin by thoroughly cleaning the area around the stopper, removing any loose debris or soap scum that may be obstructing access or concealing screws or other fasteners. This initial cleaning step ensures clear visibility and facilitates the subsequent disassembly process. A clean working environment minimizes the risk of contaminating the drain system with unnecessary debris.
Next, attempt to locate any visible screws or fasteners that secure the stopper to the drain assembly. These are often located on the knob or lever itself. If screws are present, use a flathead screwdriver of the appropriate size to carefully loosen and remove them. Store the screws in a safe place to avoid losing them, as they will be needed for reassembly or installation of a replacement stopper.
With the screws removed (or if no screws are present), gently attempt to lift the knob or lever straight up. If the stopper feels stuck, apply some gentle rotational force while lifting. The stopper may be held in place by a friction fit or a simple locking mechanism. Avoid using excessive force, as this could damage the stopper or drain assembly. If the stopper remains stubbornly in place, consider applying a small amount of penetrating oil to lubricate the interface between the stopper and the drain.
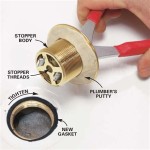
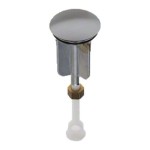
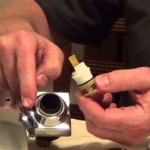
Once the knob or lever is removed, examine the remaining components of the stopper assembly. There may be a separate internal component, such as a threaded cylinder or a plunger, that needs to be removed. This component is often connected to the linkage that controls the drain opening. Carefully unscrew or disengage this component, following the specific instructions for the particular stopper design. If the component is difficult to remove, consult online resources or seek assistance from a qualified plumber.
As the stopper assembly is disassembled, take note of the order in which the various components are removed. This will be helpful during reassembly or when installing a replacement stopper. It is also advisable to take photographs of the disassembled components to provide a visual reference during the reassembly process. This proactive approach helps ensure that the stopper is reinstalled correctly and functions properly.
With all the components of the stopper assembly removed, the drain opening should be clear and accessible for cleaning or repair. Carefully inspect the drain opening for any obstructions or debris. Use a suitable cleaning tool, such as a drain snake or a stiff brush, to remove any accumulated hair, soap scum, or other debris. This cleaning step helps ensure that the drain is properly functioning and prevents future clogs.
Addressing Common Challenges
While the removal of a lift and turn bathtub drain stopper is generally a straightforward process, certain challenges may arise. One common issue is a stopper that is stuck due to corrosion, mineral deposits, or accumulated debris. Another potential problem is dealing with stripped screws or damaged components.
If the stopper is stuck, avoid using excessive force, as this could damage the stopper or drain assembly. Instead, try applying a penetrating oil to lubricate the interface between the stopper and the drain. Allow the oil to soak for several minutes before attempting to remove the stopper again. Gentle tapping with a rubber mallet may also help to loosen the stopper. If these methods fail, consider using a specialized tool designed for removing stuck drain stoppers. These tools are available at most hardware stores and can provide additional leverage without damaging the surrounding components.
If the screws securing the stopper are stripped, it may be difficult to remove them using a standard screwdriver. In this case, try using a screw extractor to grip the stripped screw and remove it. Alternatively, you may be able to use a rubber band or steel wool to create a better grip between the screwdriver and the screw head. If these methods fail, it may be necessary to drill out the stripped screw. Exercise caution when drilling to avoid damaging the surrounding drain assembly.
If any of the components of the stopper assembly are damaged, they will need to be replaced. Replacement parts are often available at hardware stores or plumbing supply stores. When purchasing replacement parts, be sure to select components that are compatible with the specific model of stopper being used. If you are unsure about which parts to purchase, consult with a qualified plumber or hardware store employee.
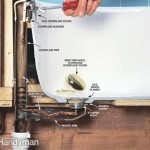
In situations where the drain assembly itself is damaged, it may be necessary to replace the entire drain assembly. This is a more complex task that may require the assistance of a qualified plumber. Attempting to repair or replace a damaged drain assembly without the necessary skills and experience could result in further damage or leaks.
Proper maintenance and cleaning of the lift and turn bathtub drain stopper can help prevent these challenges from arising in the first place. Regularly remove any accumulated hair or debris from the stopper and drain. Periodically clean the stopper with a mild detergent and water to prevent the buildup of soap scum. By following these simple maintenance tips, the lifespan of the stopper can be extended and potential problems can be avoided.

Trouble Removing Lift And Turn Bathtub Stopper R Fixit

Removing A Lift Turn Stopper 1 Step

How To Replace Bathtub Drain Stopper With A Lift And Turn Diy

How To Remove A Bathtub Drain The Home Depot

How To Replace Bathtub Drain Stopper With A Lift And Turn Diy

How To Remove A Bathtub Drain Stopper Mr Rooter

1st Simple Instructions How To Remove A Bathtub Stopper Lift And Turn Bathroom Tub Shower

How To Remove A Bathtub Drain Temecula Handyman

How To Remove A Bathtub Drain Stopper

How To Remove Bathtub Drain Stopper That Spins Freely