Essential Aspects of Refinishing a Bathtub
Refurbishing a bathtub can be a cost-effective way to revitalize your bathroom's appearance, restore its luster, and extend its longevity. Whether you're dealing with a chipped, cracked, or discolored tub, following the proper steps can ensure a professional-looking finish.
Materials Required:
- Bathtub refinishing kit (includes primer and refinishing compound)
- Safety glasses
- Respirator
- Sandpaper (120-220 grit)
- Sanding block
- Cleaning solution (TSP or denatured alcohol)
- Mixing cups and sticks
- Masking tape
- Rags
Step-by-Step Instructions:
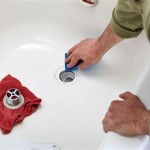
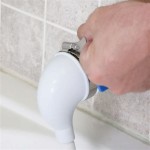
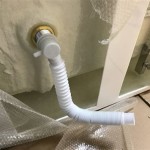
- Prepare the Bathtub: Remove all fixtures, including drains and handles. Clean the tub thoroughly with a cleaning solution and rinse it with clean water. Let it dry completely.
- Sand the Surface: Use 120-220 grit sandpaper to gently sand the bathtub's surface. Focus on removing any chipped or damaged areas, and smooth out any rough spots. Use a sanding block for even sanding.
- Clean and Degrease: Clean the sanded surface with a cleaning solution and wipe it down with a rag. Follow this by degreasing the surface with denatured alcohol and let it dry.
- Mask Off: Use masking tape to cover any areas you don't want to refinish, such as the grout or tile. Protect the surrounding area by laying down drop cloths.
- Apply Primer: Apply a thin, even coat of primer following the manufacturer's instructions. Allow the primer to cure according to the specified time.
- Apply Refinishing Compound: Mix the refinishing compound according to the instructions and apply it to the primed surface. Use a circular motion and work in thin layers. Apply several coats until the desired coverage is achieved.
- Dry and Cure: Allow the bathtub to dry thoroughly in a well-ventilated area. Follow the manufacturer's recommended drying times, typically 24-48 hours.
- Wear safety glasses and a respirator when sanding and working with refinishing compounds.
- Ventilate the bathroom well during the entire refinishing process.
- Test the refinishing compound on an inconspicuous area first to ensure compatibility and desired finish.
- Avoid using harsh cleaning agents on the refinished bathtub.
- Refinishing a bathtub is a DIY project suitable for experienced homeowners. If you're not comfortable with the process, consider hiring a professional.
Tips:

How Long Does Reglazing A Bathtub Last

Bathtub Refinishing Todds Porcelain Fiberglass Repair

Bathroom Resurfacing Resurface Old Bathtub Alaska Superior Refinishing Of

How To Refinish A Bathtub Napco Ltd

Tub Reglazing How To Prepare Your Bathtub Surface

A Bathtub Recoating In South Florida America Refinishing Pros

Bathtub Resurfacing Custom Tub And Tile

Bathtub Refinishing In Dallas Tx Happy Tubs Repair

Bathtub Refinishing Service For Fort Smith Arkansas

My Painted Bathtub 5 Years Later An Honest Review Of Refinished Jacuzzi Tub
Related Posts