How to Re-Caulk a Bathtub
Re-caulking a bathtub is a relatively simple task that can be completed in a few hours. However, it is important to do the job correctly in order to prevent water damage and leaks. Here are the steps on how to re-caulk a bathtub:
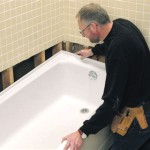
1. Remove the old caulk.
Use a utility knife or a caulk removal tool to carefully remove the old caulk. Be sure to score the caulk along the edge of the tub and the wall to break the seal. Once the old caulk has been removed, clean the area with rubbing alcohol to remove any remaining residue.
2. Apply painter's tape.
Apply painter's tape along the edge of the tub and the wall to create a clean line for the new caulk. The tape will help to prevent the caulk from getting smeared or smudged.
3. Apply the new caulk.
Cut the tip of the caulk tube at a 45-degree angle. Apply a thin, even bead of caulk along the edge of the tub and the wall. Use your finger or a caulk tool to smooth the caulk and remove any excess.
4. Remove the painter's tape.
Remove the painter's tape immediately after applying the caulk. This will prevent the tape from sticking to the caulk and causing it to peel off.
5. Allow the caulk to dry.
Allow the caulk to dry for at least 24 hours before using the bathtub. This will give the caulk time to cure and set properly.
Tips:
- Use a high-quality caulk that is specifically designed for bathtubs.
- Apply the caulk in a well-ventilated area.
- Wear gloves when applying the caulk to protect your hands from the chemicals.
- If you are not comfortable applying the caulk yourself, you can hire a professional to do the job.

How To Caulk A Bathtub On Sutton Place

How To Re Caulk A Bathtub

How To Re Caulk A Bathtub

How To Caulk A Bathtub 13 Steps With Pictures Wikihow

How To Caulk A Bathtub 13 Steps With Pictures Wikihow

Caulking A Bathtub Simple Steps For Successful Seal

How To Caulk A Shower Or Tub True Value

How To Caulk A Bathtub On Sutton Place

When How To Re Caulk Your Bathroom

Recaulking Failing Caulk Is Important When Should I Recaulk My Shower