How to Create A Bathtub: A Comprehensive Guide
A bathtub installation can transform your bathroom into a luxurious sanctuary where you can unwind and rejuvenate. However, tackling a bathtub installation project on your own requires careful planning and execution. This comprehensive guide will provide you with step-by-step instructions, essential tips, and crucial considerations to ensure a successful installation.
Step 1: Planning and Preparation
Before diving into the installation, it's vital to plan meticulously. Determine the type of bathtub you desire, whether it's a freestanding, drop-in, or alcove tub. Measure the available space and check for any obstructions that may affect the fitting. Gather all the necessary tools and materials, including a level, tape measure, wrench, pipe cutter, and plumbing connections.
Step 2: Remove the Old Bathtub (if applicable)
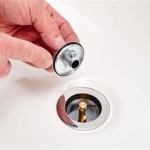
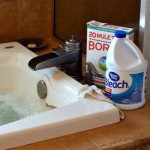
If replacing an existing bathtub, it must be removed carefully. Disconnect the water supply lines and drain the tub. Dismantle the drain assembly and remove the tub from its enclosure. Ensure the drain is clear of any debris before proceeding.
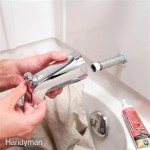
Step 3: Install the Drain and Overflow
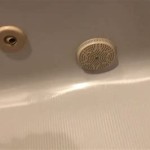
Before setting the new bathtub, install the drain and overflow assembly. Apply plumber's putty around the base of the drain flange and insert it into the drain hole. Tighten the drainpipe from underneath the bathtub. Similarly, fit the overflow tube and secure it.
Step 4: Set the Bathtub in Place
Carefully lift the bathtub into position and adjust it until it is level. Use shims or a level to ensure proper alignment. Connect the drainpipe to the bathtub drain and secure it tightly. Test the drain by filling the tub with a small amount of water to ensure it drains properly.
Step 5: Connect the Plumbing
Once the bathtub is secure, connect the water supply lines. Use Teflon tape on the threads to prevent leaks. Install the faucet and showerhead and connect them to the water supply lines. Double-check all connections for tightness.
Step 6: Seal and Finish
Apply a generous bead of silicone caulk around the tub's perimeter, where it meets the wall or enclosure. Smooth the caulk with a wet finger or caulk tool. Install the trim or tile around the bathtub to complete the look.
Essential Tips for Success:
- Use proper safety precautions, including eye protection and gloves.
- Test all connections for leaks before using the bathtub.
- If you encounter any difficulties, consulting a professional plumber is recommended.
- Follow the manufacturer's instructions carefully.
- Allow ample time for the caulk to cure before using the bathtub.
Conclusion:
Installing a bathtub can be a fulfilling project that enhances the functionality and aesthetics of your bathroom. By following these step-by-step instructions, essential tips, and crucial considerations, you can achieve a successful and lasting installation. Remember to prioritize safety, attention to detail, and a touch of patience throughout the process, and enjoy the transformative beauty of your newly installed bathtub.

How To Build A Custom Tub In 10 Steps 2024 Badeloft

Paper Bathtub Diy Bathroom For Dollhouse Furniture Doll House Origami Miniature Craft

Reverse Engineering How To Make A Bathtub

Mitja Narobe S Wooden Bathtub Build

Making A Bath Panel Ideas And Tips For The Frame Removable

Can Build A Custom Shape Tile Bathtub That Doubles As Shower Make Sure Top Edges Bathroom Designs Tub Combo Inspiration Decor

Birmingham Student Makes Her Own Bath Tub From Plastic Container Live

How To Build A Bathtub Frame Step By Diy Guide
_990x558_90_500X0_90.jpg?strip=all "The Bathtub How To Build Your Own Spa At Home")
The Bathtub How To Build Your Own Spa At Home

How To Make A Stone Bathtub
Related Posts