How to Install a Surround Bathtub: A Comprehensive Guide
Installing a surround bathtub can transform your bathroom into a luxurious and relaxing haven. While it may seem like a complex task, breaking it down into manageable steps makes it accessible to those with basic DIY skills and the appropriate tools. In this comprehensive guide, we'll provide step-by-step instructions to help you install a surround bathtub successfully.
Materials and Tools Required
- Surround bathtub
- Tub flange
- Caulk gun and caulk
- Level
- Wrench
- Screwdriver
- Hammer
- Putty knife
- Measuring tape
- Safety glasses
Step 1: Preparation
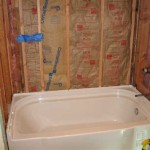
Before you begin the installation process, carefully prepare the installation area. Clear the space around the intended bathtub location, remove any existing fixtures, and clean the floor thoroughly.
Step 2: Installing the Tub Flange
The tub flange is a critical component that prevents water from leaking behind the bathtub. Measure and cut the flange to fit the perimeter of the bathtub base, ensuring that it extends about 1/4 inch above the finished floor height. Using a hammer and nails, secure the flange to the studs on the wall.
Step 3: Positioning the Bathtub
Carefully lift the bathtub and position it on the tub flange. Ensure that the bathtub is level using a spirit level, and adjust its position accordingly. To prevent the bathtub from moving, secure it to the studs on the wall using screws.
Step 4: Connect the Plumbing
Now it's time to hook up the plumbing. Assemble the drain and overflow assemblies according to the manufacturer's instructions. Connect the P-trap to the drain assembly and attach the other end to the existing drainpipe.
Step 5: Seal the Bathtub
To prevent water from seeping under the bathtub, apply a generous bead of caulk along the seam where the bathtub meets the tub flange. Using a putty knife, smooth out the caulk to create a watertight seal.
Step 6: Install the Surround
The surround panels provide a finished look to the bathtub. Start by measuring and cutting the panels to fit the walls around the bathtub. Apply caulk to the back of the panels and press them into place, ensuring they are plumb and level. Use finishing nails or screws to secure the panels.
Step 7: Trim and Caulk
To conceal the gaps between the surround and the bathtub or wall, apply caulk around the perimeter. Use a putty knife to smooth out the caulk and create a seamless finish.
Step 8: Enjoy Your New Bathtub
Congratulations! You have successfully installed a surround bathtub. Allow the caulk to cure for the recommended period before using the bathtub. Once cured, you can relax and enjoy your newly renovated and rejuvenating bathroom space.

How To Install A Bath Tub Surround

How To Install A Bath Tub Surround

How To Install A Bath Tub Surround

3 Ways To Install A Tub Surround Wikihow Life

How To Install A Bathtub An Acrylic Tub And Surround Diy

How To Install A Bath Tub Surround

How To Install A Bath And Shower Surround Delta Classic 400

How To Install Wood Planking On A Bathtub Brepurposed
.jpg?strip=all)
Installing The Ceramic Tile Tub Surround My Old House Ibuildit Ca

How To Install A Glue Up Shower Enclosure The Home Depot
Related Posts

