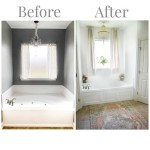
How to Install a Bathtub Wall Surround with a Window
Installing a bathtub wall surround with a window can be a challenging but rewarding DIY project. It can significantly enhance your bathroom's aesthetics and create a spa-like experience. This guide will provide a comprehensive overview of the installation process, encompassing essential steps and considerations for a successful project.
1. Preparation and Planning
Successful installation begins with meticulous preparation. Before initiating the project, carefully measure the bathtub and the surrounding area to determine the precise dimensions of the wall surround. It is essential to choose a high-quality, moisture-resistant material for the surround. Acrylic, PVC, or fiberglass are popular choices due to their durability and ease of maintenance.
Ensure the window opening is compatible with the surround. If necessary, adjust the size of the window or the surround to achieve a seamless fit. Acquiring the proper tools and materials is crucial. These may include a level, tape measure, saw, utility knife, adhesive, caulk, and safety equipment.
2. Installing the Wall Surround
The installation process typically involves several steps. Begin by preparing the existing walls. Remove any existing fixtures, trim, or wall coverings in the area where the surround will be installed. Clean and sanitize the walls thoroughly to ensure proper adhesion. Securely attach the surround panels to the walls using appropriate adhesive or fasteners, following the manufacturer's instructions. Ensure even distribution and alignment for a professional finish.
Prioritize installing the window frame first. Carefully measure the opening and cut the surround to fit the window dimensions. Secure the frame using the specified methods, ensuring a tight and secure fit.
3. Installing the Window
Once the surround is securely installed, focus on installing the window. The window should be a tight fit within the frame, ensuring a proper seal against water and humidity. Ensure the window is level and plumb before securing it in place. Use appropriate sealant or caulk around the window frame to create a waterproof barrier. Consider using a weather stripping or a window gasket to enhance the seal and prevent drafts.
After the window is installed, carefully seal any gaps or seams between the panels and the window frame. Install trim pieces for a finished look, ensuring they are flush with the surrounding surfaces. Apply caulk around the edges of the surround to provide a waterproof seal. Ensure the caulk is smooth and even for an aesthetically pleasing result.
4. Finishing Touches
The final step involves finishing the surround. Thoroughly clean the surface to remove any excess adhesive or sealant. Allow the caulk to cure completely before adding any fixtures or accessories. Install decorative trim around the window and the edges of the surround. Secure the surround to the bathtub with the necessary fasteners or adhesives. Ensure the surround is sturdy and securely attached.
Installing a bathtub wall surround with a window requires careful planning, attention to detail, and adherence to safety precautions. By following these steps, you can transform your bathroom into a sanctuary of comfort and style.

How To Install A Bath Tub Surround

Tub Surround With Window Bathroom Remodel Small Diy Bathtub

Bathroom Makeover Week 2 Bathtub Installation Love Grows Wild

How To Install A Bath Tub Surround

Window Kits For Bath Showers Liberty Home Solutions

Tub Surround With Window Cutout Bathroom Design Remodel Shower Guest

Window Kits For Bath Showers Liberty Home Solutions

How To Install A Bath Tub Surround

Solution To The Large Window In Shower Simple Diy Cover

How To Install Fiberglass Tub Surround Easy
Related Posts