How To Install a Bathtub Surround
Installing a bathtub surround is a significant home improvement project that can dramatically enhance the aesthetic appeal and functionality of a bathroom. A properly installed surround not only provides a visually pleasing backdrop for the bathtub but also protects the surrounding walls from water damage and mildew growth. This article provides a comprehensive guide to the installation process, outlining the necessary tools, materials, and techniques required to achieve a professional-looking result.
Before commencing the installation, a thorough assessment of the existing bathroom structure is crucial. Evaluate the condition of the existing walls surrounding the bathtub. Look for signs of water damage, mold, or structural issues. Addressing these problems before installing the surround is essential to prevent future complications. If the existing walls are severely damaged, they may need to be repaired or replaced before proceeding.
Furthermore, measure the dimensions of the bathtub and the surrounding area accurately. These measurements will determine the size and type of surround needed. Choose a surround material that complements the bathroom's overall design and meets the desired level of durability and water resistance. Common materials include acrylic, fiberglass, and tile. Each material has its own advantages and disadvantages in terms of cost, ease of installation, and maintenance requirements.
Key Point 1: Preparation and Material Selection
The success of any bathtub surround installation hinges on meticulous preparation and careful selection of materials. This phase involves not only assessing the existing conditions and taking accurate measurements but also gathering the necessary tools and ensuring a clean and organized workspace.
Begin by gathering the following tools and materials:
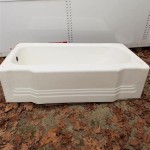
*Bathtub surround kit (acrylic, fiberglass, or tile)
*Measuring tape
*Level
*Utility knife
*Caulk gun
*Silicone caulk (mildew-resistant)
*Construction adhesive
*Safety glasses
*Gloves
*Screwdriver or drill (depending on the surround type)
*Saw (for cutting the surround panels to size, if necessary)
*Putty knife or scraper
*Clean rags
*Drop cloths
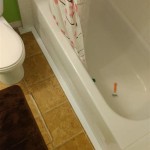
Prior to installing the surround, ensure the bathtub is clean and free of any debris. Cover surrounding surfaces with drop cloths to protect them from adhesive or caulk spills. Remove any existing fixtures that may interfere with the installation, such as shower rods or soap dishes. If the existing walls are painted or have wallpaper, consider removing them to ensure a better bond for the construction adhesive. If removing wallpaper, use a wallpaper steamer or chemical remover to loosen the adhesive and scrape it off the wall surface.
The choice of surround material depends on individual preferences, budget considerations, and the overall aesthetic of the bathroom. Acrylic surrounds are lightweight, durable, and relatively easy to install. Fiberglass surrounds are more affordable but may be less durable than acrylic. Tile surrounds offer a wide range of design options but require more time and skill to install. When selecting a surround kit, ensure it is compatible with the dimensions of the bathtub and the surrounding walls. Read the manufacturer's instructions carefully to understand the specific installation requirements for the chosen product.
Once the materials are gathered, it is advisable to unpack the surround panels and inspect them for any damage. Familiarize oneself with the layout of the panels and the order in which they will be installed. Dry-fitting the panels before applying adhesive can help identify any potential problems and ensure a proper fit. This step allows for adjustments to be made before committing to the final installation.
Furthermore, prepare the wall surfaces to receive the surround panels. Clean the walls thoroughly with a mild detergent and water to remove any dirt, grease, or soap scum. Rinse the walls with clean water and allow them to dry completely. Ensure the walls are smooth and free of any protruding nails or screws. If there are any imperfections in the wall surface, such as cracks or holes, fill them with a patching compound and sand them smooth before proceeding.
Key Point 2: Installation Procedure
The installation procedure involves carefully applying adhesive to the surround panels and attaching them to the prepared wall surfaces. Accuracy and attention to detail are essential to ensure a watertight and visually appealing result. The following steps outline the typical installation process for a multi-piece bathtub surround:
1.
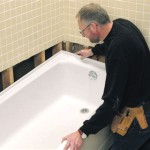
Apply Construction Adhesive:
Apply a generous bead of construction adhesive to the back of each surround panel, following the manufacturer's instructions. Typically, the adhesive is applied in vertical strips or a grid pattern, ensuring full coverage across the entire surface of the panel. Avoid applying excessive adhesive, as it can squeeze out from the edges and create a messy appearance.2.
Position and Attach the Panels:
Carefully position the first surround panel against the wall, aligning it with the top edge of the bathtub and the adjacent walls. Use a level to ensure the panel is plumb and square. Press the panel firmly against the wall to ensure good contact with the adhesive. Secure the panel in place with clamps or shims, if necessary, to prevent it from shifting while the adhesive dries.3.
Install Remaining Panels:
Repeat the process for the remaining surround panels, overlapping the edges of adjacent panels according to the manufacturer's instructions. Ensure the panels are aligned properly and that the seams are tight and flush. Use clamps or shims to hold the panels in place while the adhesive dries.4.
Allow Adhesive to Cure:
Allow the construction adhesive to cure completely according to the manufacturer's recommendations. This typically takes 24 to 48 hours. Avoid using the bathtub or shower during this time to prevent the panels from shifting or dislodging.5.
Caulk the Seams:
Once the adhesive has cured, apply a bead of mildew-resistant silicone caulk to all seams and joints around the surround. This will create a watertight seal and prevent water from penetrating behind the panels. Use a caulk gun to apply the caulk evenly and smoothly. Smooth the caulk bead with a wet finger or a caulk smoothing tool to create a professional-looking finish. Wipe away any excess caulk with a damp rag.6.
Install Fixtures:
Reinstall any fixtures that were removed prior to the installation, such as shower rods or soap dishes. Ensure the fixtures are securely attached and properly sealed to prevent water leaks.When working with tile surrounds, the installation process is more complex and requires specialized tools and techniques. Tile installation involves applying mortar to the wall surface and setting the tiles in place, ensuring they are level and evenly spaced. Grouting is then applied to fill the gaps between the tiles. This process requires precision and attention to detail to achieve a professional-looking result.
Key Point 3: Sealing and Finishing Touches
The final stage of bathtub surround installation involves sealing the seams and joints to prevent water damage and adding finishing touches to enhance the overall appearance. Proper sealing is crucial for maintaining the integrity of the surround and preventing mold or mildew growth.
After the construction adhesive has fully cured and the caulk has been applied, inspect all seams and joints for any gaps or imperfections. If any gaps are found, apply additional caulk to ensure a complete and watertight seal. Pay particular attention to the corners of the surround, as these areas are prone to water penetration.
Allow the caulk to dry completely before using the bathtub or shower. Refer to the manufacturer's instructions for the recommended drying time. Once the caulk is dry, test the surround for leaks by running water along the seams and joints. Check for any signs of water penetration behind the panels. If any leaks are detected, apply additional caulk to the affected areas.
To enhance the appearance of the surround, consider adding decorative trim or molding around the edges. This can help conceal any imperfections and create a more finished look. Choose trim or molding that complements the style of the bathroom and is resistant to moisture. Install the trim or molding using construction adhesive and finish nails.
Clean the surround thoroughly with a mild detergent and water to remove any dirt, dust, or adhesive residue. Use a soft cloth or sponge to avoid scratching the surface of the surround. Rinse the surround with clean water and dry it with a clean towel.
Proper maintenance is essential for prolonging the life of the bathtub surround and preventing mold or mildew growth. Clean the surround regularly with a mild detergent and water. Avoid using abrasive cleaners or scouring pads, as they can damage the surface of the surround. Wipe down the surround after each use to remove excess water and soap scum. Ensure adequate ventilation in the bathroom to prevent moisture buildup. Inspect the surround regularly for any signs of damage or leaks and address any problems promptly.
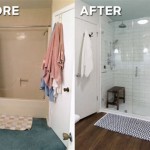
Installing a bathtub surround is a rewarding project that can significantly improve the look and functionality of a bathroom. By following these detailed instructions and taking the necessary precautions, a homeowner can achieve a professional-looking result and enjoy a refreshed and updated bathing space.

How To Install A Bath Tub Surround

How To Install A Bath Tub Surround

How To Install A Bath Tub Surround

3 Ways To Install A Tub Surround Wikihow Life

How To Install A Bathtub An Acrylic Tub And Surround Diy

How To Install A Glue Up Shower Enclosure The Home Depot

How To Install A Bath Tub Surround

How To Install Wood Planking On A Bathtub Brepurposed

The Complete Guide To Installing Tile On Shower Or Bathtub Walls

How To Install A Bathtub And Shower Wall Set