How to Install an Aloha Bathtub
Installing a new bathtub, such as an Aloha model, can significantly enhance a bathroom's aesthetics and functionality. While professional installation is always an option, a competent homeowner with some plumbing and carpentry experience can successfully complete this project. This article provides a comprehensive guide to installing an Aloha bathtub, covering essential preparation, step-by-step instructions, and necessary precautions. Adhering to these guidelines ensures a secure and functional installation.
Before commencing any installation, gather all required tools and materials. This proactive measure streamlines the process and minimizes potential delays. The following list outlines the essential items:
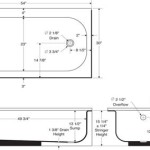
* Aloha Bathtub (ensure the correct model and dimensions) * Level * Measuring tape * Pencil or marker * Wrench (adjustable or pipe wrench) * Screwdrivers (Phillips and flathead) * Plumber's putty * Plumber's tape (Teflon tape) * Caulk gun and silicone caulk * Safety glasses * Gloves * Drop cloths or protective sheeting * Shims (wooden or plastic) * Drain assembly (strainer, overflow, and waste shoe) * Optional: Bathtub surround or tiling materialsProper preparation of the bathroom is paramount for a smooth installation. This involves removing the old bathtub, inspecting the subfloor, and ensuring the plumbing is correctly positioned.
Removing the Existing Bathtub
The first step involves safely disconnecting the water supply to the existing bathtub. Locate the shut-off valves for both hot and cold water lines feeding the faucet. Turn these valves off completely. Open the existing faucet to release any residual water pressure in the pipes. Failure to disconnect the water supply can result in significant water damage and pose a safety hazard.
Next, detach the drain assembly. This typically involves loosening the nut connecting the drain pipe to the bathtub's drain flange. Place a bucket underneath the drainpipe to catch any remaining water. Once the drain is disconnected, proceed to remove any caulk or sealant around the perimeter of the old bathtub. A utility knife or a caulk removal tool can be used for this purpose. Exercise caution to avoid damaging the surrounding walls or flooring.
Determine how the old bathtub is secured to the wall studs. Some bathtubs are nailed or screwed directly to the studs, while others are held in place by adhesive or a flange. Remove any fasteners using appropriate tools. If the bathtub is particularly heavy or difficult to maneuver, seek assistance from another person to avoid injury.
Carefully lift the old bathtub out of its enclosure. Depending on the size and weight of the bathtub, it may be necessary to break it into smaller pieces for easier removal. Dispose of the old bathtub according to local regulations.
Inspecting and Preparing the Subfloor
With the old bathtub removed, thoroughly inspect the subfloor for any signs of damage, such as rot, water damage, or insect infestation. Address any issues before proceeding with the new installation. Repair or replace damaged sections of the subfloor as needed. A level subfloor is essential for proper bathtub support and prevents potential issues with water drainage.
Clean the subfloor thoroughly to remove any debris, dirt, or adhesive residue. A vacuum cleaner or a broom can be used for this purpose. Ensure the subfloor is dry before proceeding. Apply a waterproofing membrane to the subfloor, especially in areas prone to moisture, such as around the drain opening. This helps prevent water from seeping into the subfloor and causing damage.
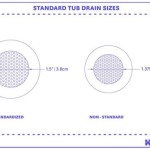
Verify the drain opening is properly sized and positioned to align with the new Aloha bathtub's drain. If necessary, adjust the drain opening to ensure a proper fit. Install the appropriate drain adapter according to the manufacturer's instructions. This adapter connects the bathtub's drain to the existing plumbing system.
Installing the Drain Assembly
The drain assembly is a critical component of any bathtub installation. Ensure all the parts are present and undamaged before commencing. The drain assembly typically consists of a strainer, overflow, and waste shoe, connected to each other.
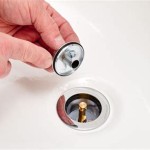
Apply a bead of plumber's putty around the underside of the strainer flange. Insert the strainer into the drain opening of the Aloha bathtub. From underneath the bathtub, attach the waste shoe to the strainer using the provided hardware. Tighten the connection securely, ensuring the plumber's putty creates a watertight seal. Wipe away any excess plumber's putty with a damp cloth.
Install the overflow assembly, which prevents the bathtub from overflowing. The overflow assembly typically consists of a pipe that connects to the drainpipe. Ensure the overflow assembly is properly aligned and securely connected to the bathtub and the drainpipe. Use plumber's tape (Teflon tape) on threaded connections to create a watertight seal.
Test the drain assembly for leaks before proceeding with the final installation. Fill the Aloha bathtub with a small amount of water and check for leaks around the strainer, overflow, and waste shoe. If any leaks are detected, tighten the connections or reapply plumber's putty and Teflon tape as needed.
Installing the Aloha Bathtub
Carefully position the Aloha bathtub into the prepared enclosure. Ensure the bathtub is level in both directions. Use a level to check the bathtub's alignment and adjust as needed. Shims can be used to level the bathtub on uneven surfaces. Place the shims underneath the bathtub's support legs or rim to achieve a level surface. Apply a thin bead of construction adhesive to the shims to secure them in place.
Once the bathtub is level, secure it to the wall studs using screws or nails. Pre-drill pilot holes to prevent the wood from splitting. Ensure the fasteners are properly sized and spaced to provide adequate support for the bathtub. The Aloha bathtub should be firmly anchored to the wall studs to prevent movement or shifting.
Connect the drainpipe to the drain assembly. Use a wrench to tighten the connections securely. Apply plumber's tape (Teflon tape) to threaded connections to create a watertight seal. Test the drain connection for leaks by filling the bathtub with water and checking for any signs of leakage. Address any leaks promptly to prevent water damage.
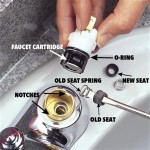
Connect the water supply lines to the faucet. Ensure the hot and cold water lines are properly identified and connected to the corresponding inlets on the faucet. Use flexible supply lines to facilitate the connection. Tighten the connections securely, using a wrench. Apply plumber's tape (Teflon tape) to threaded connections to create a watertight seal. Turn on the water supply and check for leaks around the faucet connections. Address any leaks promptly.
Finishing the Installation
Apply a bead of silicone caulk around the perimeter of the Aloha bathtub, where it meets the wall. This creates a watertight seal and prevents water from seeping behind the bathtub. Use a caulk gun to apply the caulk smoothly and evenly. Smooth the caulk bead with a wet finger or a caulk smoothing tool.
Install the bathtub surround or tile the walls around the bathtub. Follow the manufacturer's instructions for installing the chosen surround or tiling materials. Ensure the surround is properly sealed to prevent water from penetrating the walls. Grout the tiles to create a watertight and aesthetically pleasing finish.
Install the faucet handles, spout, and showerhead, if applicable. Follow the manufacturer's instructions for installing these fixtures. Ensure all connections are properly tightened and sealed to prevent leaks. Test the faucet and showerhead to ensure they are functioning correctly.
Clean the Aloha bathtub and the surrounding area thoroughly. Remove any debris, caulk residue, or grout haze. Inspect the installation for any imperfections or potential issues. Address any problems promptly to ensure a secure and functional installation.

Bootz Industries Aloha 60 In X 30 Soaking Bathtub With Right Drain White 011 3364 00 The Home Depot

Bootz Industries Aloha 60 In X 30 Soaking Bathtub With Left Drain White 011 3365 00 The Home Depot

Bootz Industries Aloha 60 In X 30 Soaking Bathtub With Left Drain White 011 3365 00 The Home Depot

Part 1 How To Install New Tub Level It Connect Drain And Overflow Plumbing Diy Atlanta Ga

Bootzcast Bathtub Review And Installation Scrappy Geek

Bootz 011 3365 00 Aloha 60 X 30 Porcelain Enamel Alcove Bathtub In White Af Supply

Bootz Industries Aloha Plus 60 In X 32 Soaking Bathtub With Right Drain White 011 2366 00 The Home Depot

Aloha Ohana 60 X 30 Porcelain Enamel Alcove Right Hand Drain Bathtub In White

Bootz 011 3365 00 Aloha 60 X 30 Porcelain Enamel Alcove Bathtub In White Af Supply

Bootz Industries Aloha Plus 60 In X 32 Soaking Bathtub With Left Drain White 011 2367 00
Related Posts