How to Install a Sunken Bathtub: A Comprehensive Guide
Installing a sunken bathtub, also known as a Roman tub or a recessed bathtub, can significantly enhance the aesthetic appeal and functionality of a bathroom. This type of installation creates a seamless transition between the bathroom floor and the bathing space, offering a modern and luxurious feel. However, installing a sunken bathtub is a complex project that requires careful planning, specialized skills, and adherence to plumbing and building codes. This article provides a comprehensive guide to the process, outlining the necessary steps and considerations.
Before commencing any installation, it is paramount to ensure compliance with local building codes and regulations. These codes often dictate specific requirements for plumbing, electrical work (if the tub includes features like jets or lighting), and structural modifications. Failing to adhere to these codes can result in costly rework, fines, and safety hazards. Contacting the local building department or a qualified building inspector is crucial to obtain the necessary permits and to understand the specific regulations governing sunken bathtub installations in the area.
The weight of a filled sunken bathtub can be substantial. Therefore, it is necessary to verify that the existing floor structure can adequately support the weight of the tub, water, and the bather(s). This is particularly crucial in older homes or in installations on upper floors. A structural engineer should be consulted to assess the floor's load-bearing capacity and recommend any necessary reinforcements. This might involve adding additional joists, reinforcing existing joists, or even modifying the subfloor to ensure adequate structural integrity.
Planning and Preparation: Laying the Groundwork for Success
The success of a sunken bathtub installation hinges on meticulous planning. This involves accurately measuring the bathroom space, selecting the appropriate bathtub size and style, and creating a detailed installation plan. Consider the overall bathroom layout, traffic flow, and desired aesthetic. A bathtub that is too large can overwhelm the space, while one that is too small may not provide the desired comfort. Furthermore, the installation plan should include the location of plumbing connections (supply lines and drain), electrical connections (if applicable), and any necessary modifications to the existing floor structure.
Selecting the appropriate bathtub is crucial. Sunken bathtubs come in various shapes, sizes, and materials, including acrylic, cast iron, fiberglass, and copper. Each material offers different advantages and disadvantages in terms of durability, heat retention, weight, and cost. Cast iron tubs are known for their excellent heat retention but are very heavy, requiring significant floor support. Acrylic tubs are lighter and more affordable but may not retain heat as effectively. Fiberglass tubs are also lightweight and inexpensive but are less durable than acrylic or cast iron. Consider the pros and cons of each material before making a decision.
Before any demolition or construction begins, it is essential to gather all the necessary tools and materials. This typically includes: the chosen bathtub, plumbing fittings (pipes, elbows, connectors), drain assembly, leveling shims, construction adhesive, waterproofing membrane, mortar or concrete mix (for creating a base), safety glasses, gloves, measuring tape, level, saw (for cutting subfloor and framing), drill, and a mixing tool (for mortar or concrete). Having all the tools and materials readily available will streamline the installation process and minimize delays.
Protecting adjacent areas from dust, debris, and potential damage is crucial. Cover flooring, fixtures, and furniture with plastic sheeting or drop cloths. Use painter's tape to secure the edges of the protective coverings. Ensure adequate ventilation during demolition and construction to minimize the buildup of dust and fumes. Consider using a dust collection system to further mitigate dust pollution.
Demolition and Framing: Creating the Recessed Space
The first step in the physical installation is the careful demolition of the existing floor where the bathtub will be recessed. This typically involves removing the existing flooring (tile, linoleum, or wood), subfloor, and potentially even sections of the floor joists. Exercise caution during demolition to avoid damaging surrounding structures, plumbing lines, or electrical wiring. Use appropriate tools, such as a reciprocating saw or a circular saw, to cut through the flooring and subfloor.
Once the demolition is complete, the framing for the recessed area needs to be constructed. This framing will provide support for the bathtub and ensure that it is level and stable. Typically, this involves building a box-like structure using pressure-treated lumber. The dimensions of the frame should be slightly larger than the bathtub's outer dimensions to allow for adjustments and shimming. Ensure that the frame is square and level before proceeding.
The new framing needs to be securely attached to the existing floor joists. This can be achieved using screws, nails, or construction adhesive. The spacing between the framing members should be adequate to support the weight of the bathtub and the water it will hold. Consult with a structural engineer or a building professional to determine the appropriate framing configuration for the specific bathtub and floor structure.
Plumbing and electrical work might be necessary before installing the bathtub. This includes relocating or extending drainpipes and water supply lines. If the bathtub includes features like jets or lighting, electrical wiring needs to be installed according to local electrical codes. Engage a licensed plumber and electrician to perform these tasks, ensuring compliance with all applicable regulations and safety standards.
Installation and Finishing: Securing and Waterproofing the Tub
Before placing the bathtub into the framed recess, it is crucial to prepare a level and stable base. This is typically achieved by pouring a layer of mortar or concrete mix into the bottom of the recess. The thickness of the base will depend on the specific bathtub and the desired depth of the recessed area. Use a level to ensure that the base is perfectly flat and level. Allow the mortar or concrete to cure completely before proceeding.
Carefully lower the bathtub into the framed recess, ensuring that it rests securely and evenly on the prepared base. Use leveling shims to make any necessary adjustments to ensure that the bathtub is perfectly level. Connect the drain assembly to the drainpipe, ensuring a tight and leak-proof connection. Connect the water supply lines to the bathtub's faucets or valves, again ensuring secure and leak-proof connections.
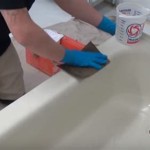
Waterproofing the area around the bathtub is critical to prevent water damage and mold growth. Apply a waterproof membrane to the seams between the bathtub and the surrounding floor and walls. This membrane can be a liquid-applied membrane, a sheet membrane, or a combination of both. Ensure that the membrane extends sufficiently beyond the edge of the bathtub to provide adequate protection. Follow the manufacturer's instructions carefully when applying the waterproofing membrane.
Once the waterproofing is complete, the surrounding floor can be finished. This typically involves installing tile, stone, or another waterproof flooring material. Ensure that the flooring is properly sealed and grouted to prevent water penetration. The transition between the flooring and the edge of the bathtub should be smooth and seamless to create a visually appealing and functional space.
After the flooring is installed, install any necessary trim or molding around the bathtub to conceal the edges of the flooring and create a finished look. This trim can be made of wood, PVC, or metal, depending on the desired aesthetic. Ensure that the trim is properly sealed to prevent water damage.
After the installation is complete, thoroughly inspect all plumbing connections for leaks. Turn on the water supply and fill the bathtub to its maximum capacity. Check for any leaks around the drain, faucets, and supply lines. If any leaks are detected, immediately shut off the water supply and repair the leaks before proceeding.

3 Installation Tips For Sunken Tubs Seattle Bathtub Guy

How To Build A Sunken Tub Hunker

How To Replace A Sunken Tub Hunker

What Is A Sunken Bathtub Introduction And Examples Badeloft

Is A Sunken Tub Right For You

48 Dreamy Sunken Bathtubs To Relax In Digsdigs

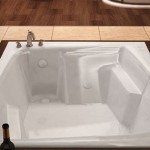
Sunken Bathtub With Steps Why Are They Gaining Popularity Decoholic

The Sunken Bathtub Stunning In Floor Ideas For Your Home Spa Batherich Bath

The Benefits Of A Sunken Bathtub Thebath Com

20 Sunken Bathtubs Full Of Elegance And Relaxation Decoist