How To Install A Lift And Turn Bathtub Drain
The installation of a lift and turn bathtub drain is a common plumbing task that homeowners can undertake. This type of drain offers a simple mechanism for opening and closing the drain, controlled by lifting and turning the stopper. Proper installation prevents leaks and ensures efficient drainage, contributing to the longevity and functionality of the bathtub. Understanding the process is essential for a successful installation.
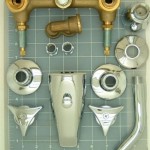
Before beginning the installation, it is crucial to gather the necessary tools and materials. This typically includes a new lift and turn drain assembly, adjustable pliers, a screwdriver (usually a flathead), plumber's putty, a clean rag or paper towels, a waste and overflow wrench (also known as a tub drain wrench), and potentially a penetrating oil if the old drain is difficult to remove. Safety glasses are also recommended to protect the eyes from debris.
The installation process generally involves removing the old drain, preparing the drain opening, installing the new drain assembly, and testing for leaks. Each of these steps requires careful attention to detail to ensure a watertight seal and proper operation of the drain.
Removing the Old Bathtub Drain
The first step in installing a new lift and turn bathtub drain is the removal of the existing drain. This process can vary in difficulty depending on the age and condition of the old drain. Corrosion and mineral buildup can make the removal challenging, requiring patience and the use of appropriate tools.
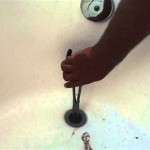
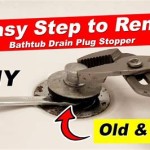
Begin by attempting to unscrew the existing drain stopper. Some lift and turn mechanisms have a small setscrew that needs to be loosened first, usually located on the side of the stopper. Use a small screwdriver to loosen this screw. Once loosened, try to unscrew the stopper by hand. If the stopper is stuck, applying penetrating oil around the base of the stopper and letting it sit for a while can help loosen it.
After removing the stopper, the drain flange (the part that sits flush with the bathtub surface) needs to be removed. This is typically achieved using a waste and overflow wrench. Insert the wrench into the drain opening, ensuring that the teeth of the wrench grip the inside of the drain flange. Turn the wrench counterclockwise to loosen the flange. If the flange is severely corroded or stuck, applying penetrating oil and tapping the flange gently with a hammer can help break the seal.
In some cases, the drain flange might be connected to the drain pipe with a nut located underneath the bathtub. Access to this nut might require access through an access panel, or potentially through the ceiling below the bathtub. If the nut is present, use adjustable pliers or a wrench to loosen and remove it. Once the nut is removed, the drain flange can be pushed up and out of the drain opening.
Once the drain flange is removed, clean the drain opening thoroughly. Remove any old plumber's putty or sealant from the surface. A putty knife or scraper can be used to carefully remove the old material. Ensure the surface is clean and dry before proceeding to the next step.
Preparing the Drain Opening
Proper preparation of the drain opening is critical for ensuring a watertight seal with the new drain assembly. Any debris or imperfections on the sealing surface can lead to leaks, compromising the integrity of the installation.
After removing the old drain and cleaning the area, inspect the drain opening for any damage or irregularities. Look for cracks, chips, or rough spots on the bathtub surface around the drain opening. If any damage is present, it may be necessary to repair the surface before installing the new drain. Minor imperfections can sometimes be addressed with a thin layer of epoxy or sealant designed for bathtub repair.
Thoroughly clean the drain opening and the surrounding area with a clean rag or paper towel. Remove any remaining debris, dirt, or grease. A mild detergent or cleaning solution can be used to ensure the surface is clean. Rinse the area with clean water and dry it completely before proceeding.
Inspect the drain pipe itself for any signs of corrosion or damage. If the drain pipe is severely corroded, it may be necessary to replace it. This is a more complex plumbing task and may require professional assistance. If the drain pipe is in good condition, ensure that it is clean and free of any obstructions.
Once the drain opening and drain pipe are clean and inspected, the area is ready for the installation of the new drain assembly. Ensure that all surfaces are dry before proceeding to the next step.
Installing the New Lift and Turn Drain Assembly
The installation of the new lift and turn drain assembly requires careful attention to detail to ensure a watertight seal and proper operation of the drain. This process involves applying plumber's putty, assembling the drain components, and tightening the connections.
Begin by applying a generous amount of plumber's putty to the underside of the drain flange. Roll the putty into a rope shape and press it firmly onto the underside of the flange, ensuring that the entire surface is covered. The putty will create a watertight seal between the flange and the bathtub surface.
Insert the drain flange through the drain opening from the top of the bathtub. Press down firmly on the flange to ensure that the putty makes good contact with the bathtub surface. Excess putty will squeeze out from under the flange. This excess putty should be removed with a clean rag or paper towel. Smooth the remaining putty around the edge of the flange to create a neat and clean appearance.
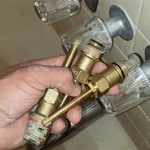
From underneath the bathtub, attach the drain body to the drain flange. Depending on the type of drain assembly, this may involve screwing the drain body directly onto the flange or using a nut to secure the connection. Ensure that the threads are properly aligned before tightening the connection. Use adjustable pliers or a wrench to tighten the connection securely. Do not overtighten, as this could damage the drain assembly or the bathtub.
Connect the overflow tube to the drain body. The overflow tube is the vertical pipe that connects the overflow opening on the bathtub to the drain assembly. Ensure that the overflow tube is properly aligned and that the connections are tight. Use the appropriate connectors and seals to ensure a watertight connection.
Install the lift and turn stopper into the drain flange. Follow the manufacturer's instructions for installing the stopper. This typically involves inserting the stopper into the drain opening and tightening a setscrew to secure it in place. Adjust the height of the stopper as needed to ensure that it properly seals the drain opening when closed and allows water to drain freely when open.
Once the drain assembly is fully installed, carefully inspect all connections for any signs of leaks. Tighten any loose connections as needed. Allow the plumber's putty to cure for the recommended time before using the bathtub.
Testing for Leaks
After installing the new lift and turn bathtub drain, it is essential to test for leaks to ensure the installation is watertight. This step involves filling the bathtub with water and carefully observing the drain assembly for any signs of leakage. Addressing any leaks promptly prevents water damage and ensures the longevity of the installation.
Before filling the bathtub, double-check all connections to ensure they are properly tightened. Pay particular attention to the connections between the drain flange, the drain body, and the overflow tube. Ensure that the lift and turn stopper is properly installed and that it seals the drain opening when closed.
Close the lift and turn stopper and begin filling the bathtub with water. Fill the bathtub to a level above the overflow opening. This will test the integrity of both the drain and the overflow connections.
Carefully inspect the drain assembly and the surrounding area for any signs of leaks. Look for water dripping from any of the connections or from the drain pipe itself. Use a flashlight to inspect hard-to-reach areas. If any leaks are detected, immediately stop filling the bathtub and address the leaks.
If a leak is detected, determine the source of the leak and tighten the corresponding connection. If the leak persists after tightening the connection, it may be necessary to disassemble the connection and reapply plumber's putty or sealant. Ensure that the surfaces are clean and dry before reassembling the connection.
Once all leaks have been addressed, drain the bathtub and thoroughly dry the drain assembly and the surrounding area. Inspect the area again for any signs of residual water or dampness. If no leaks are present, the installation is complete.
Regularly inspect the bathtub drain for any signs of leaks or damage. Promptly address any issues to prevent water damage and ensure the longevity of the drain assembly.

How To Replace Bathtub Drain Stopper With A Lift And Turn Diy

Watco Lift And Turn Replacement Bath Tub Stopper Installation

Cannot Un The Knob From Lift And Turn Bathtub Stopper R Fixit

Danco Lift And Turn Tub Drain Stopper In Chrome 88599 The Home Depot

1st Simple Instructions How To Remove A Bathtub Stopper Lift And Turn Bathroom Tub Shower

Sento Chrome Lift And Turn Bathtub Drain Assembly Stopper Kit Fit Both 1 2 Inch Or 5 8 Strainer Heavy Duty Metal With Matching S Easy Installation Polished Com

How To Remove A Bathtub Drain The Home Depot

Tub Stopper Universal Bathtub Drain Pop Cover Temu

How To Replace A Bathtub Drain Stopper With Lift And Turn Old Shower Installation

Removing A Lift Turn Stopper 1 Step
Related Posts