How to Install a Kohler Bathtub Faucet
Installing a Kohler bathtub faucet is a relatively straightforward process that can be completed with the right tools and a little time. This article will provide a step-by-step guide to help you install your new Kohler faucet successfully. Kohler faucets are known for their quality and durability, making them a popular choice for homeowners looking to upgrade their bathroom fixtures. This guide will walk you through the installation process, ensuring you have a functional and stylish faucet in your bathroom.
Gathering the Necessary Tools and Materials
Before you begin, ensure you have all the necessary tools and materials on hand. This will make the installation process smoother and more efficient. Here's a list of what you'll need:
- Kohler bathtub faucet
- Adjustable wrench
- Channel-lock pliers
- Phillips head screwdriver
- Flat-head screwdriver
- Plumber's tape
- Pipe thread sealant
- Bucket
- Towels
- Safety glasses
- Work gloves
It's essential to have the correct faucet model and the appropriate replacement parts. Check your Kohler faucet's installation instructions for specific requirements and recommended tools.
Step-by-Step Installation Guide
With your tools and materials ready, follow these steps to install your Kohler bathtub faucet:
1. Turn Off the Water Supply
Safety is paramount. Before doing any plumbing work, turn off the water supply to your bathroom. Locate the shut-off valves for the hot and cold water lines supplying your bathtub and close them completely. Next, drain the bathtub to avoid any water spillage and ensure the area is clean and dry. Use a bucket to catch any remaining water in the pipes.
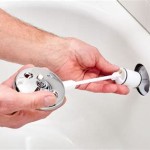
2. Remove the Old Faucet
Use the adjustable wrench to loosen the nuts securing the old faucet to the tub spout. With the nuts loosened, gently pull the old faucet out from the tub spout. If the old faucet is stubborn, use channel-lock pliers to grip the spout or faucet body to prevent it from slipping. Be careful not to damage the tub spout or surrounding surfaces.
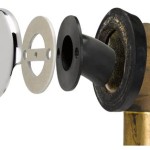
3. Prepare the Tub Spout
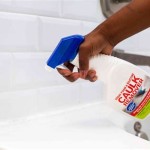
Once the old faucet is removed, thoroughly clean the tub spout and its threads. Remove any debris, mineral buildup, or old sealant. Wrap a layer of plumber's tape around the threads of the tub spout, ensuring it's tight and secure. The plumber's tape creates a watertight seal, preventing leaks.
4. Install the New Tub Spout
Connect the new tub spout to the faucet body according to the manufacturer's instructions. Use the adjustable wrench to tighten the nuts securing the tub spout, but avoid overtightening. Test the connection by turning the spout slightly; it should feel firm and secure. If you encounter any resistance, loosen the connection slightly.
5. Connect the Faucet to the Water Lines
Connect the hot and cold water lines to the faucet body. Apply a layer of pipe thread sealant to the threads of the water lines before attaching them to the faucet. Tighten the nuts using the adjustable wrench, but avoid overtightening. Remember to connect the correct water line to the corresponding hot and cold inlets on the faucet body.
6. Install the Faucet Handle(s) and Lever
Install the faucet handles and lever according to the manufacturer's instructions. Typically, the handles screw onto the body of the faucet. Use the Phillips head screwdriver to tighten the screws, but avoid overtightening. Once the handles are installed, ensure they turn smoothly and freely.
7. Test the New Faucet
After completing the installation, turn the water supply back on gradually. Check for any leaks at the connections. If you notice any leaks, you may need to re-tighten the nuts or apply more pipe thread sealant. If necessary, consult the manufacturer's instructions for specific troubleshooting steps.
8. Final Touches
Once the faucet is leak-free, clean up any spills or debris. Wipe down the faucet and surrounding areas with a clean towel. You may need to adjust the faucet's handle positioning for optimal comfort and ease of use. Enjoy your newly installed Kohler bathtub faucet!
Safety Precautions
Remember to prioritize safety throughout the installation process. Always turn off the water supply before working on the faucet. Use work gloves and safety glasses to protect your hands and eyes. If you're unsure about any aspect of the installation, consulting with a qualified plumber is always recommended.

Learn How To Remove And Install Various Tub Spouts

Pt 2 Diy Kohler Purist Faucet Valve Install Mariposa Bathtub Home How To Bathroom Remodel Renovation

Replace Diverter Bathtub Spout Kohler K Gp85556 Cp With Slip Fit Connection

Installation Worth Bath And Shower Faucet

Kohler Faucets Finial Series Tub Spout Replaced

Replace Diverter Bathtub Spout Kohler K Gp85556 Cp With Slip Fit Connection

Kohler Oil Rubbed Broe Universal Fit Bathtub Spout With Diverter 389 2bz At Com

Learn How To Remove And Install Various Tub Spouts

Installation Avail Bath And Shower Faucet

Installation Worth Bath And Shower Faucet