How To Fix Stuck Bathtub Faucet Diverters In Singapore
Bathtub faucet diverters, commonly found in Singaporean homes, direct water flow either to the tub spout for filling the bathtub or to the showerhead for showering. These diverters can become stuck or difficult to operate over time, leading to frustration and inconvenience. Understanding the common causes and implementing appropriate solutions is crucial for maintaining a properly functioning bathroom.
The malfunction of a bathtub faucet diverter typically stems from several factors. Mineral buildup, particularly prevalent in Singapore’s water supply, is a significant contributor. The hard water leaves deposits of calcium and magnesium, which accumulate within the diverter mechanism, hindering its smooth operation. Corrosion, especially in older faucets, can also seize the diverter components. Furthermore, the rubber O-rings and seals within the diverter assembly degrade over time, losing their elasticity and ability to create a watertight seal, resulting in stiffness and difficulty in switching between the tub spout and showerhead.
Addressing a stuck bathtub faucet diverter requires a systematic approach, starting with diagnosis and progressing through cleaning, lubrication, or replacement of components. Safety is paramount, and the water supply must be shut off before any repair work is undertaken. This article outlines a step-by-step guide to troubleshoot and rectify various scenarios of a stuck bathtub faucet diverter, specifically tailored to the context of Singaporean households.
Identifying the Diverter Type
Before attempting any repairs, it is essential to identify the type of diverter installed in the bathtub faucet. There are three main types commonly encountered in Singapore:
1. Lift-Rod Diverter: This type features a small rod or knob located on the tub spout. Lifting the rod diverts water to the showerhead, and pushing it down directs water to the tub spout. These are mechanically simple but prone to mineral buildup and corrosion.
2. T-handle Diverter: This diverter has a T-shaped handle, usually positioned above the tub spout. Turning the handle diverts the water flow. Like the lift-rod type, these are susceptible to mineral deposits and wear on internal components.
3. In-Faucet Diverter: This type integrates the diverter mechanism directly within the faucet valve body. The diverter is controlled by pulling or pushing the faucet handle, or by rotating a collar on the faucet. These are generally more complex to repair than the other two types and often require specialized tools or professional assistance.
Correctly identifying the diverter type is crucial for selecting the appropriate repair methods and obtaining the correct replacement parts, if necessary.
Troubleshooting a Stuck Lift-Rod Diverter
A stuck lift-rod diverter is a common issue and often resolvable with basic tools and cleaning supplies. The initial step involves inspecting the rod and spout for any visible signs of mineral buildup. White or greenish deposits are indicative of calcium and copper corrosion. The following steps detail the process of resolving issues with a lift-rod diverter:
1. Shut Off the Water Supply: Locate the shut-off valves for the bathtub faucet, typically located under the sink or behind an access panel. Turn the valves clockwise to stop the water flow. If individual shut-off valves are not available, the main water supply to the entire house must be shut off.
2. Loosen the Diverter Rod: Gently attempt to move the diverter rod up and down. If it is completely stuck, apply a penetrating oil, such as WD-40 or a similar lubricant, around the base of the rod where it enters the spout. Allow the lubricant to sit for approximately 15-20 minutes to penetrate the mineral buildup.
3. Remove the Tub Spout: Most tub spouts are either threaded or slip-on. Threaded spouts can be unscrewed by rotating them counterclockwise. Slip-on spouts are secured with a set screw, typically located on the underside of the spout. Loosen the set screw with an Allen wrench and gently pull the spout away from the wall. Be prepared for residual water to drain out.
4. Clean the Diverter Mechanism: Once the spout is removed, the diverter mechanism is accessible. Clean the diverter valve and the surrounding area with a brush and a descaling solution. A mixture of white vinegar and water (1:1 ratio) is an effective descaling agent. Scrub away any mineral deposits and rinse thoroughly with clean water.
5. Lubricate the Diverter: Apply a silicone-based plumber's grease to the diverter rod and the internal components of the diverter mechanism. This will help to ensure smooth operation and prevent future corrosion.
6. Reassemble the Tub Spout: Reinstall the tub spout, ensuring it is securely tightened (for threaded spouts) or that the set screw is properly tightened (for slip-on spouts). Test the diverter by turning the water supply back on. The diverter should now move freely and effectively switch between the tub spout and showerhead.
If the diverter remains stuck after these steps, the internal components may be severely corroded or damaged, necessitating replacement of the entire tub spout.
Repairing a T-Handle Diverter
T-handle diverters also encounter issues due to mineral buildup and internal corrosion. Repairing a T-handle diverter often involves disassembling the handle and cleaning or replacing the internal components. The following steps outline the repair process:
1. Shut Off the Water Supply: As with the lift-rod diverter, ensure the water supply is shut off before commencing any repairs. Locate and close the appropriate shut-off valves.
2. Remove the T-Handle: The T-handle is typically secured with a set screw located on the side or underneath the handle. Use an Allen wrench to loosen the set screw and carefully pull the handle off the diverter stem. Some handles may be press-fit and require gentle but firm pulling.
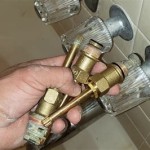
3. Disassemble the Diverter Valve: Once the handle is removed, the diverter valve assembly is exposed. This assembly usually consists of a bonnet or cap that holds the valve stem in place. Unscrew the bonnet using a wrench or pliers. Be cautious, as the bonnet may be tight due to corrosion.
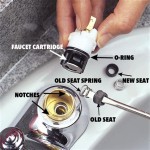
4. Remove and Inspect the Valve Stem: Carefully remove the valve stem from the valve body. Inspect the stem, O-rings, and other internal components for signs of wear, corrosion, or mineral buildup. Pay particular attention to the condition of the O-rings, as these are often the source of leaks and stiffness.
5. Clean or Replace Damaged Components: Clean all components with a brush and a descaling solution (white vinegar and water mixture). Remove any mineral deposits. If the O-rings are cracked, brittle, or damaged, they must be replaced. Obtain replacement O-rings of the correct size and material from a plumbing supply store.
6. Lubricate and Reassemble: Apply silicone-based plumber's grease to the valve stem, O-rings, and the inside of the valve body. This will ensure smooth operation and prevent future corrosion. Reassemble the valve stem into the valve body, and tighten the bonnet securely. Reattach the T-handle and tighten the set screw.
7. Test the Diverter: Turn the water supply back on and test the diverter. The T-handle should move smoothly and effectively divert the water flow between the tub spout and showerhead. Check for any leaks around the valve stem or bonnet. If leaks persist, ensure the bonnet is properly tightened or re-examine the O-rings for correct installation.
If the T-handle diverter continues to malfunction after these steps, the internal valve body may be damaged or severely corroded, requiring replacement of the entire faucet assembly.
Addressing In-Faucet Diverter Problems
In-faucet diverters, being integrated directly into the faucet valve body, are more complex to repair. The specific repair procedure varies depending on the faucet model. The following are general guidelines for troubleshooting and addressing issues with in-faucet diverters, but consulting the faucet manufacturer's instructions is strongly recommended:
1. Shut Off the Water Supply: This is a fundamental safety precaution before undertaking any plumbing repairs. Close the appropriate shut-off valves.
2. Identify the Faucet Model: Knowing the faucet model is crucial for obtaining the correct replacement parts and accessing detailed repair instructions. The model number is often printed on the faucet body or can be found in the original installation documentation.
3. Consult the Manufacturer's Instructions: Refer to the faucet manufacturer's website or documentation for specific instructions on disassembling and repairing the diverter mechanism. These instructions will provide detailed diagrams and step-by-step guidance.
4. Disassemble the Faucet: Follow the manufacturer's instructions to carefully disassemble the faucet. This typically involves removing the faucet handle, escutcheon, and any retaining screws or nuts. Be extremely careful not to damage any components during disassembly.
5. Access the Diverter Mechanism: Once the faucet is disassembled, the diverter mechanism will be accessible. This mechanism may be a cartridge-style diverter or a series of internal valves and seals.
6. Inspect and Clean the Diverter: Inspect the diverter components for signs of wear, corrosion, or mineral buildup. Clean all components with a brush and a descaling solution. Pay close attention to the condition of any O-rings or seals.
7. Replace Worn or Damaged Components: If any components are worn, damaged, or corroded, replace them with genuine replacement parts from the faucet manufacturer. Ensure that the replacement parts are the correct size and type for the specific faucet model.
8. Lubricate and Reassemble: Apply silicone-based plumber's grease to all moving parts and seals. This will ensure smooth operation and prevent future corrosion. Reassemble the faucet according to the manufacturer's instructions. Ensure that all components are properly aligned and securely tightened.
9. Test the Faucet: Turn the water supply back on and test the faucet. The diverter should function smoothly and effectively divert the water flow between the tub spout and showerhead. Check for any leaks around the faucet body or handle. If leaks persist, re-examine the assembly and ensure that all components are properly installed.
Due to the complexity of in-faucet diverter repairs, it may be necessary to consult a qualified plumber, particularly if the faucet is an older model or if the repair requires specialized tools or expertise. Improper disassembly or reassembly can damage the faucet and lead to further problems.

Shower Tub Diverter Quick Fix Pull Spout Repair For Sticky Leaky

Diy How To Fix Shower Tub Stuck Spout Vinegar Diverter Bathtub

Tub Faucet Spout Diverter Pull Lever Broke Off Diy Fix

Troubleshooting A Stuck Shower Faucet Diverter Doityourself Com

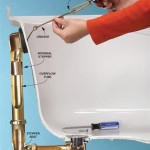
Repair Leaking Tub Spout Diverter Pull In Shower Mode

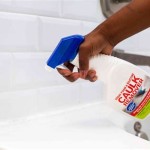
Loosen Your Tub S Stuck Faucet Diverter With This Handy Household Spray

How To Replace A Slip On Tub Spout Diverter

How To Replace Or Fix Tub Spout Not Working

How To Repair A Shower Diverter Mr Rooter Blog

How To Replace A Bathtub Diverter Spout
Related Posts