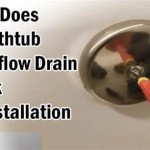
How To Fix a Pop-Up Bathtub Stopper
Pop-up bathtub stoppers are a common plumbing fixture designed to prevent water from draining while bathing. However, due to their mechanical complexity and constant exposure to water and debris, they are prone to malfunctions. A malfunctioning pop-up stopper can lead to several inconveniences, including a tub that won't drain, a stopper that won't stay open, or a stopper that is difficult to operate. Addressing these issues promptly can prevent more significant plumbing problems and ensure the proper functioning of the bathtub.
This article provides a comprehensive guide to troubleshooting and repairing common problems associated with pop-up bathtub stoppers. It outlines the tools required for the job, explains the different types of pop-up stoppers, and details the steps involved in diagnosing and fixing various malfunctions. By understanding the mechanics of these stoppers and following the instructions provided, homeowners can often resolve these issues without the need for a professional plumber.
Identifying the Type of Pop-Up Bathtub Stopper
Before attempting any repairs, it's crucial to identify the specific type of pop-up stopper installed in the bathtub. Different types of stoppers have different mechanisms and require different repair approaches. Some common types include:
Lift-and-Turn Stoppers: These stoppers feature a knob on top that is turned to raise or lower the stopper. They are typically simple in design and relatively easy to repair. They generally have a screw that connects the knob to the plunger below.
Push-and-Pull Stoppers: These stoppers are operated by pushing down on them to close the drain and pulling them up to open it. They often have a spring mechanism that can wear out over time. Sometimes these are also referred to as "toe-touch" stoppers.
Trip-Lever Stoppers: These stoppers are connected to a lever, typically located on the overflow plate, which is used to raise or lower the stopper. The linkage between the lever and the stopper can be complex and prone to issues.
Pop-Up Drain Stoppers (Standard): This is a general category that includes stoppers activated by direct pressure. These stoppers pop up when the water is released and can be manually manipulated. Some have a simple rocker arm mechanism underneath.
Identifying the type of stopper will greatly simplify the repair process and ensure that the correct tools and techniques are used.
Tools and Materials Required for Repair
Having the right tools and materials on hand is essential for a successful repair. The specific tools needed will vary depending on the type of stopper and the nature of the problem, but some common items include:
Screwdrivers: A set of screwdrivers, including both Phillips head and flathead types, is necessary for removing screws and adjusting components.
Pliers: Pliers, particularly needle-nose pliers, are useful for gripping and manipulating small parts. Channel-lock pliers can also be helpful for loosening stubborn connections.
Adjustable Wrench: An adjustable wrench is needed for loosening and tightening nuts and bolts.
Penetrating Oil: Applying penetrating oil to corroded or stuck parts can help loosen them.
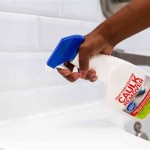
Plumber's Putty: Plumber's putty is used to create a watertight seal around the stopper assembly.
Replacement Parts: Depending on the problem, it may be necessary to replace worn or damaged parts, such as the stopper itself, the linkage, or the spring mechanism. Visit a local hardware store to find matching components.
Clean Rags: Clean rags are helpful for wiping away dirt and debris.
Flashlight or Headlamp: A flashlight or headlamp provides illumination in the often-dark area under the bathtub.
Gloves: Gloves protect the hands from dirt and grime.
Small Bucket or Container: A small bucket or container can catch any water or debris that comes out during the repair process.
Troubleshooting Common Pop-Up Stopper Problems
Before disassembling the stopper, it's essential to diagnose the problem. Here are some common issues and their potential causes:
Stopper Won't Open or Close: This could be caused by a buildup of hair and debris, a misadjusted linkage, or a broken part. Inspect the visible parts for obstructions and check the linkage underneath the tub.
Stopper Won't Stay Open or Closed: This is often due to a worn-out spring mechanism, a loose connection, or a misadjusted linkage. Ensure that all connections are tight and that the spring is functioning correctly.
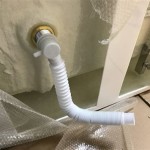
Slow Drain: While not always a problem with the stopper itself, a slow drain can be caused by hair and debris obstructing the stopper or the drainpipe. Remove the stopper and clean the drain thoroughly.
Water Leaks Around the Stopper: This could be due to a damaged seal or improperly applied plumber's putty. Remove the stopper and inspect the seal. Reapply plumber's putty if necessary, ensuring a complete and watertight seal.
Difficult to Operate: If the stopper is hard to turn, push, or pull, it may be due to corrosion or a buildup of debris. Apply penetrating oil to the moving parts and try to clean away any obstructions.
Step-by-Step Repair Guide for Different Stopper Types
Once the problem has been diagnosed, the next step is to repair the stopper. The repair process will vary depending on the type of stopper.
Repairing a Lift-and-Turn Stopper:
1. Inspect the Stopper: Begin by visually inspecting the stopper for any obvious signs of damage or debris. Remove the stopper by unscrewing the knob on top.
2. Clean the Stopper: Clean the stopper thoroughly, removing any hair or debris that may be obstructing its movement. A small brush or toothpick can be helpful for this task.
3. Check the Plunger: Examine the plunger beneath the stopper for any damage or wear. Replace the plunger if necessary. The plunger is the part that actually blocks the drain.
4. Adjust the Screw: Adjust the screw that connects the knob to the plunger. Tightening or loosening this screw can affect the stopper's ability to open and close properly. Experiment with small adjustments and test the stopper after each adjustment.
5. Reassemble and Test: Reassemble the stopper and test its operation. Ensure that it opens and closes smoothly and creates a watertight seal.
Repairing a Push-and-Pull Stopper:
1. Remove the Stopper: Pull the stopper straight up and out of the drain. This may require some force, but avoid using excessive force, as this could damage the stopper.
2. Clean the Stopper and Drain: Clean both the stopper and the drain opening, removing any hair or debris. A bent wire or a specialized drain cleaning tool can be used to remove debris from the drainpipe.
3. Inspect the Spring Mechanism: Check the spring mechanism for any signs of wear or damage. Replace the spring if necessary. The spring is located on the underside of the stopper.
4. Lubricate the Stopper: Apply a small amount of silicone grease to the stopper to help it move smoothly. Avoid using oil-based lubricants, as these can attract dirt and debris.
5. Reinstall and Test: Reinstall the stopper and test its operation. It should pop up and down smoothly and create a watertight seal.
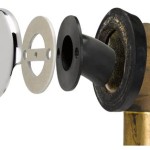
Repairing a Trip-Lever Stopper:
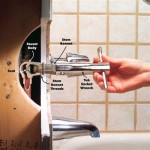
1. Locate the Overflow Plate: Locate the overflow plate on the side of the bathtub. This plate covers the overflow drain and houses the trip lever.
2. Remove the Overflow Plate: Remove the screws holding the overflow plate in place and carefully pull the plate away from the bathtub. Be prepared for some water to spill out.
3. Inspect the Linkage: Examine the linkage connecting the trip lever to the stopper. This linkage may consist of a series of rods and levers. Look for any broken or disconnected parts.
4. Adjust the Linkage: Adjust the linkage as needed to ensure that the stopper opens and closes properly. This may involve tightening or loosening screws, bending the rods, or replacing worn parts. Sometimes the linkage has a series of holes that can be adjusted to change the length of the lever arm.
5. Clean the Stopper: Inspect and clean the stopper itself. Debris can interfere with the stopper's ability to seal correctly.
6. Reassemble and Test: Reassemble the overflow plate and test the operation of the trip lever. The stopper should open and close smoothly, and the tub should drain properly.
Addressing Slow Drains and Leaks
Apart from the mechanisms of the stopper itself, related problems such as slow drains and leaks often require additional attention.
Clearing a Slow Drain
A slow drain can often be resolved by removing the hair and debris that accumulate in the drainpipe. After removing the pop-up stopper, use a bent wire, a specialized drain cleaning tool (such as a Zip-It), or a drain snake to remove any obstructions. Be careful not to damage the drainpipe while using these tools. In some cases, pouring boiling water down the drain can help dissolve grease and soap buildup. Avoid using chemical drain cleaners, as these can damage the pipes and pose a safety hazard.
Sealing Leaks Around the Stopper
Leaks around the stopper can be caused by a damaged seal or improperly applied plumber's putty. Remove the stopper and clean the area around the drain opening. Apply a generous amount of plumber's putty to the underside of the stopper flange, ensuring that it creates a watertight seal when the stopper is reinstalled. Press the stopper firmly into place and remove any excess putty. Allow the putty to cure for the recommended time before using the bathtub.
Preventive Maintenance for Pop-Up Stoppers
Preventive maintenance can help prolong the life of the pop-up stopper and prevent future problems. Regularly remove the stopper and clean it, along with the drain opening, to remove hair and debris. Avoid using harsh chemicals or abrasive cleaners, as these can damage the stopper and the drainpipe. Periodically lubricate the moving parts of the stopper with silicone grease to ensure smooth operation. Check the stopper regularly for signs of wear or damage and replace any worn or damaged parts promptly.
By following these steps, homeowners can effectively troubleshoot and repair common problems associated with pop-up bathtub stoppers, ensuring the proper functioning of their bathtubs and avoiding costly plumbing repairs.

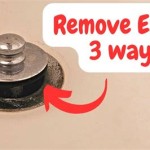
Remove Pop Up Bath Tub Drain Stopper 3 Ways

How To Remove Pop Up Tub Stopper Easy Method

How To Remove A Bathtub Drain The Home Depot

How To Fix A Bathtub Or Sink Pop Up Stopper

So Easy How To Remove A Watco Pop Up Drain Plug

How To Remove A Bathtub Drain Stopper

How To Stop A Drain From Leaking Pop Up

Matte Black Universal Bathtub Drain Stopper Pop Up Brass Tub Ez Install

Replace Your Bathtub Drain Like A Pro Using The Right Tools

How To Fix A Sink Or Bathtub Pop Up Drain Stopper
Related Posts