How to Fix a Pop-Up Bathtub Drain Stopper
A malfunctioning pop-up bathtub drain stopper is a common household nuisance. The inability to properly drain or retain water renders the bathtub useless. Often, the issue stems from accumulated hair, soap scum, and other debris hindering the stopper's mechanism. Correcting this problem typically involves a few simple steps, potentially avoiding a costly plumber visit. This article provides detailed instructions on diagnosing and resolving common issues with pop-up bathtub drain stoppers.
Removing the Pop-Up Stopper
The first step in addressing a faulty pop-up drain stopper is to remove it from the drain assembly. Various types of stoppers exist, each requiring a slightly different removal technique. Identifying the stopper type ensures the appropriate method is employed, minimizing the risk of damage.
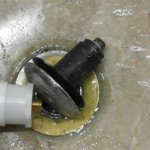
Lift-and-Turn Stoppers: This type features a knob on top of the stopper that needs to be turned to either lock or unlock it. To remove, rotate the stopper to its open position. Then, firmly grasp the knob and attempt to lift the entire stopper assembly straight up. Some may require slight wiggling to dislodge them from the drain housing. If resistance is encountered, check for a small set screw located on the side of the stopper body, near the top. Loosen this screw with a small screwdriver (typically a flathead or Allen wrench), which will release the stopper. Once the screw is loosened, the stopper should lift out easily.
Press-and-Seal Stoppers: These stoppers operate by pressing down on the stopper's head to seal the drain and pressing again to release it. Removal often involves unthreading the stopper. Grip the stopper head firmly and rotate it counterclockwise. If the stopper spins freely without loosening, there may be a nut beneath the stopper head that needs to be held with pliers while turning the stopper itself. Once unthreaded, the stopper can be lifted out of the drain.
Toe-Touch Stoppers: Similar to press-and-seal stoppers, toe-touch stoppers are activated by pressing down with a toe. However, their removal is usually more involved. Begin by attempting to unthread the stopper like a press-and-seal type. If it doesn't unscrew, inspect the stopper head for a small opening or indentation. Some toe-touch stoppers have a hidden screw beneath a decorative cap that can be pried off with a small flathead screwdriver. Once the screw is exposed, loosen it, and the stopper should then be able to be lifted out.
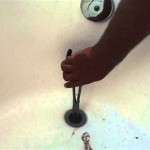
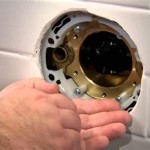
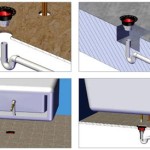
Pop-Up Stoppers with Linkage: These stoppers are connected to a lever, often located on the overflow plate (a circular plate usually positioned a few inches below the bathtub faucet). This linkage controls the stopper's up-and-down movement. To remove this type of stopper, begin by removing the overflow plate. This usually involves unscrewing one or two screws holding the plate in place. Once the plate is removed, carefully pull out the linkage assembly. The stopper itself will be connected to the bottom of this linkage and can usually be detached by a simple clip or swivel mechanism. If the stopper appears stuck, gently wiggle the linkage to free it.
Before proceeding, take a photograph of the drain and stopper assembly. This visual aid can be invaluable when reassembling the mechanism, ensuring that all parts are aligned correctly.
Cleaning the Stopper and Drain Components
Once the stopper is removed, thoroughly clean it and the surrounding drain area. This addresses the most common cause of stopper malfunction: the accumulation of hair, soap scum, and other debris.
Cleaning the Stopper: Use an old toothbrush or scrub brush to remove any visible debris from the stopper's surface. Pay particular attention to crevices and areas around any moving parts. A solution of warm water and dish soap is often sufficient for cleaning. For stubborn grime, consider using a specialized bathroom cleaner or a diluted solution of vinegar and water. Rinse the stopper thoroughly with clean water after cleaning.
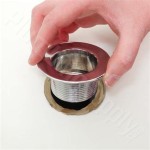
Cleaning the Drain: With the stopper removed, examine the drain opening for visible clogs. Use a bent wire hanger or a specialized drain cleaning tool (such as a drain snake or a barbed plastic drain cleaning tool) to remove any hair or debris lodged in the drain. Insert the tool into the drain opening and rotate it to snag any obstructions. Carefully pull out the tool, removing the collected debris. Repeat this process until no more debris is retrieved. After removing visible obstructions, flush the drain with hot water to clear any remaining residue. Alternatively, a mixture of baking soda and vinegar can be used. Pour about a cup of baking soda down the drain, followed by a cup of vinegar. Let the mixture fizz for approximately 30 minutes, then flush with hot water. This can help dislodge stubborn build-up.
For stoppers with linkage, carefully inspect and clean the linkage assembly as well. This includes removing any debris from the pivot points and ensuring that the linkage moves freely. Lubricating the pivot points with a silicone-based lubricant can also improve the linkage's performance.
After cleaning, inspect the stopper and drain components for any signs of damage, such as cracks, corrosion, or worn-out seals. If damage is found, the affected parts may need to be replaced.
Adjusting the Stopper Mechanism
If cleaning the stopper and drain doesn't resolve the issue, the problem may lie in the stopper's adjustment. Pop-up stoppers, particularly those with linkage, often require adjustment to ensure proper sealing and operation.
Adjusting Stoppers with Linkage: The most common adjustment point for linkage-style stoppers is the clevis strap, a metal strap that connects the overflow lever to the stopper mechanism. This strap usually has multiple holes that allow the length of the linkage to be adjusted. By changing the hole to which the connecting rod is attached, the height of the stopper can be raised or lowered. To adjust, remove the connecting rod from its current hole and reinsert it into a different hole. A higher hole will raise the stopper, while a lower hole will lower it. Once the adjustment is made, reassemble the overflow plate and test the stopper's operation. If the stopper still doesn't seal properly, repeat the adjustment process until the desired seal is achieved.
Another adjustment point may be located on the stopper itself. Some stoppers have a threaded section near the bottom that allows for fine-tuning of the stopper's height. By rotating this threaded section, the stopper can be raised or lowered slightly. This is particularly useful for achieving a perfect seal when the clevis strap adjustment is insufficient.
Adjusting Lift-and-Turn and Toe-Touch Stoppers: These stoppers typically have less adjustment capability. However, some models may have a small adjustment screw located on the side of the stopper or beneath a decorative cap. This screw can be used to fine-tune the stopper's height or tension. Consult the manufacturer's instructions for specific adjustment procedures for these types of stoppers.
When making adjustments, it's essential to test the stopper's operation frequently to ensure that the desired result is achieved. Over-adjusting the stopper can lead to problems such as difficulty in opening or closing the drain, or damage to the stopper mechanism.
After adjusting the stopper, lubricate any moving parts with a silicone-based lubricant. This will help ensure smooth operation and prevent future sticking or binding.
If adjusting the stopper mechanism fails to correct the problem, it may indicate that parts are worn or damaged and require replacement. Replacement parts can often be found at hardware stores or online retailers.
Reassembling the stopper after cleaning and adjustment should be done carefully, referring to the photograph taken before disassembly. Ensure that all parts are correctly aligned and securely fastened. Test the stopper's operation after reassembly to confirm that the problem has been resolved. If the stopper continues to malfunction, consider consulting a qualified plumber for assistance.

Bathroom Repair How To A Pop Up Tub Drain Stopper

Remove Pop Up Bath Tub Drain Stopper 3 Ways

How To Fix A Bathtub Or Sink Pop Up Stopper

How To Remove Pop Up Tub Stopper Easy Method

How To Remove A Bathtub Drain The Home Depot

So Easy How To Remove A Watco Pop Up Drain Plug

How To Remove Bathtub Drain Stopper

Plumbing Replacing The Popup Tub Drain Plug Home Improvement Stack Exchange

Matte Black Universal Bathtub Drain Stopper Pop Up Brass Tub Ez Install

Replace Your Bathtub Drain Like A Pro Using The Right Tools
Related Posts