How To Fix a Leaky Bathtub Faucet with Double Handles
A leaky bathtub faucet can be an annoying and wasteful problem. Fortunately, many leaks are caused by common issues that can be repaired with basic tools and a little know-how. This article will guide you through the steps to diagnose and fix a leaking bathtub faucet with double handles.
Step 1: Identify the Source of the Leak
The first step in fixing a leaky faucet is to determine the source of the leak. Observe the faucet carefully when it's turned on and off. Is the leak coming from the spout, the handle, or the base of the faucet? Knowing the source will help you identify the specific problem causing the leak.
Common Leak Locations and Potential Causes:
- Spout: Worn-out O-rings or washers, a corroded spout, or a loose connection.
- Handle: Worn-out O-rings or washers, a damaged stem, or a loose handle.
- Base of the faucet: Loose connections, worn-out O-rings, or a corroded body.
Step 2: Gather the Necessary Tools and Supplies
Before you begin the repair process, gather the following tools and supplies:
- Adjustable wrench
- Channel-lock pliers
- Phillips screwdriver
- Flathead screwdriver
- Basin wrench (optional)
- Plumber's tape
- New faucet washers (O-rings)
- Replacement stem (if damaged)
- Replacement cartridge (if applicable)
- Bucket or basin to catch water
- Gloves (optional)
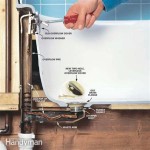
Step 3: Shut Off the Water Supply
Before disassembling the faucet, it's crucial to shut off the water supply. Locate the shut-off valve for the bathtub, usually found on the wall behind the faucet. Turn the valve clockwise until it's completely closed.
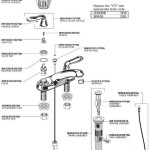
Step 4: Remove the Handle
The handle removal process varies depending on the faucet model. Generally, you'll find a set screw on the handle's underside. Use a Phillips or flathead screwdriver to loosen and remove the set screw. Some faucets have a decorative cap that needs to be removed before the handle is loosened. Once the set screw is removed, carefully pull the handle off.
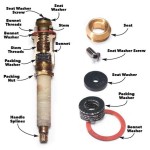
Step 5: Inspect and Replace Worn Components
Once the handle is removed, you can access the internal components. Carefully inspect the O-rings and washers for wear and tear. If they are cracked, brittle, or deformed, they'll need to be replaced. Look for any signs of corrosion on the stem or cartridge. If you find damage, replace the stem or cartridge as needed.
Step 6: Reassembly and Testing
After replacing worn components, reassemble the faucet in reverse order. Ensure all connections are tight and secure. Turn the water supply back on gradually and check for leaks. If the leak persists, repeat the inspection and replacement steps, ensuring to check all parts for proper seating and engagement.
If the leak persists after replacing components, you may have a more complex problem that requires professional assistance. A plumber can identify and repair any underlying issues like a damaged valve or a cracked faucet body.

Repairing A Leaky Two Three Handle Tub Shower Faucet

How To Fix A Leaking Bathtub Faucet Diy Family Handyman

How To 008 Leaking Bathtub Faucet Delta Handle Removal

Fix A Leaky Tub Faucet With Two Handles

Diy Bathtub Faucet Repair

How To Fix A Leaking Dripping Delta Bathtub Faucet 2

How To Fix A Leaky Bathtub Faucet 6 Ways Stop Drips

How To Fix A Leaking Bathtub Faucet The Home Depot

How To Fix Dripping Faucet Bathtub And Kitchen

2 Handle Shower Faucet Replacement 1 Tom Plumber
Related Posts