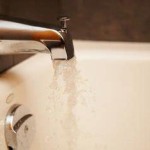
How to Fix a Leaking Bathtub Faucet When the Shower Is On
A leaking bathtub faucet when the shower is in use is a common plumbing issue that can be both annoying and wasteful. It signifies that water is being diverted to the faucet even when it should be exclusively directed to the showerhead. This problem not only leads to unnecessary water consumption, potentially increasing water bills, but can also contribute to mineral buildup and staining in the bathtub due to the constant dripping. Furthermore, ignoring the issue can potentially lead to more significant plumbing problems down the line. Understanding the underlying causes and learning how to address this issue is crucial for home maintenance.
Diagnosing the precise cause of the leak is the first step towards resolving the problem. Several components within the faucet and shower valve system can contribute to this issue. The most frequent culprits include worn or damaged diverter valves, faulty cartridges, and deteriorated O-rings or seals. Understanding the function of each component and how its malfunction can lead to a leak is essential for effective troubleshooting.
Identifying the Root Cause
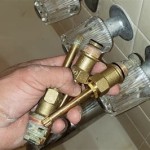
The diverter valve is a critical component responsible for directing water flow either to the bathtub faucet or the showerhead. Its primary function is to seal off one outlet while opening the other. Diverter valves come in several types, each with its own mechanism. A lift-rod diverter, commonly found on older faucets, uses a vertical rod that, when pulled, lifts a gate to block the faucet outlet and redirect water to the showerhead. A tee-handle diverter, often located in the center of the faucet, rotates to shift the water flow. Cartridge-style diverters use a single handle to control both water temperature and direction. Regardless of the type, wear and tear, mineral buildup, or damage to the internal components of the diverter valve can compromise its ability to properly seal, resulting in water leaking from the faucet when the shower is on.
A faulty cartridge, especially in single-handle faucets, can also contribute to the issue. The cartridge is a cylindrical component that controls the mixing of hot and cold water and the overall water flow. Over time, the cartridge can become worn, cracked, or clogged with mineral deposits. This deterioration can disrupt the intended water flow, causing leaks from the faucet even when the shower is engaged. Inspecting the cartridge for any signs of damage or mineral buildup is essential for determining whether it is the source of the problem.
O-rings and seals play a crucial role in creating watertight connections within the faucet and shower valve assembly. These small, rubber or silicone rings are positioned at joints and connections to prevent water from escaping. Over time, these rings can dry out, crack, or become brittle due to exposure to water and temperature fluctuations. When O-rings and seals deteriorate, they lose their ability to effectively seal the connections, leading to leaks. Identifying the specific location of the leaking O-ring or seal requires careful inspection of the faucet and valve components.
Replacing a Diverter Valve
Replacing a diverter valve generally involves shutting off the water supply to the bathroom at the main shut-off valve. This is a critical step to prevent water damage during the repair. Once the water is shut off, the faucet handles or knobs must be removed, typically by unscrewing a small set screw located on the side or beneath the handle. With the handles removed, the faucet escutcheon (the decorative plate covering the valve body) can be unscrewed or pried off carefully.
The next step involves removing the existing diverter valve. Depending on the style of the valve, this may involve unscrewing it from the valve body or pulling it out after releasing a retaining clip or screw. It is crucial to take note of the orientation of the old valve before removing it to ensure the new valve is installed correctly. Clean the valve body thoroughly to remove any mineral deposits or debris that may interfere with the new valve's seal.
Install the new diverter valve by aligning it with the valve body and securing it in place. Ensure the retaining clip or screw is properly fastened. Reassemble the faucet components, including the escutcheon and handles. Turn the water supply back on slowly and test the faucet and shower to ensure the leak is resolved and the diverter valve is functioning correctly. Observing for any leaks around the valve body or handles is essential during the testing phase.
Replacing a Cartridge
Replacing a faucet cartridge follows a similar process of shutting off the water supply and removing the faucet handles. Depending on the faucet design, accessing the cartridge may require removing the handle adapter or a decorative cap. Once the cartridge is exposed, a retaining clip or nut will need to be removed to release the cartridge from the valve body. Special cartridge puller tools are available to assist in removing stubborn cartridges that are stuck due to mineral buildup.
Carefully remove the old cartridge, noting its orientation. Before installing the new cartridge, lubricate it with plumber's grease to facilitate smooth operation and prevent future sticking. Insert the new cartridge into the valve body, ensuring it is properly aligned according to the manufacturer's instructions. Secure the cartridge with the retaining clip or nut.
Reassemble the faucet components, including the handle adapter or cap, handles, and escutcheon. Turn the water supply back on slowly and test the faucet for leaks. Adjust the handle to ensure proper hot and cold-water mixing and water flow control. Continuous monitoring is crucial to ensure the cartridge operates without any leaks.
Replacing O-Rings and Seals
Replacing O-rings and seals requires disassembling the faucet and shower valve components to access the affected areas. Before disassembling, documenting the location and orientation of each component is advisable by taking pictures. This will help during reassembly.
Once the components are disassembled, carefully remove the old O-rings and seals using a small pick or screwdriver. Be cautious not to scratch or damage the surrounding surfaces. Clean the grooves or channels where the O-rings and seals were located to remove any debris or mineral deposits.
Lubricate the new O-rings and seals with plumber's grease before installing them. This will help them slide into place and create a better seal. Ensure the O-rings and seals are properly seated in their respective grooves or channels. Reassemble the faucet and shower valve components, following the documentation taken during disassembly. Turn the water supply back on slowly and test for leaks around the replaced O-rings and seals.
When addressing a leaking bathtub faucet, especially one that leaks when the shower is in use, safety precautions should be observed. Always turn off the water supply before beginning any repairs. Working with water and plumbing components presents a risk of electrical shock if the plumbing is not properly grounded. Exercise caution when using tools to avoid injury. If uncomfortable with any part of the repair process, consulting a qualified plumber is recommended. Ignoring the problem will increase water wastage and lead to expensive repairs.

How To Fix A Leaking Bathtub Faucet The Home Depot

Fix Leaking Shower Head Or Bathtub Faucet Rebuild Replace Valve

How To Fix A Leaking Bathtub Faucet Diy Family Handyman

Easy Fix For Leaking Bathtub Faucet Diverter W Shower

How To Fix A Leaking Bathtub Faucet The Home Depot

How To Fix A Leaking Bathtub Faucet The Home Depot

How To Fix A Leaking Bathtub Faucet The Home Depot

How To Fix A Leaking Bathtub Faucet Diy Family Handyman

How To Fix Shower Tub Faucet Leaks

Leak How Do I Prevent This Bath Faucet From Leaking While The Shower Is Running Home Improvement Stack Exchange