How To Fix a Leaking Bathtub Drain Stopper
A leaking bathtub drain stopper can be a source of significant frustration and wasted water. Even a slow drip can add up over time, increasing water bills and potentially leading to water damage in surrounding areas. Identifying the type of stopper and understanding the common causes of leaks are crucial first steps in resolving the problem. This article details common causes, troubleshooting steps, and repair methods for different types of bathtub drain stoppers to effectively eliminate leaks.
Before attempting any repairs, it is important to properly identify the type of drain stopper installed in the bathtub. Common types include lift-and-turn, pop-up, toe-touch, push-and-pull, and trip-lever drain stoppers. Each type has a slightly different mechanism, and understanding this mechanism is key to diagnosing and fixing the leak. Safety precautions should also be observed. This includes turning off the water supply to the bathtub if necessary and wearing gloves to protect hands during the repair process.
Identifying the Leak Source and Stopper Type
The first step in fixing a leaking bathtub drain stopper is to accurately pinpoint the source of the leak. Observing the drain area while the bathtub is filled with a small amount of water is recommended. If water is visibly leaking past the stopper, the problem likely lies within the stopper mechanism or the seal between the stopper and the drain opening. If the leak seems to be coming from around the drain flange (the metal ring surrounding the drain opening), the issue could be a deteriorated plumber's putty seal or a loose drain flange.
To determine the stopper type, examine its appearance and how it operates. A lift-and-turn stopper has a knob on top that is turned to raise or lower the stopper. A pop-up stopper usually works with a lever located on the overflow plate (the plate near the top of the bathtub drain). A toe-touch stopper is activated by pressing it with a toe. A push-and-pull stopper is operated by pushing it down to close and pulling it up to open. A trip-lever stopper uses a lever, typically located on the overflow plate, connected to an internal linkage that controls the stopper's position.
Once the stopper type is identified, a targeted approach to troubleshooting and repair can then be implemented. Each type of stopper has common issues that are more likely to cause leaks.
Troubleshooting and Repairing Common Stopper Types
Each bathtub drain stopper type requires a unique approach to diagnosis and repair. Here’s how to address common issues with each type:
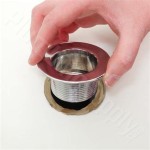
Lift-and-Turn Stoppers: These stoppers often leak due to a worn or misaligned rubber seal at the bottom. To fix this, the stopper typically needs to be unscrewed from its base. Once removed, the rubber seal should be inspected for damage, such as cracks or wear. If damaged, the seal should be replaced with a new one of the correct size. Before reinstalling the stopper, the drain opening should be cleaned of any debris or buildup. When reinstalling, ensure the stopper is properly aligned and tightened.
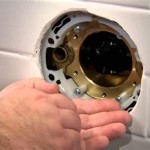
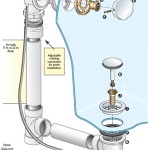
Pop-Up Stoppers: Leaks in pop-up stoppers are often caused by a misadjusted or corroded linkage inside the overflow pipe. To access the linkage, the overflow plate must be removed. Removing the plate will reveal the linkage, which usually consists of a rod and a spring. The linkage should be inspected for corrosion or damage. The adjustment point on the linkage, often a screw or clip, should be located. Minor adjustments to this point can change the height and seal of the stopper. If the linkage is significantly corroded or damaged, replacing the entire assembly might be necessary. Before reinstalling the overflow plate, testing the stopper's operation is recommended.
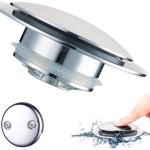
Toe-Touch Stoppers: These stoppers can leak when the internal mechanism becomes clogged with hair or debris, or when the rubber seal wears out. To remove the stopper, it typically needs to be unscrewed. There may be a small screw or set screw holding it in place. After removing the stopper, it should be thoroughly cleaned to remove any accumulated debris. The rubber seal should be inspected and replaced if necessary. Reassembling the stopper and testing its operation is the final step.
Push-and-Pull Stoppers: Like toe-touch stoppers, push-and-pull stoppers can leak due to debris buildup or seal wear. To remove the stopper, it should be fully extended and then either unscrewed or pulled free, depending on the specific design. Cleaning the stopper and replacing the rubber seal are the primary repair steps. Ensure the stopper is securely reattached after cleaning and repair.
Trip-Lever Stoppers: This system uses a complex linkage that connects the trip lever to the stopper. Leaks can occur due to misadjustments, corrosion, or breakage within this linkage. Access to the linkage requires removing the overflow plate. The linkage should be carefully inspected for any broken or corroded parts. Adjustment points, often screws or clips, can be used to fine-tune the stopper's position. If the linkage is severely damaged, replacing the entire trip-lever mechanism is recommended. Thoroughly testing the stopper's operation before reinstalling the overflow plate is essential.
Addressing Leaks Around the Drain Flange
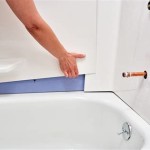
If the leak is not originating from the stopper itself but from around the drain flange, the problem likely lies with the plumber's putty seal. Plumber's putty creates a watertight seal between the drain flange and the bathtub surface. Over time, this putty can dry out, crack, and lose its sealing properties. To address this issue, the old putty must be removed and replaced with fresh putty.
To start, the drain stopper needs to be removed. It may be necessary to loosen and disconnect the drainpipe beneath the bathtub, which typically involves using a pipe wrench to loosen the connections. Once the drainpipe is disconnected, the drain flange can be unscrewed from the bathtub. It is often held in place by a drain nut located underneath the bathtub.
After removing the drain flange, the old plumber's putty should be carefully scraped away from both the flange and the bathtub surface. The surfaces should be thoroughly cleaned to remove any residue. A fresh roll of plumber's putty should then be rolled into a rope-like shape and applied to the underside of the drain flange. The flange should be reinstalled into the bathtub, pressing firmly to create a good seal. Excess putty that squeezes out should be removed with a putty knife or a similar tool. The drain nut should be tightened to secure the flange in place. Finally, the drainpipe should be reconnected, and the drain stopper should be reinstalled.
After completing the repair, the drain should be tested for leaks. Fill the bathtub with a small amount of water and observe the drain area for any signs of leakage. If leaks are still present, the putty application and drain flange tightening process may need to be repeated. It is also possible that the threads on the drain flange or the drain nut are damaged, requiring replacement of these components.
Beyond plumber's putty, silicone caulk can also be used to seal the drain flange. Silicone caulk offers excellent water resistance and flexibility. When using silicone caulk, the application process is similar to that of plumber's putty. The old sealant must be removed, the surfaces must be cleaned, and the caulk must be applied evenly around the underside of the drain flange. The flange should be reinstalled and allowed to cure completely before using the bathtub. The curing time for silicone caulk is typically 24 to 48 hours. Ensure to follow the manufacturer’s instructions for the specific product used.
In cases of significant corrosion or damage to the drain flange itself, replacing the entire drain assembly might be necessary. This is a more involved process that may require professional plumbing assistance. If the drainpipe connections are severely corroded or difficult to access, seeking professional help is recommended to avoid further damage or complications. A professional plumber has the tools and experience to properly remove and replace the drain assembly, ensuring a watertight seal and preventing future leaks.

Bathtub Drain Leak Repair Leaking How To Fix

6 Steps To Eliminate Bathtub Drain Leaking

Plumbing Bathtub Drain Leakage Recurring Failures Home Improvement Stack Exchange

Bathroom Repair How To A Pop Up Tub Drain Stopper

How To Replace Bathtub Drain Stopper With A Lift And Turn Diy

How To Replace Bathtub Drain Stopper With A Lift And Turn Diy

How To Replace A Bathtub Drain And Fix Leak

Bathroom Repair How To A Pop Up Tub Drain Stopper

Bathtub Has Been Extremely Slow Draining Clogged For What Seems Like Years And All Methods We Ve Tried To Fix Draino Snakes Etc Are Inconsistent Any Permanent Solutions Quora

How To Replace A Bathtub Drain And Fix Leak