How To Fix a Leaky Delta Single Handle Bathtub Faucet
A dripping bathtub faucet is more than just an annoyance; it wastes water, increases water bills, and can eventually lead to mineral buildup and damage to the fixture itself. Delta single-handle bathtub faucets are generally reliable, but over time, their internal components can wear down, leading to leaks. Fortunately, repairing a leaky Delta single-handle faucet is often a manageable DIY project, provided one follows a systematic approach and has the appropriate tools.
Before embarking on any plumbing repair, safety is paramount. The first step is to gather all necessary tools and materials. This typically includes a Phillips head screwdriver, a flathead screwdriver, an Allen wrench (the size will depend on the specific model), a new Delta faucet repair kit (containing O-rings, seats, and possibly a new cartridge), adjustable pliers, a basin wrench (optional but helpful), white vinegar, plumber's grease, and a clean rag or towel. It is also highly recommended to have a parts diagram of the specific Delta faucet model readily available; this can usually be found on the Delta Faucet website using the model number.
The most crucial preliminary step is to shut off the water supply to the bathtub faucet. This is usually accomplished by turning off the water shut-off valves located either directly behind the faucet (accessible through an access panel) or in the main water supply line to the house. If individual shut-off valves are not present, the main water supply to the entire house must be turned off. After shutting off the water, open the faucet to relieve any remaining pressure in the pipes. Place a towel or rag in the bathtub to protect the finish and catch any stray parts or water.
Identifying the Source of the Leak
The first step in fixing the leak is to pinpoint its origin. Common leak locations in a Delta single-handle bathtub faucet include around the base of the handle, from the spout itself, or from the showerhead when the faucet is in the "off" position. Each location suggests a different potential issue.
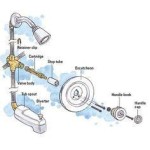
A leak around the base of the handle often indicates worn O-rings on the valve cartridge. The valve cartridge is the core component that controls the water flow and temperature. Over time, the rubber O-rings that seal the cartridge can dry out, crack, or become damaged, allowing water to seep around them. A leak from the spout or showerhead, even when the handle is in the off position, can also point to a faulty valve cartridge, or possibly worn seats and springs in older models.
To diagnose the issue effectively, carefully observe the faucet while slowly turning the handle from the cold to the hot position. Note where the leak is most pronounced. This observation can help to narrow down the potential causes. If the leak is consistent regardless of the handle position, the cartridge is the prime suspect. If the leak is only present in certain positions, the seats and springs (if applicable to the model) may be the culprit.
Replacing the Valve Cartridge
Replacing the valve cartridge is a common repair for leaky Delta single-handle faucets. This procedure involves several stages requiring precision.
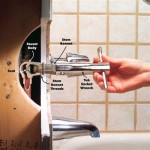
Begin by removing the faucet handle. The handle is typically secured by a small screw, often hidden under a decorative cap or button. Use a small flathead screwdriver or a knife to carefully pry off the cap and expose the screw. Use a Phillips head screwdriver or an Allen wrench to loosen and remove the screw. Once the screw is removed, gently pull the handle straight off the faucet stem. It may be necessary to wiggle the handle slightly to loosen it.
After removing the handle, the faucet escutcheon (the decorative plate behind the handle) must be removed. This may be held in place by screws or by a friction fit. If screws are present, remove them. If not, gently twist and pull the escutcheon to dislodge it. Be careful not to scratch or damage the surrounding surface of the bathtub.
With the escutcheon removed, the cartridge retainer clip or nut will be visible. This clip or nut holds the cartridge in place within the faucet body. Depending on the model, the clip may be a U-shaped piece of metal that needs to be pried out using a flathead screwdriver, or the nut may require loosening with adjustable pliers or a basin wrench. Exercise caution to avoid damaging the cartridge or the surrounding faucet body.
Once the retainer clip or nut is removed, the valve cartridge can be extracted. If the cartridge is stuck, a cartridge puller tool may be necessary. These tools are specifically designed to grip the cartridge and provide leverage for removal. If a cartridge puller is not available, try gently wiggling the cartridge back and forth while pulling it straight out. Avoid using excessive force, as this could break the cartridge and make removal even more difficult.
Before installing the new cartridge, inspect the faucet body for any mineral buildup or debris. Use a toothbrush or a clean rag soaked in white vinegar to clean the inside of the faucet body. This will ensure a proper seal between the new cartridge and the faucet body. Apply a thin layer of plumber's grease to the O-rings on the new cartridge before inserting it into the faucet body. This will help to create a watertight seal and protect the O-rings from damage during installation.
Carefully align the new cartridge with the faucet body and push it firmly into place. Ensure that the cartridge is fully seated and that the alignment is correct. Reinstall the retainer clip or nut to secure the cartridge. Tighten the nut snugly, but avoid over-tightening, as this could damage the cartridge or the faucet body. Replace the escutcheon and the handle, securing them with the appropriate screws. Turn the water supply back on slowly and check for leaks. If leaks are present, double-check the cartridge installation and ensure that all connections are tight.
Replacing Seats and Springs (If Applicable)
Some older Delta single-handle bathtub faucets utilize seats and springs, small rubber and metal components that help to control water flow and prevent leaks. These components are typically located at the back of the faucet body, behind the valve cartridge. If the faucet is leaking and the valve cartridge is not the cause, or if the faucet is particularly old, replacing the seats and springs may be necessary.
After removing the valve cartridge, carefully inspect the back of the faucet body for the seats and springs. They are typically small, cylindrical pieces of rubber with a small spring behind them. Use a small screwdriver or a pair of needle-nose pliers to remove the old seats and springs. Be careful not to damage the faucet body during this process.
Before installing the new seats and springs, clean the area where they sit with a brush and white vinegar to eliminate mineral deposits. Insert the new springs into the faucet body, followed by the new seats. Ensure that the seats are fully seated and that the springs are properly positioned behind them. Apply a small amount of plumber's grease to the seats before installing them to help create a watertight seal.
Reinstall the valve cartridge, following the steps outlined previously. Once the cartridge is securely in place, turn the water supply back on slowly and check for leaks. If leaks are still present, double-check the installation of the seats and springs, and ensure that the valve cartridge is properly seated.
Addressing Other Potential Leak Sources
While the valve cartridge and seats and springs are the most common causes of leaks in Delta single-handle bathtub faucets, other potential sources should not be overlooked. These include the spout O-rings, the showerhead connection, and the faucet body itself.
If the leak is originating from around the base of the spout, the spout O-rings may be worn or damaged. To replace these O-rings, the spout must be removed. This typically involves loosening a set screw located on the underside of the spout, near the faucet body. Once the set screw is loosened, the spout can be pulled straight off the faucet body. Inspect the O-rings on the spout and replace them with new ones, ensuring that they are properly seated. Apply a small amount of plumber's grease to the O-rings before reinstalling the spout.
Leaks from the showerhead connection are often caused by worn or damaged Teflon tape on the shower arm threads. To fix this, remove the showerhead from the shower arm. Clean the threads of the shower arm and apply several layers of new Teflon tape, wrapping it in the direction of the threads. Reinstall the showerhead, tightening it snugly, but avoid over-tightening.
In rare cases, the faucet body itself may be cracked or damaged, leading to leaks. If this is the case, the entire faucet may need to be replaced. Carefully inspect the faucet body for any visible cracks or damage. If cracks are present, replacing the faucet is the recommended course of action.
Once all repairs have been completed, thoroughly clean the bathtub and the surrounding area. Remove any tools or materials that were used during the repair. Turn the water supply back on fully and check for any remaining leaks. Monitor the faucet for several days to ensure that the repairs are successful and that no new leaks develop.

How To Fix A Leaking Single Handle Bathtub Faucet Quick And Easy

How To Fix A Leaky Bathtub Faucet Delta Shower Cartridge L Replace

Fix A Leaky Delta Single Handle Shower Faucet For Under 2

Repairing A Leaky Delta Bath Or Shower Faucet Single Lever And Setting Temp

Fix The Leaky Delta Bathtub Faucet

How To Replace A Delta Cartridge And Fix Leaky Bathtub Faucet It Tutorials

How To Fix A Leaking Single Handle Bathtub Faucet Quick And Easy

How To Repair A Delta Tub Shower Valve

Fix A Leaky Delta Single Handle Shower Faucet For Under 2

Delta Foundations Single Handle 1 Spray Tub And Shower Faucet In Chrome Valve Included B114900c The Home Depot