How to Fix a Leaky Delta Bathtub Faucet Double Handle
A persistent drip from a double-handle Delta bathtub faucet is a common household nuisance. Beyond the irritating sound, a leaky faucet wastes water, leading to higher utility bills and potential damage to the bathtub and surrounding areas. Fortunately, most double-handle Delta bathtub faucet leaks can be repaired by a homeowner with basic plumbing knowledge and a few readily available tools. This article provides a comprehensive guide on how to diagnose and repair a leaky Delta bathtub faucet with double handles, focusing on practical steps and essential safety precautions.
Before embarking on any plumbing repair, safety is paramount. Begin by turning off the water supply to the bathtub faucet. The shut-off valves are typically located either behind an access panel in the wall behind the faucet, or in the basement or crawl space directly below the bathroom. If individual shut-off valves for the hot and cold water lines are not present, the main water supply to the entire house will need to be turned off. Once the water supply is shut off, open both faucet handles to relieve any residual pressure in the lines. Place a towel or rag in the bathtub to protect the finish and catch any stray parts or water. Gather all necessary tools and replacement parts before starting the repair process. Common tools include: a flat-head screwdriver, a Phillips-head screwdriver, an adjustable wrench, pliers, a socket set, a valve seat wrench (optional but helpful), white vinegar, plumber's grease (silicone-based), and replacement O-rings, seats, and springs.
Identifying the Source of the Leak
The first step in repairing a leaky faucet is to accurately pinpoint the source of the leak. With a double-handle Delta faucet, the leak typically originates from one of two areas: the faucet handle itself, or the spout. Leaks around the handle usually indicate a problem with the O-rings or the cartridge/stem assembly. Leaks from the spout, especially a continuous drip, are often caused by worn or damaged seats and springs within the valve body. To determine the source, dry the faucet thoroughly and observe where the water is emerging. If the leak appears around the base of one or both handles, focus on replacing the O-rings and possibly the stem assembly. If the leak is a steady drip from the spout, concentrate on the seats and springs.
Another diagnostic step is to examine the faucet handles themselves. Sometimes, the handles become loose or corroded, which can contribute to leaks. Try tightening the handle screws. If this resolves the issue, the problem was simply a loose connection. However, if the leak persists, further investigation is required. Run the faucet for a short period after each adjustment to see if there is a change. If you notice leaks from both handles, it’s recommended to tackle one handle at a time. This ensures that you can easily reassemble the faucet if you run into any difficulties along the way.
If the leak seems to be sporadic or only occurs when the faucet is turned on and off, it's often an indication of a more complex issue within the valve body itself. This might involve worn or damaged washers, or even corrosion within the valve. In this case, a more thorough inspection and potentially replacement of the entire valve cartridge may be necessary.
Replacing O-Rings and Stem Assembly
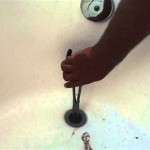
If the leak is originating from around the faucet handle, replacing the O-rings is usually the first course of action. To access the O-rings, begin by removing the decorative handle cap. This cap is typically held in place by a small screw, which may be concealed beneath a decorative button or cover. Use a flat-head screwdriver to gently pry off the button or cover, revealing the screw. Unscrew the handle screw and carefully pull the handle off the stem. Once the handle is removed, you will see the stem assembly. This assembly may be concealed by a sleeve or escutcheon, which typically can be unscrewed or pulled off. The stem assembly itself is usually held in place by a retaining nut. Use an adjustable wrench to loosen and remove this nut.
Once the retaining nut is removed, carefully pull the stem assembly out of the faucet body. Examine the stem for any signs of damage or corrosion. Locate the O-rings on the stem. These are small rubber rings that create a watertight seal between the stem and the faucet body. Use a small, pointed tool or a dental pick to carefully remove the old O-rings. Be careful not to scratch or damage the stem during this process. Clean the stem thoroughly with white vinegar to remove any mineral deposits or corrosion. Lubricate the new O-rings with plumber's grease before installing them onto the stem. This will make it easier to slide them into place and will help to ensure a watertight seal. Install the new O-rings in the same positions as the old ones. Reassemble the stem assembly, tightening the retaining nut securely, but not excessively. Replace the handle escutcheon (if applicable), the handle, and the handle cap. Turn the water supply back on slowly and check for leaks around the handle. If the leak is resolved, the repair is complete. If the leak persists, the stem assembly itself may be damaged and need to be replaced with a new one.
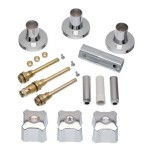
When replacing the stem assembly, ensure that you purchase a compatible replacement part. Delta faucets have various stem designs, so it is essential to identify the correct model for your faucet. Take the old stem assembly to a plumbing supply store or home improvement center to ensure you get the right replacement. The stem assembly typically includes new O-rings and a valve cartridge. Follow the same steps as above to remove the old stem assembly and install the new one. Always use plumber's grease on the O-rings to ensure a proper seal. Tighten the retaining nut securely, but avoid over-tightening, as this could damage the new stem assembly.
Replacing Seats and Springs
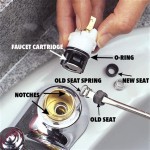
If the leak is a continuous drip from the spout, the problem is likely with the seats and springs. To access the seats and springs, remove the faucet handles and stem assemblies as described in the previous section. Once the stem assemblies are removed, you will see the valve body. Inside the valve body, at the bottom of the stem cavity, are the seats and springs. The seats are small, rubber or plastic components that fit snugly into the valve body and provide a sealing surface for the valve cartridge. The springs are located beneath the seats and provide pressure to keep the seats firmly in place. Use a valve seat wrench (if available) or a small screwdriver to remove the old seats from the valve body. If the seats are difficult to remove, try using pliers to grip them and twist them out. Be careful not to damage the valve body during this process.
Once the old seats are removed, inspect the valve body for any signs of damage or corrosion. Clean the valve body thoroughly with white vinegar to remove any mineral deposits. Insert the new springs into the valve body, followed by the new seats. Ensure that the seats are properly seated and fit snugly in the valve body. Apply a small amount of plumber’s grease to the seats before installing them. This helps them seal properly and extends their lifespan. Reassemble the stem assemblies, tightening the retaining nuts securely. Replace the handles and handle caps. Turn the water supply back on slowly and check for leaks from the spout. If the leak is resolved, the repair is complete. If the leak persists, the valve body itself may be damaged.
In some cases, the valve seats may be deeply embedded or corroded, making them difficult to remove. A specialized valve seat removal tool can be helpful in these situations. This tool typically has a threaded end that screws into the valve seat, allowing you to pull it out without damaging the valve body. If you are unable to remove the valve seats using hand tools, consider consulting a professional plumber. Forcing the seats out could damage the valve body and require a more extensive repair.
Choosing the correct replacement seats and springs is crucial for a successful repair. Like stem assemblies, Delta faucets utilize various seat and spring designs. Take the old seats and springs to a plumbing supply store or home improvement center to ensure you get the correct replacements. When installing the new seats, make sure they are oriented properly and fit snugly in the valve body. If the seats are too loose or too tight, they may not seal properly, leading to a continued leak. Always use plumber's grease on the seats and springs to ensure a proper seal and to prevent corrosion.
Addressing Additional Issues
While replacing O-rings, stem assemblies, seats, and springs addresses the most common causes of leaks in Delta double-handle bathtub faucets, other issues can sometimes contribute to the problem. For example, the valve body itself may be cracked or corroded, requiring replacement of the entire faucet. Cracks in the valve body can be difficult to detect, but they can often be identified by persistent leaks that do not respond to other repairs. Corrosion within the valve body can also cause leaks by creating rough surfaces that prevent a proper seal. If the valve body is damaged, it is generally recommended to replace the entire faucet rather than attempting to repair the valve body itself.
Another potential issue is related to water pressure. Excessively high water pressure can put stress on the faucet components, leading to leaks. If you suspect that high water pressure is contributing to the problem, consider installing a pressure regulator on the main water supply line. A pressure regulator will reduce the water pressure to a safe and manageable level, which can help to prevent leaks and extend the lifespan of your plumbing fixtures.
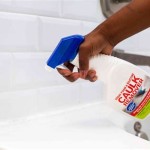
Occasionally, mineral buildup can impede the function of the faucet. Hard water contains minerals like calcium and magnesium, which can accumulate over time and form deposits on the faucet components. These deposits can interfere with the smooth operation of the faucet and contribute to leaks. To remove mineral buildup, soak the affected parts in white vinegar for several hours. Vinegar is a mild acid that will dissolve the mineral deposits without damaging the faucet components. After soaking, scrub the parts with a soft brush to remove any remaining residue. Rinse thoroughly with water before reassembling the faucet.

How To Fix A Leaky Delta Two Handle Faucet

How To Fix A Leaking Dripping Delta Bathtub Faucet 2

Fix A Leaky Tub Faucet With Two Handles

How To 008 Leaking Bathtub Faucet Delta Handle Removal

How To Fix A Leaky Delta Two Handle Faucet

How To Stop Delta Faucet From Dripping Two Handle Repair Kit

How To 008 Leaking Bathtub Faucet Delta Handle Removal

Repairing A Leaky Two Three Handle Tub Shower Faucet

How To Repair Leaking Dripping Delta Faucet Diyplumbing Serviceplumbing Tappplumbing

Simple Ways To Fix A Leaky Delta Bathroom Sink Faucet
Related Posts