How To Fix a Leaking Single Handle Bathtub Faucet
A dripping bathtub faucet is more than a mere annoyance; it represents a continuous waste of water and, consequently, money. Beyond the financial implications, a persistent leak can lead to mineral deposits and unsightly stains on the tub surface. While professional plumbing services offer a definitive solution, many homeowners possess the aptitude and resources to address a leaking single-handle bathtub faucet independently. This article provides a comprehensive guide to diagnosing and rectifying common causes of leaks in single-handle bathtub faucets.
Before initiating any repair work, it is imperative to identify the specific type of single-handle faucet installed. Common types include ball faucets, cartridge faucets, and ceramic disc faucets. Each type features a distinct internal mechanism, requiring a tailored approach to disassembly, troubleshooting, and repair. Attempting to apply generic repair methods can lead to further damage and complications. Understanding the faucet type streamlines the repair process and ensures the selection of appropriate replacement parts.
Safety is paramount when undertaking any plumbing repair. The initial step involves shutting off the water supply to the bathroom. Typically, shut-off valves are located beneath the sink or in the basement. If individual shut-off valves are unavailable, the main water supply to the entire house must be turned off. Thoroughly test the faucet after turning off the water to confirm the supply is completely halted. Place a stopper in the drain to prevent small parts from falling into the drain during disassembly. Gather all necessary tools and replacement parts before beginning the repair. Essential tools include a screwdriver set (both Phillips and flathead), an adjustable wrench, pliers, a faucet handle puller (optional but recommended), and a utility knife. Replacement parts should be specific to the faucet type and acquired from a reputable plumbing supply store.
Identifying the Cause of the Leak
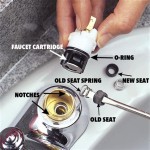
Pinpointing the source of the leak is fundamental to effective repair. Common causes include worn-out O-rings, corroded valve seats, damaged cartridges, or mineral buildup. Visual inspection often provides valuable clues. Examine the faucet handle for signs of looseness or damage. Observe the area around the spout and handle base for water accumulation or mineral deposits. Operate the handle in various positions to determine if the leak changes intensity or ceases altogether. This can help narrow down the potential culprits. Listen closely for unusual noises emanating from the faucet when it's turned on, as these can also indicate specific problems within the valve body.
For a ball-type faucet, leaks often originate from worn-out springs and rubber seats located beneath the ball. These components are relatively inexpensive and easy to replace. Cartridge faucets frequently leak due to a damaged or worn-out cartridge. The cartridge is a cylindrical component that regulates water flow and temperature. Ceramic disc faucets are less prone to leaks than ball or cartridge faucets, but they can experience problems with mineral buildup or damaged ceramic discs. The location of the leak (e.g., around the handle, from the spout, or from the base of the faucet) also provides important clues about the likely cause.
Mineral deposits, particularly in areas with hard water, can accumulate on internal faucet components, hindering their proper function and leading to leaks. White, chalky deposits are a telltale sign of mineral buildup. Cleaning these deposits with a specialized descaling solution or white vinegar can sometimes resolve minor leaks. However, in severe cases, replacing affected parts may be necessary.
Repairing a Ball-Type Single Handle Faucet
To repair a ball-type single-handle faucet, the process involves several steps. First, locate the setscrew on the side of the handle, typically concealed by a decorative cap. Use a small Allen wrench to loosen the setscrew and remove the handle. Next, unscrew the cap and collar beneath the handle. The ball assembly will now be visible. Carefully lift out the ball. Examine the ball for scratches or damage. If significant wear is evident, the ball should be replaced. Beneath the ball, you'll find the springs and rubber seats. Use a small screwdriver or pliers to remove these components. Install the new springs and seats, ensuring they are properly seated. Reassemble the faucet in reverse order, tightening the components securely but avoiding over-tightening. Test the faucet for leaks after reassembly.
If the leak persists after replacing the springs and seats, the O-rings on the faucet body might be worn out. These O-rings seal the connections between the faucet body and the spout. Replacing these O-rings involves disassembling the faucet body. Consult the manufacturer's instructions or a plumbing diagram for guidance on disassembling the faucet body safely and effectively. Remove the old O-rings and install new ones, lubricating them with silicone grease to ensure a proper seal. Reassemble the faucet body and test for leaks.
Repairing a Cartridge-Type Single Handle Faucet
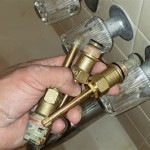
Repairing a cartridge-type single-handle faucet typically involves replacing the cartridge itself. First, locate the setscrew on the handle, usually covered by a decorative cap. Loosen the setscrew and remove the handle. Some faucets may have a retaining clip or nut that secures the cartridge in place. Remove the retaining clip or nut. Use pliers to gently pull the cartridge straight out of the faucet body. If the cartridge is stuck, a faucet handle puller may be necessary. Examine the old cartridge for damage or wear. Install the new cartridge, aligning it properly with the faucet body. Replace the retaining clip or nut and reassemble the handle. Test the faucet for leaks.
Before installing the new cartridge, inspect the faucet body for debris or mineral deposits. Clean the faucet body thoroughly with a descaling solution or white vinegar. Lubricate the new cartridge with silicone grease to ensure smooth operation and a proper seal. When inserting the new cartridge, apply even pressure to avoid damaging it. Ensure that the cartridge is fully seated and properly aligned before securing it with the retaining clip or nut.
Sometimes the leak from a cartridge faucet isn't from the cartridge itself, but from the O-rings around the cartridge stem. Before replacing the entire cartridge, inspect these O-rings. If they appear damaged or worn, replace them. This can often resolve minor leaks without the need for a complete cartridge replacement.
Repairing a Ceramic Disc Single Handle Faucet
Ceramic disc faucets, while generally durable, can develop leaks due to mineral buildup or damaged ceramic discs. Repairing these faucets requires careful handling of the ceramic components. Start by locating the setscrew on the handle and removing the handle. Remove the decorative cap and the screws holding the cylinder in place. Carefully lift out the cylinder assembly. The ceramic discs will be visible within the cylinder. Inspect the discs for cracks or chips. If damage is evident, the entire cylinder assembly should be replaced.
Mineral buildup is a common cause of leaks in ceramic disc faucets. Clean the ceramic discs and the cylinder assembly thoroughly with a descaling solution or white vinegar. Use a soft brush or cloth to remove stubborn deposits. Rinse the components thoroughly with clean water. Before reassembling the faucet, inspect the O-rings and seals for damage. Replace any worn or damaged O-rings or seals. Lubricate the O-rings and seals with silicone grease to ensure a proper seal. Reassemble the faucet carefully, ensuring that the ceramic discs are properly aligned and seated. Test the faucet for leaks.
When reassembling a ceramic disc faucet, avoid over-tightening the screws. Over-tightening can damage the ceramic discs or the cylinder assembly. Tighten the screws just enough to secure the components in place. If the leak persists after cleaning and replacing the O-rings, the valve body might be cracked. In such cases, replacing the entire faucet is often the most practical solution.
Preventative Maintenance
Regular preventative maintenance can significantly prolong the lifespan of a single-handle bathtub faucet and minimize the likelihood of leaks. Periodic cleaning of the faucet components, particularly in areas with hard water, can prevent mineral buildup. Apply a descaling solution or white vinegar to the faucet spout and handle base periodically. Use a soft brush or cloth to remove any visible deposits. Rinse thoroughly with clean water.
Lubricate the moving parts of the faucet with silicone grease. This includes the cartridge, the ball assembly, and the O-rings. Lubrication helps to ensure smooth operation and prevents premature wear and tear. Inspect the faucet regularly for signs of leaks or damage. Address any minor issues promptly to prevent them from escalating into more significant problems. Replacing worn-out O-rings or seals at the first sign of wear can often prevent leaks from developing.
Consider installing a water softener if you live in an area with hard water. A water softener can remove minerals from the water, preventing them from accumulating on faucet components and reducing the risk of leaks. Another preventative measure is to avoid using abrasive cleaners on the faucet finish. Abrasive cleaners can scratch the finish and damage the protective coating, making the faucet more susceptible to corrosion and damage.

How To Fix A Leaking Single Handle Bathtub Faucet Quick And Easy

How To Fix A Leaky Tub Shower Faucet

How To Fix Leaking Bathtub Faucet

How To Fix A Leaky Single Handle Tub Shower Faucet Danco

How To Replace A Moen Cartridge And Fix Leaky Bathtub Faucet It Tutorials

Moen Bathtub Faucet Dripping Wasting Water How To Repair A Leaking Single Handle Bath Shower

How To Replace A Delta Cartridge And Fix Leaky Bathtub Faucet It Tutorials

How To Fix A Leaking Bathtub Faucet The Home Depot

How To Fix A Leaking Bathtub Faucet Diy Family Handyman

How To Fix A Leaking Bathtub Faucet The Home Depot
Related Posts