How To Fix A Bathtub Drain Leak
A leaking bathtub drain can be more than just an annoyance; it can lead to significant water damage, mold growth, and wasted water, resulting in higher utility bills. Addressing the leak promptly is crucial to prevent further complications. This article provides a step-by-step guide on how to identify and fix a leaky bathtub drain, covering common causes and practical solutions.
Identifying the Source of the Leak
Before attempting any repairs, pinpointing the exact location of the leak is paramount. Common areas where leaks occur include the drain flange (the visible metal ring around the drain opening inside the tub), the drainpipe connections underneath the tub, and the overflow drain. A methodical approach will help isolate the problem and determine the appropriate repair strategy.
To begin, visually inspect the area around the drain flange inside the bathtub. Look for cracks in the caulk or sealant. Water stains or discoloration can indicate water seepage. Run water into the tub, stopping just below the overflow drain, and observe if any water is leaking from the drain flange area. If so, the issue likely lies with the sealant around the flange.
Next, examine the overflow drain, typically located near the top of the tub. This drain prevents the tub from overflowing. Similar to the drain flange, inspect the caulk or sealant around the overflow drain cover. Running water near the overflow drain and observing for leaks will help determine if this is the source of the problem.
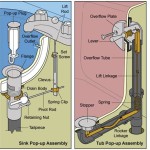
Finally, access the drainpipe connections underneath the tub. This often requires access through an access panel, a crawlspace, or removing a section of the ceiling below the bathtub. Use a flashlight to carefully inspect all the connections, including where the drainpipe connects to the tub drain, the P-trap (the curved section of pipe designed to trap debris and prevent sewer gases from entering the house), and any other joints in the drainpipe system. Dry all the pipes with a rag. Then, run water into the tub and observe for leaks forming at any of these connections. Even a small drip can indicate a loose connection or damaged fitting.
Tools and Materials Required
Having the right tools and materials on hand before beginning any repairs is essential for a smooth and efficient process. The specific items needed will depend on the nature of the leak and the type of repair required. However, a general list of potentially necessary tools and materials includes:
- Plumber's Putty: Used to create a watertight seal between the drain flange and the bathtub.
- Silicone Caulk: Used to seal around the drain flange and overflow drain. Choose a mildew-resistant caulk specifically designed for bathrooms.
- Drain Wrench (Tub Drain Removal Tool): A specialized wrench designed to grip the drain flange and allow for easy removal and installation.
- Adjustable Wrench: Used for tightening and loosening pipe connections.
- Channel-Lock Pliers: Helpful for gripping and turning pipes and fittings.
- Screwdrivers (Phillips and Flathead): Needed for removing and installing screws on the overflow drain cover and other components.
- Utility Knife: Used for removing old caulk and sealant.
- Rags: For cleaning and drying surfaces.
- Bucket: To catch any water that may drain from the pipes.
- Penetrating Oil: To loosen corroded or stuck drain flange nuts or fittings.
- New Drain Flange (Optional): If the existing drain flange is damaged or corroded beyond repair.
- New Drainpipe Fittings (Optional): If any of the drainpipe fittings are cracked or damaged.
- Hacksaw (Optional): For cutting pipes if necessary.
- Sandpaper or Scouring Pad: For cleaning surfaces before applying sealant.
Repairing Leaks Around the Drain Flange
If the leak is originating from around the drain flange, the repair process typically involves removing the existing flange, cleaning the area, and resealing with plumber's putty and silicone caulk.
First, shut off the water supply to the bathtub. This is a precautionary measure to prevent unexpected water flow during the repair. Next, remove the existing drain stopper. This may involve unscrewing it or lifting it out, depending on the type of stopper.
Using a utility knife, carefully cut away the old caulk around the drain flange. Be thorough in removing all traces of the old sealant to ensure a clean surface for the new sealant to adhere to. Now, use a drain wrench to loosen and remove the drain flange. This may require some force, especially if the flange is corroded. Applying penetrating oil can help loosen stubborn flanges. Place a bucket underneath the drainpipe to catch any remaining water.
Once the drain flange is removed, clean the drain opening and the underside of the drain flange thoroughly. Use sandpaper or a scouring pad to remove any rust, mineral deposits, or old plumber's putty. Ensure both surfaces are clean, dry, and free of debris.
Roll a rope of plumber's putty and apply it to the underside of the new or cleaned drain flange, where it will contact the bathtub surface. This creates a watertight seal. Insert the drain flange into the drain opening and tighten the nut underneath the tub using the drain wrench. Tighten securely, but avoid over-tightening, which could crack the tub or damage the drain flange.
Remove any excess plumber's putty that squeezes out from around the drain flange. Finally, apply a bead of silicone caulk around the perimeter of the drain flange where it meets the bathtub surface. Smooth the caulk with a wet finger or a caulking tool for a professional finish. Allow the caulk to dry completely according to the manufacturer's instructions before using the bathtub.
Repairing Leaks in Drainpipe Connections
Leaks in drainpipe connections often stem from loose fittings or damaged pipes. The repair process depends on the severity of the damage and the type of pipe used.
If the leak appears to be coming from a loose connection, try tightening the fitting with an adjustable wrench. Avoid overtightening, as this can damage the pipe or fitting. If tightening the fitting doesn't stop the leak, the fitting may need to be disassembled and reassembled with new Teflon tape or pipe dope to create a better seal. Before disassembling, place a bucket underneath the connection to catch any water.
If the pipe or fitting is cracked or damaged, it will need to be replaced. Determine the type of pipe (PVC, ABS, or metal) and the size of the fitting. Shut off the water supply to the house before proceeding with the replacement. Cut out the damaged section of pipe using a hacksaw. If working with PVC or ABS pipe, use a solvent cement primer and cement to join the new pipe section and fittings. Follow the manufacturer's instructions carefully for proper bonding. If working with metal pipe, use threaded fittings and Teflon tape to create a watertight seal.
After completing the repair, turn the water supply back on slowly and check for leaks. If any leaks are present, tighten the fittings further or re-do the connection as needed. It’s important to ensure all connections are secure and watertight before considering the repair complete.
Addressing Leaks Around the Overflow Drain
Leaks around the overflow drain are typically caused by deteriorated caulk or a loose connection. The repair process is similar to that of the drain flange.
First, remove the overflow drain cover by unscrewing the screws that hold it in place. Carefully inspect the area around the overflow drain opening for cracks or gaps in the caulk. Use a utility knife to remove the old caulk thoroughly.
Clean the area around the overflow drain opening with a damp cloth to remove any debris. Apply a bead of silicone caulk around the perimeter of the overflow drain opening. Reinstall the overflow drain cover and tighten the screws securely, but not excessively. Smooth the caulk with a wet finger or a caulking tool.
Allow the caulk to dry completely according to the manufacturer's instructions before using the bathtub. Run water near the overflow drain to test for leaks. If any leaks are present, reapply caulk as needed.

Tub Drain Pipe Leaks How To Replace

How To Replace A Bathtub Drain And Fix Leak

Plumbing Bathtub Drain Leakage Recurring Failures Home Improvement Stack Exchange

Fix A Leaky Tub In 5 Minutes

Bathtub Drain Leak Concrete Home Improvement Stack Exchange

6 Steps To Eliminate Bathtub Drain Leaking

Bathtub Drain Leak Repair Leaking How To Fix

How To Fix A Leaking Bathtub Overflow Drain Diy Guide

Is Your Bathtub Leaking How To Fix It Graham S And Son

Bathtub Drain Leak Repair Leaking How To Fix