```html
How To Clean Bathtub Surround
The bathtub surround, encompassing the walls, tiles, and grout surrounding the bathtub, is a common area in bathrooms prone to the accumulation of soap scum, mildew, hard water stains, and general grime. Regular cleaning is crucial not only for maintaining a visually appealing bathroom but also for preventing the growth of mold and bacteria, which can pose health risks. This article provides a comprehensive guide on how to effectively clean a bathtub surround, outlining necessary materials, step-by-step procedures, and preventative measures.
The frequency of cleaning depends on the usage of the bathtub and the ventilation within the bathroom. Bathrooms with poor ventilation and frequent use will require more frequent cleaning, perhaps once a week. Bathrooms with good ventilation and less frequent use may only require cleaning every two weeks. Ignoring the accumulation of grime and mildew will only make the cleaning process more difficult and time-consuming in the long run.
Essential Materials and Tools
Before commencing the cleaning process, it is essential to gather the necessary materials and tools. Having everything readily available will streamline the process and ensure efficient cleaning. The following items are typically required:
- Cleaning Solution: This can be a commercially available bathroom cleaner, a homemade solution of white vinegar and water, or a mixture of baking soda and water. The choice of cleaning solution depends on the severity of the stains and the type of material the surround is made of.
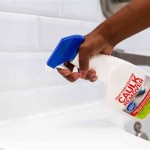
- Spray Bottle (if using a liquid solution): A spray bottle allows for even distribution of the cleaning solution over the surface of the surround.
- Scrub Brush or Sponge: A scrub brush with stiff bristles is ideal for tackling stubborn stains and reaching into grout lines. A sponge can be used for milder cleaning tasks.
- Grout Brush: A smaller, specialized brush designed for cleaning grout lines. Its narrow bristles effectively remove grime and mildew from these hard-to-reach areas.
- Microfiber Cloths: These are excellent for wiping down surfaces and absorbing moisture. They are also gentle and less likely to scratch delicate surfaces.
- Squeegee: A squeegee can be used after cleaning to remove excess water and prevent water spots from forming.
- Protective Gloves: Gloves protect hands from harsh cleaning chemicals and prevent skin irritation.
- Eye Protection (optional): Eye protection can prevent splashes of cleaning solution from entering the eyes.
- Ventilation: Ensure adequate ventilation by opening a window or turning on the exhaust fan.
Step-by-Step Cleaning Procedure
The cleaning process involves several steps to ensure a thorough and effective outcome. It is important to follow these steps in order to maximize the cleaning power and minimize potential damage to the bathtub surround.
- Preparation: Begin by removing any items from the bathtub and surround area, such as shampoo bottles, soap dishes, and bath toys. This will provide unobstructed access to the surfaces that need cleaning.
- Rinsing: Rinse the bathtub surround with warm water to loosen any surface dirt and grime. This preliminary rinse will also prepare the surface for the application of the cleaning solution.
- Applying Cleaning Solution: Apply the chosen cleaning solution liberally to the entire bathtub surround, including the walls, tiles, and grout. If using a spray bottle, ensure even coverage. For stubborn stains or heavily soiled areas, allow the cleaning solution to dwell for several minutes to effectively break down the grime. The exact dwell time will depend on the specific cleaning solution and the severity of the stains.
- Scrubbing: Using a scrub brush or sponge, thoroughly scrub the entire surface of the bathtub surround. Pay particular attention to areas with visible stains, mildew, or soap scum. Use a grout brush to scrub the grout lines, ensuring that all grime and mildew are removed. Apply firm, consistent pressure while scrubbing to effectively dislodge the dirt.
- Rinsing Again: Once the scrubbing is complete, rinse the entire bathtub surround thoroughly with warm water to remove all traces of the cleaning solution. Ensure that no residue remains, as this can attract dirt and contribute to future build-up.
- Drying: Wipe down the bathtub surround with clean microfiber cloths to dry the surfaces and prevent water spots. A squeegee can also be used to remove excess water from the walls and tiles, leaving them streak-free.
- Ventilation: Continue to ventilate the bathroom by opening a window or running the exhaust fan until the entire area is completely dry. This will help prevent the growth of mold and mildew.
- Replacement: Return all items that were removed from the bathtub and surround area.
Addressing Specific Issues: Soap Scum, Mildew, and Hard Water Stains
Different types of stains require specific cleaning approaches. Understanding the composition of each type of stain allows for selecting the most effective cleaning method.
Soap Scum
Soap scum is a common residue that forms from the combination of soap, body oils, and hard water minerals. It appears as a white or grayish film on surfaces. To remove soap scum:
- Vinegar Solution: A solution of equal parts white vinegar and warm water is effective for dissolving soap scum. Spray the solution onto the affected area, let it sit for 10-15 minutes, and then scrub with a sponge or brush.
- Commercial Soap Scum Remover: There are many commercially available soap scum removers that are specifically formulated to dissolve soap scum quickly and effectively. Follow the instructions on the product label.
- Baking Soda Paste: A paste made from baking soda and water can be used as a mild abrasive to scrub away soap scum. Apply the paste to the affected area, let it sit for a few minutes, and then scrub with a sponge or brush.
Mildew
Mildew is a type of fungus that thrives in damp environments, and it often appears as black or green spots on the bathtub surround. To remove mildew:
- Bleach Solution: A solution of one part bleach to ten parts water is effective for killing mildew. Apply the solution to the affected area, let it sit for 10-15 minutes, and then scrub with a sponge or brush. *Caution: Always wear gloves and eye protection when working with bleach. Ensure adequate ventilation.*
- Hydrogen Peroxide: Hydrogen peroxide is a less harsh alternative to bleach that can also kill mildew. Spray hydrogen peroxide onto the affected area, let it sit for 10-15 minutes, and then scrub with a sponge or brush.
- Commercial Mildew Remover: Commercial mildew removers are available that are specifically formulated to kill mildew and prevent its regrowth. Follow the instructions on the product label.
Hard Water Stains
Hard water stains are caused by mineral deposits in hard water, and they appear as white or chalky deposits on surfaces. To remove hard water stains:
- Vinegar: Vinegar is an effective natural cleaner for removing hard water stains. Soak a cloth in vinegar and apply it to the affected area. Let it sit for several hours or overnight, and then scrub with a sponge or brush.
- Lemon Juice: Lemon juice is another natural cleaner that can be used to remove hard water stains. Apply lemon juice to the affected area, let it sit for 30 minutes, and then scrub with a sponge or brush.
- Commercial Hard Water Stain Remover: Commercial hard water stain removers are available that are specifically formulated to dissolve mineral deposits quickly and effectively. Follow the instructions on the product label.
Preventative Measures
Implementing preventative measures can significantly reduce the frequency and intensity of cleaning required. These measures help to minimize the accumulation of grime, mildew, and hard water stains.
- Ventilation: Ensure adequate ventilation in the bathroom by opening a window or running the exhaust fan after each shower or bath. This will help to dry the surfaces and prevent the growth of mold and mildew.
- Squeegee: Use a squeegee to wipe down the bathtub surround after each shower or bath. This will remove excess water and prevent water spots from forming.
- Regular Cleaning: Clean the bathtub surround regularly, even if it does not appear to be dirty. This will prevent the accumulation of grime and make cleaning easier in the long run.
- Use Shower Cleaner: Use a shower cleaner regularly to help prevent the buildup of soap scum and hard water stains. These cleaners are typically sprayed onto the surfaces after each shower or bath and do not require rinsing.
- Water Softener: Consider installing a water softener to reduce the mineral content of the water. This will help to prevent hard water stains from forming.
- Reseal Grout: Periodically reseal the grout lines to prevent water from penetrating and causing mold and mildew growth.
By regularly cleaning the bathtub surround and implementing preventative measures, it is possible to maintain a clean, healthy, and visually appealing bathroom. The consistent application of these techniques will minimize the effort required for each cleaning session and extend the lifespan of the bathtub surround materials.
```
Best Way To Clean A Tub Surround Bath Fitter Pittsburgh

How To Clean Fiberglass Tub Shower Enclosure Hometalk

How To Clean A Fiberglass Tub Surround Doityourself Com

How To Re Shine Plastic Bathtubs And Shower Enclosures Hunker

How To Deep Clean A Bath Cleaning Tips The Home Depot

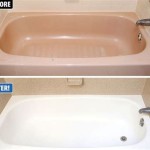
How To Reglaze A Bathtub And Tile Surround Daly Digs

Cleaning A Formica Tub Surround And Recaulking Bathtub Clean

Removing Soap Scum Orange Stains In Shower Surrounds

How Do I Get My Fiberglass Tub White Again Hometalk

How To Reglaze A Bathtub And Tile Surround Daly Digs
Related Posts