How to Change the Color of a Porcelain Bathtub
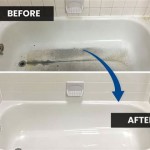
Changing the color of a porcelain bathtub can be an attractive option for homeowners looking to update their bathroom without the expense and hassle of a full bathtub replacement. A properly executed refinishing project can transform an old, stained, or outdated tub into a fresh, modern centerpiece. However, refinishing a porcelain tub is a complex process that requires careful preparation, specialized materials, and a thorough understanding of proper application techniques. This article provides a detailed guide on how to change the color of a porcelain bathtub, outlining the necessary steps and offering crucial considerations for achieving a durable and aesthetically pleasing result.
It is essential to acknowledge the alternative option of replacing the entire bathtub. While refinishing offers cost savings and avoids demolition, replacement provides a completely new fixture and allows for potential layout changes or upgrades. The decision between refinishing and replacement should be based on a thorough assessment of the bathtub's condition, the desired aesthetic outcome, the budget constraints, and the long-term goals for the bathroom renovation.
Key Point 1: Preparing the Bathtub Surface
Surface preparation is arguably the most critical step in the bathtub refinishing process. A properly prepared surface ensures that the new coating adheres correctly, preventing peeling, chipping, or blistering. Inadequate preparation will invariably lead to premature coating failure, negating the time and effort invested in the project.
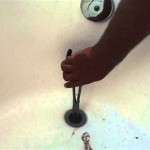
The first step is to thoroughly clean the bathtub. Use a strong alkaline cleaner specifically designed for removing soap scum, hard water stains, and mineral deposits. Scrub the entire surface vigorously, paying particular attention to areas with heavy staining or buildup. Rinse the bathtub thoroughly with clean water, ensuring that all traces of the cleaner are removed. Allow the bathtub to dry completely before proceeding.
Next, address any existing damage to the porcelain surface. Chips, cracks, and rust spots must be repaired before applying the new coating. Use a two-part epoxy filler specifically formulated for porcelain repairs. Follow the manufacturer's instructions to mix and apply the epoxy, carefully filling in any imperfections. Allow the epoxy to cure completely according to the manufacturer's recommendations. Once cured, sand the repaired areas smooth using progressively finer grits of sandpaper, starting with a coarser grit (e.g., 120 grit) and working up to a finer grit (e.g., 400 grit). The goal is to create a seamless transition between the repaired areas and the surrounding porcelain surface.
After repairing any damage, etch the entire surface of the bathtub. Etching creates microscopic pores in the porcelain, providing a better bonding surface for the new coating. Use an etching solution specifically designed for porcelain refinishing. Apply the etching solution according to the manufacturer's instructions, ensuring that the entire surface is evenly coated. Allow the etching solution to dwell for the recommended time, typically 15-30 minutes. Rinse the bathtub thoroughly with clean water to remove all traces of the etching solution. It is imperative to wear appropriate personal protective equipment (PPE), including gloves, eye protection, and a respirator, when working with etching solutions, as they can be corrosive and harmful.
Finally, thoroughly clean the bathtub again with a tack cloth to remove any remaining dust or debris. The surface must be completely clean, dry, and free of contaminants before proceeding to the priming stage. This meticulous cleaning process will ensure optimal adhesion of the primer and subsequent topcoat.
Key Point 2: Priming and Coating the Bathtub
Once the surface preparation is complete, the next step is to apply a high-quality primer specifically designed for porcelain refinishing. The primer serves as a bonding layer between the etched porcelain and the new topcoat, promoting long-term adhesion and preventing peeling or chipping. Selecting the correct primer is crucial for the success of the refinishing project.
Apply the primer in thin, even coats using a high-volume, low-pressure (HVLP) sprayer. An HVLP sprayer provides a consistent and controlled application, minimizing drips and runs. If an HVLP sprayer is unavailable, a high-quality brush or roller can be used, but extra care must be taken to avoid brush strokes or roller marks. Follow the manufacturer's instructions for thinning the primer and adjusting the sprayer settings. Apply two to three thin coats of primer, allowing each coat to dry completely before applying the next. Sand lightly between coats with fine-grit sandpaper (e.g., 400 grit) to create a smooth, uniform surface.
After the primer has dried completely, it is time to apply the topcoat. The topcoat is the colored coating that will give the bathtub its new appearance. Choose a topcoat specifically formulated for bathtub refinishing. These coatings are typically two-part epoxy or polyurethane formulations that are designed to be durable, water-resistant, and resistant to chemicals and abrasion. Mix the topcoat components according to the manufacturer's instructions, paying close attention to the mixing ratios and pot life. Improper mixing can result in a coating that does not cure properly or has poor performance characteristics.
Apply the topcoat in thin, even coats using an HVLP sprayer. Again, follow the manufacturer's instructions for thinning the topcoat and adjusting the sprayer settings. Apply two to three thin coats, allowing each coat to dry completely before applying the next. Sand lightly between coats with fine-grit sandpaper (e.g., 600 grit) to remove any imperfections and create a smooth, uniform surface. The final coat should be applied as smoothly and evenly as possible to achieve a professional-looking finish.
Proper ventilation is essential during the priming and coating process. These coatings typically contain volatile organic compounds (VOCs) that can be harmful to breathe. Wear a respirator with appropriate cartridges and ensure that the bathroom is well-ventilated to minimize exposure to fumes. It might be beneficial to use an exhaust fan to help vent the fumes outside of the building.
Key Point 3: Curing and Post-Application Care
The curing process is a critical phase in bathtub refinishing. Although the coating may appear dry to the touch, it is still undergoing chemical reactions that are necessary for achieving its full hardness and durability. Disturbing the coating prematurely or exposing it to moisture or chemicals can compromise its long-term performance.
Allow the topcoat to cure completely according to the manufacturer's instructions. Curing times can vary depending on the type of coating and the ambient temperature and humidity. Typically, it takes at least 24-48 hours for the coating to fully cure. Avoid using the bathtub during the curing period, and protect it from moisture, chemicals, and abrasive cleaners.
After the coating has cured, inspect the surface for any imperfections, such as drips, runs, or blemishes. These can be carefully removed using a fine-grit sandpaper (e.g., 1000 grit) followed by polishing compound. Be careful not to sand through the coating or scratch the surface.
To maintain the appearance and longevity of the refinished bathtub, use non-abrasive cleaners specifically designed for acrylic or porcelain surfaces. Avoid using harsh chemicals, abrasive scrub brushes, or scouring pads, as these can damage the coating. Rinse the bathtub thoroughly after each use to remove soap scum and hard water stains. Consider applying a sealant or wax specifically designed for refinished surfaces to provide an additional layer of protection.
It's also advisable to avoid placing heavy or sharp objects in the bathtub, as these can scratch or chip the coating. Regularly inspect the caulking around the bathtub and repair any cracks or gaps to prevent water damage. With proper care and maintenance, a professionally refinished bathtub can provide years of reliable service and enhance the aesthetic appeal of the bathroom. Using a squeegee after each use will further reduce the build-up of soap scum and hard water deposits, extending the life and appearance of the refinishing job. Remember to always consult the manufacturer's specifications for the specific refinishing products used, as these guidelines provide the most accurate information regarding application, curing, and maintenance.
Choosing a qualified professional for the job is always an option, especially for individuals who lack experience with refinishing or are unsure about the process. A professional refinisher will have the necessary skills, equipment, and expertise to ensure a high-quality and durable finish.

How To Change The Color Of Your Bathtub With And Without Paint In 2024

Can You Change The Color Of Your Bath Tub Maryland Tile

Before After How To Paint A Bathtub And Clean It Does Last Thrift Diving

How To Change The Color Of Your Bathtub With And Without Paint In 2024

How To Change The Color Of Your Bathtub With And Without Paint In 2024

How To Paint A Tub With Rustoleum What Not Do

Diy Painted Bathtub Follow Up Your Questions Answered Addicted 2 Decorating

Yes You Can Paint Your Bathtub And Tile Here S How Toolbox Divas

Bathtub Refinishing Todds Porcelain Fiberglass Repair

How To Change The Color Of Your Bathtub With And Without Paint In 2024