How To Change a Bathtub Faucet Handle
Changing a bathtub faucet handle is a common plumbing task that can improve the bathroom's aesthetic and functionality. A worn or damaged handle can be unsightly and difficult to operate. This guide provides a step-by-step approach to replacing a bathtub faucet handle, empowering homeowners to tackle this project with confidence.
Before beginning the replacement process, gathering the necessary tools and materials is essential. These typically include a new faucet handle (ensure compatibility with the existing valve), a flathead or Phillips screwdriver, an Allen wrench (if applicable), adjustable pliers, a putty knife, and possibly replacement screws.
Turning off the water supply is paramount before any plumbing work commences. Locate the shut-off valves for the bathtub, usually found beneath the sink or behind the access panel. Turn these valves clockwise to stop the water flow. After shutting off the valves, turn on the bathtub faucet to release any remaining water pressure in the lines.
The next step involves removing the old faucet handle. Examine the handle for a setscrew, a small screw often concealed beneath a decorative cap. If present, use an Allen wrench or small screwdriver to remove the setscrew. The cap can typically be pried off gently using a flathead screwdriver or a thin utility knife. Once the setscrew is removed, the handle should pull straight off the valve stem. Some handles might require a slight twisting motion to loosen them.
If the handle does not easily pull off after removing the setscrew, it may be corroded or stuck. Penetrating oil can be applied to the base of the handle and allowed to sit for a few minutes. This can help loosen the connection. Afterward, gently try to wiggle the handle back and forth while pulling it outwards. Avoid excessive force, which could damage the valve stem.
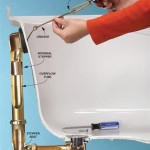
With the old handle removed, the next step focuses on the adapter, the piece connecting the handle to the valve stem. Some faucet designs integrate the adapter into the handle. However, if a separate adapter is present, it will need to be removed. Use pliers to gently unscrew the adapter from the valve stem. Take care not to scratch the valve stem during this process. If the adapter is difficult to remove, penetrating oil can be applied here as well.
Once the old handle and adapter (if applicable) are removed, take the opportunity to clean the valve stem. Use a cloth to wipe away any mineral deposits or corrosion. This will ensure a smooth and proper fit for the new handle and adapter.
Now, the new faucet handle can be installed. If the design includes a separate adapter, screw the new adapter onto the valve stem, ensuring a snug fit. Hand-tighten the adapter initially and then use pliers for a final quarter-turn to secure it. Avoid overtightening, which can strip the threads.
Next, align the new handle with the valve stem, ensuring it is oriented correctly. If there is a setscrew, insert and tighten it securely with an Allen wrench or screwdriver. This screw holds the handle firmly in place on the valve stem. Replace the decorative cap, if applicable.
After installing the new handle, turn the water supply back on by slowly turning the shut-off valves counterclockwise. Observe the faucet and surrounding pipes for any leaks. If a leak is detected, turn the water supply off again and check the connections to ensure they are tight. If the leak persists, further investigation or professional assistance might be necessary.
Test the new faucet handle by turning it on and off in both hot and cold positions. Check for smooth operation and ensure that the water temperature adjusts as expected. Also, observe for any dripping or leaks around the base of the handle.
Regular maintenance can prolong the lifespan of the faucet handle. Periodically clean the handle with a mild soap and water solution to remove any buildup. Avoid using abrasive cleaners which can damage the finish. If the handle becomes stiff or difficult to operate, lubricating the valve stem with a silicone-based lubricant can help restore smooth operation.
While replacing a bathtub faucet handle is generally a straightforward task, complexities can arise depending on the specific faucet model. If encountering difficulties, consulting a qualified plumber is recommended. A professional can diagnose any underlying issues and ensure the repair is completed correctly.

How To Replace A Bathtub Faucet The Home Depot

How To Replace A Bathtub Faucet The Home Depot

How To Fix A Leaking Bathtub Faucet Diy Family Handyman

How To Replace A Bathtub Faucet The Home Depot

Shower Handle Replacement

3 Ways To Remove A Tub Faucet Wikihow

How To Replace A Bathtub Faucet The Home Depot

Fixing Faucets How To Replace A Difficult Tub Faucet Cartridge

How To Fix A Loose Bath Tub Faucet Handle Ifixit Repair Guide

How To Fix A Leaky Bathtub Faucet 6 Ways Stop Drips
Related Posts