How to Change a Bathtub Faucet
Replacing a bathtub faucet is a relatively simple plumbing project that can be completed in a few hours with the right tools and materials. Here's a step-by-step guide to help you change your bathtub faucet:
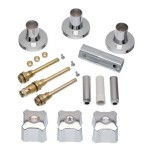
Materials you'll need:
- New bathtub faucet
- Adjustable wrench
- Plumber's putty
- Teflon tape
- Bucket
- Screwdriver
Step 1: Prepare the work area
First, close the water supply valves beneath the sink or behind the access panel. Open the faucet to release any remaining water. Place a bucket beneath the faucet to catch any residual water.
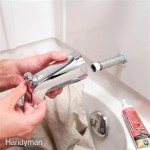
Step 2: Remove the old faucet
Use an adjustable wrench to loosen the nuts that secure the faucet to the bathtub. Once the nuts are loose, you can remove the old faucet by pulling it straight up.
Step 3: Clean the installation surface
Thoroughly clean the surface where the new faucet will be installed. Remove any old sealant or debris to ensure a secure fit.
Step 4: Apply plumber's putty
Apply a bead of plumber's putty around the base of the new faucet. This will create a watertight seal between the faucet and the bathtub.
Step 5: Install the new faucet
Align the new faucet over the installation surface and press it firmly into place. Use the adjustable wrench to tighten the nuts that secure the faucet to the bathtub. Avoid overtightening.
Step 6: Connect the water supply lines
Connect the hot and cold water supply lines to the corresponding valves on the new faucet. Use Teflon tape on the threads of the supply lines to prevent leaks.
Step 7: Reinstall the handles
Insert the handles into the faucet and secure them with the screws provided. Ensure they are facing the desired direction.
Step 8: Test the faucet
Turn on the water supply valves and check for any leaks. If there are any leaks, tighten the nuts or adjust the seals accordingly.
Step 9: Enjoy your new faucet
Congratulations! You have successfully replaced your bathtub faucet. Step back and admire your work, and enjoy the convenience of a fresh, updated faucet.

How To Replace A Mobile Home Bathtub Faucet Parts Latest News

How To Install A Tub Spout The Home Depot With Thisoldhouse

How To Replace A Bathtub Spout Diy Family Handyman

How To Change A Bathtub Faucet 14 Steps With Pictures Wikihow

How To Replace A Tub Spout Project Tutorial Bob Vila

Fixing Faucets How To Replace A Difficult Tub Faucet Cartridge

Learn How To Remove And Install Various Tub Spouts

Learn How To Remove And Install Various Tub Spouts

Replacing Shower Tub Faucet How To Install A New

Installing A Tub Faucet Fine Homebuilding