How to Change a Bathtub Drain: A Comprehensive Guide
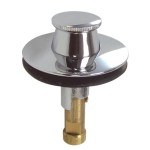
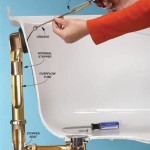
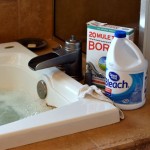
A leaky or clogged bathtub drain can be a major inconvenience, leading to water damage and unsanitary conditions. Replacing a bathtub drain is a relatively easy task that can be completed in a few hours with the right tools and materials. Follow this step-by-step guide to learn how to change a bathtub drain. ### 1. Gather Your Tools and Materials * Adjustable wrench * Plumber's putty * New bathtub drain assembly * Screwdriver * Utility knife * Gloves * Safety glasses ### 2. Turn Off the Water Supply Before you begin working on the drain, turn off the water supply to your bathtub. This will prevent water from leaking out while you are replacing the drain. ### 3. Remove the Old Drain Assembly 1. Use the adjustable wrench to loosen the drain stopper and remove it from the bathtub. 2. Once the stopper is removed, you will see the drain flange. Use the screwdriver to remove the screws that hold the flange in place. 3. Once the screws are removed, you can lift the drain flange out of the bathtub. ### 4. Clean the Drain Hole Once the old drain assembly is removed, take a few minutes to clean the drain hole. Remove any debris or buildup that may have accumulated over time. You can use a scrub brush and some mild detergent to clean the drain hole. ### 5. Apply Plumber's Putty Before installing the new drain assembly, you will need to apply plumber's putty to the bottom of the drain flange. Plumber's putty is a waterproof sealant that will help to prevent leaks. To apply plumber's putty, roll it out into a rope about the same size as the diameter of the drain flange. Then, press the plumber's putty around the bottom of the drain flange, creating a seal. ### 6. Install the New Drain Assembly 1. Insert the new drain assembly into the drain hole. Make sure that the plumber's putty is evenly distributed around the bottom of the drain flange. 2. Use the screwdriver to screw the drain flange into place. Tighten the screws until the drain flange is secure. 3. Reattach the drain stopper to the drain assembly. ### 7. Turn on the Water Supply Once the new drain assembly is installed, turn on the water supply to your bathtub. Check for leaks around the drain. If you see any leaks, tighten the screws on the drain flange until the leak stops. ### 8. Test the Drain Once you have checked for leaks, test the drain to make sure that it is working properly. Fill the bathtub with water and then drain it. The water should drain quickly and smoothly. ### Conclusion Replacing a bathtub drain is a relatively simple task that can be completed in a few hours. By following this step-by-step guide, you can easily replace a bathtub drain and prevent future leaks and clogs.
How To Replace A Bathtub Drain

How To Remove A Bathtub Drain Forbes Home

Replacing A Tub Drain Bathtub Removal And Replacement

How To Replace A Bathtub Drain

How To Remove Bathtub Drain

4 Easy Ways To Remove A Tub Drain Stopper Wikihow

How To Replace A Bathtub Drain

Diy How To Replace Bathtub Drain Stopper Tutorial Clogged

Replace Your Bathtub Drain Like A Pro Using The Right Tools

4 Easy Ways To Remove A Tub Drain Stopper Wikihow