How to Change a Bathtub Faucet Stem
Bathtub faucet stems, also known as cartridges or valve stems, are integral components that control the flow of water and regulate its temperature. Over time, mineral buildup, corrosion, and general wear and tear can cause these stems to malfunction, leading to drips, leaks, and difficulty in achieving the desired water temperature. Replacing a worn or damaged bathtub faucet stem is a common plumbing repair that can be successfully undertaken by a homeowner with basic tools and a methodical approach. This article provides a comprehensive guide on how to change a bathtub faucet stem, ensuring a leak-free and properly functioning faucet.
Before embarking on this project, it is crucial to identify the type of faucet stem being used. There are primarily three types: compression, ball, and cartridge. Compression stems are typically found in older faucets and feature a rubber washer that compresses against a valve seat to shut off the water flow. Ball stems utilize a slotted ball that rotates to control the water flow. Cartridge stems, common in newer faucets, employ a plastic or brass cartridge with O-rings to regulate the water. Determining the faucet type will influence the tools required and the specific steps involved in the replacement process.
Safety is paramount when working with plumbing. Always begin by shutting off the water supply to the bathtub faucet. Typically, there are shut-off valves located beneath the sink or near the water meter. If individual shut-off valves are unavailable, the main water supply to the entire house must be turned off. After shutting off the water, open the faucet to relieve any remaining pressure in the pipes. It is also advisable to wear safety glasses to protect the eyes from debris and to have a towel handy to absorb any residual water.
Key Point 1: Identifying the Faucet Stem and Gathering Necessary Tools
The first crucial step involves correctly identifying the type of faucet stem that needs replacement. Observation is key. Does the faucet have separate hot and cold water handles? Does it require a significant turn to shut off the water? These are indicators of a compression-type faucet. If the faucet has a single handle that pivots left and right for temperature control, it is likely a ball or cartridge faucet. Once the faucet type is determined, the next step is to gather the necessary tools. A standard set of tools will typically include:
- Screwdrivers (both flathead and Phillips head)
- Adjustable wrench
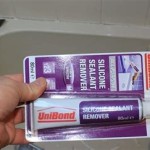
- Penetrating oil
- Pliers (needle-nose and regular)
- Faucet stem puller (optional, but highly recommended for stubborn stems)
- New faucet stem (matching the existing one)
- Flashlight
- Clean rags or towels
Purchasing the correct replacement faucet stem is arguably the most important aspect. It is highly recommended to remove the old stem and take it to a hardware store or plumbing supply store for an exact match. Alternatively, obtain the faucet's make and model information and use it to identify the correct replacement part online. Using an incorrect stem can lead to leaks and potential damage to the faucet body.
Prior to disassembling the faucet, it is beneficial to take photographs of the various components in their assembled state. These photographs will serve as a valuable reference during reassembly, ensuring that all parts are correctly positioned.
Key Point 2: Removing the Old Faucet Stem
With the water shut off, pressure relieved, and the appropriate tools assembled, the process of removing the old faucet stem can commence. The specific steps involved will vary slightly depending on the type of faucet. Generally, the procedure involves the following:
First, remove the faucet handle. This typically involves unscrewing a set screw located on the handle or beneath a decorative cap. The screw may be concealed, requiring the removal of a small cover plate. Once the set screw is loosened, the handle should slide off. If the handle is stuck, applying penetrating oil around the base of the handle can help to loosen it.
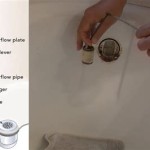
Next, expose the faucet stem. This may require removing a decorative escutcheon or trim ring. These components are often threaded or held in place by screws. Once removed, the faucet stem will be visible.
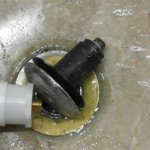
For compression stems, use an adjustable wrench to carefully unscrew the stem assembly. Be mindful not to damage the surrounding faucet body. If the stem is corroded or stuck, apply penetrating oil and allow it to soak for several minutes before attempting to unscrew it again. A faucet stem puller can be employed if the stem remains stubbornly in place.
For ball or cartridge stems, locate the retaining clip or nut that secures the cartridge. Remove the clip or nut, and then gently pull the cartridge straight out of the faucet body. If the cartridge is difficult to remove, a faucet stem puller designed for cartridges can be used.
Once the old faucet stem is removed, inspect the faucet seat (the area where the stem seals against the faucet body) for any damage or corrosion. If the seat is damaged, a seat reamer or seat wrench can be used to repair it. Clean the faucet body thoroughly with a clean cloth to remove any mineral deposits or debris.
Key Point 3: Installing the New Faucet Stem and Reassembling the Faucet
With the old faucet stem removed and the faucet body cleaned, the installation of the new stem can begin. Before installing the new stem, apply a thin layer of plumber's grease to the O-rings or rubber washers on the stem. This will help to ensure a watertight seal and facilitate smooth operation.
For compression stems, carefully thread the new stem assembly into the faucet body. Tighten it securely with an adjustable wrench, but avoid over-tightening, which could damage the stem or faucet body.
For ball or cartridge stems, align the new cartridge with the faucet body and gently push it into place until it is fully seated. Secure the cartridge with the retaining clip or nut. Ensure that the clip or nut is properly tightened to prevent leaks.
After installing the new faucet stem, reassemble the faucet in the reverse order of disassembly. Replace the decorative escutcheon or trim ring, and then reinstall the faucet handle. Tighten the set screw or secure the handle with the appropriate hardware.
Once the faucet is reassembled, slowly turn the water supply back on. Check for any leaks around the faucet stem, handle, and spout. If leaks are present, tighten the stem or connections as needed. Minor drips may disappear after a short period of use as the seals seat properly.
Test the faucet thoroughly by turning it on and off and adjusting the water temperature. Ensure that the water flows smoothly and that the faucet shuts off completely without any drips. If the faucet continues to leak or malfunction, double-check the installation and ensure that all components are properly aligned and tightened. It may also be necessary to inspect the faucet seat for damage or corrosion and address any issues accordingly.
In cases where the faucet continues to leak or malfunction despite repeated attempts at repair, it may be necessary to consult a qualified plumber. A plumber has the expertise and tools to diagnose and repair more complex plumbing problems, ensuring a properly functioning and leak-free faucet.
Proper maintenance of the bathtub faucet can help to prolong the life of the faucet stem and prevent future problems. Regularly cleaning the faucet with a mild detergent and water can remove mineral deposits and prevent corrosion. Avoid using abrasive cleaners, which can damage the faucet finish and seals. In hard water areas, consider installing a water softener to reduce mineral buildup and extend the life of plumbing fixtures.
Replacing a bathtub faucet stem is a straightforward task that can save money on plumbing repair costs. By following these instructions carefully, and taking your time during the project, homeowners can change a worn out faucet stem by completing each steps.

How To Remove Bathtub Faucet Stems Quick And Easy
:max_bytes(150000):strip_icc()/how-to-replace-a-bathtub-faucet-5210836-10-6825223c1e75442187d5ab09690510d4.jpg?strip=all "How To Replace A Bathtub Faucet")
How To Replace A Bathtub Faucet

Bathtub Stem And Seat Replacement
:max_bytes(150000):strip_icc()/how-to-replace-a-bathtub-faucet-5210836-08-dde7e85413a9421cb4414bb4655e49e3.jpg?strip=all "How To Replace A Bathtub Faucet")
How To Replace A Bathtub Faucet

How To Fix A Leaking Bathtub Faucet Diy Family Handyman

Bathtub Spout With Diverter Replacement Fix Leaking Tub Jonny Diy

Plumbing Stuck Bathtub Faucet Stem Home Improvement Stack Exchange

Plumbing Repairing A Leaky Valve Stem Home Improvement Stack Exchange

Diy Bathtub Faucet Repair

How To Change A Bathtub Faucet 14 Steps With Pictures Wikihow
Related Posts