How To Change A Bathtub Faucet Handle
A leaky faucet is not only annoying, but it can also waste a lot of water. If you're not sure how to fix a leaky faucet, don't worry - it's actually quite easy. Here's a step-by-step guide:
Tools You'll Need:
- Adjustable wrench
- Phillips head screwdriver
- Flathead screwdriver
- New faucet handle
Instructions
- Turn off the water supply to the faucet. There will be two shut-off valves under the sink, one for hot water and one for cold water. Turn both valves clockwise to turn off the water.
- Open the faucet to release any remaining water in the line.
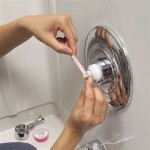
- Locate the set screw on the faucet handle. It is usually located on the underside of the handle, near the base. Use a Phillips head screwdriver to remove the set screw.
- Pull the faucet handle straight up to remove it from the faucet body.
- Inspect the O-rings on the faucet handle. If the O-rings are worn or damaged, they will need to be replaced. You can purchase new O-rings at a hardware store.
- Apply a small amount of plumber's grease to the new O-rings.
- Place the new O-rings on the faucet handle.
- Push the faucet handle back onto the faucet body.
- Tighten the set screw using a Phillips head screwdriver.
- Turn on the water supply to the faucet and check for leaks.
Tips
- If you are replacing a faucet handle on a widespread faucet, you will need to remove the aerator before you can remove the handle. To remove the aerator, use a wrench to unscrew it from the faucet body.
- If you are still having trouble fixing a leaky faucet, you may need to call a plumber.

How To Fix A Leaking Bathtub Faucet Diy Family Handyman

Shower Handle Replacement

How To Remove Moen Bathroom Faucet Handle In 2 Steps

Fixing Faucets How To Replace A Difficult Tub Faucet Cartridge

How To Fix A Leaking Single Handle Bathtub Faucet Quick And Easy

How To Fix A Leaky Single Handle Tub Shower Faucet Danco

Can T Fixure Out How To Remove Bathtub Faucet Handle

3 Ways To Remove A Tub Faucet Wikihow

How Do I Replace Bathroom Sink Faucet Handles Cleaning More

How To Fix A Leaky Bathtub Faucet 6 Ways Stop Drips
Related Posts