How To Change A Bathtub Faucet Cartridge
A dripping bathtub faucet, while seemingly minor, can lead to significant water waste and increased water bills over time. The primary culprit behind a persistent drip is often a worn-out or damaged faucet cartridge. This component, located within the faucet handle, controls the flow of water. Replacing the cartridge is a relatively straightforward plumbing task that most homeowners can accomplish with the right tools and a methodical approach. This article provides a detailed guide on how to change a bathtub faucet cartridge, ensuring a leak-free and functional fixture.
Before embarking on this project, it is crucial to understand the different types of faucet cartridges and to identify the correct replacement for the specific faucet model. There are primarily four types of faucet cartridges: compression cartridges, ball cartridges, ceramic disc cartridges, and cartridge faucets (often referred to as single-handle cartridges). Each type operates differently and requires a specific replacement part. Attempting to install an incorrect cartridge will likely result in continued leaking or damage to the faucet assembly.
Furthermore, preparation is key to a successful faucet cartridge replacement. Gathering the necessary tools and materials beforehand prevents delays and frustration during the process. Shutting off the water supply to the faucet is paramount to avoid flooding and making the repair process manageable. With careful preparation and a step-by-step approach, replacing a bathtub faucet cartridge can be a cost-effective solution to a common household plumbing issue.
Key Point 1: Identifying the Faucet Cartridge Type and Gathering Supplies
The first and most critical step in replacing a bathtub faucet cartridge is identifying the type of cartridge your faucet utilizes. This will directly dictate the type of replacement cartridge you need and, to some extent, the procedure you will follow. Visually inspecting the faucet handle and its operation can provide clues. Single-handle faucets often utilize either ball cartridges or single-handle cartridges themselves. Two-handle faucets typically employ compression cartridges or ceramic disc cartridges.
Compression faucets, the oldest design, have two separate handles for hot and cold water. They work by compressing a rubber washer against a valve seat to stop the flow of water. These are identifiable by a noticeable delay between turning the handle and the water flow starting or stopping, and they often require more force to operate. Within these faucets, you'll find compression cartridges, which control this pressure mechanism. These are typically straightforward to replace, but may require some force if they have been corroded in place by the water.
Ball faucets, usually single-handle, feature a slotted ball that controls water flow and temperature. Moving the handle adjusts the position of the ball, aligning the slots with the hot and cold water inlets. These are less common in bathtubs than in kitchen sinks, but still encountered. Replacing the ball cartridge involves several small components, including springs and O-rings, which are often included in a rebuild kit. Keep track of the positioning of these components when disassembling the faucet.
Ceramic disc faucets, also usually two-handle, are known for their smooth operation and durability. They utilize two ceramic discs that slide against each other to control water flow. When the holes in the discs align, water flows. These faucets are readily identifiable by their smooth and effortless operation. Cartridges in these kinds of faucets can be easily damaged by hard water deposits, which is a significant factor in their failure.
Single-handle cartridge faucets (also often just referred to as "cartridge faucets" specifically) are a popular choice for modern bathtubs. They utilize a single cartridge to control both water flow and temperature. These cartridges are typically cylindrical and can be removed as a single unit. Different manufacturers have slightly different mechanisms for releasing the faucet handle and accessing the cartridge, so refer to the manufacturer's instructions if available.
Once the faucet type is identified, gather the necessary tools and materials. A new replacement cartridge is, of course, essential. Ensure it matches the faucet type and, ideally, the faucet model number for a perfect fit. Other essential tools include:
*A flathead screwdriver
*A Phillips head screwdriver
*An adjustable wrench
*A set of Allen wrenches (various sizes)
*Penetrating oil (to loosen stubborn parts)
*A cartridge puller (optional, but helpful for stubborn cartridges)
*Clean rags or towels
*Plumber's grease (silicone based)
*Flashlight
Having all these tools readily available will streamline the process and minimize potential delays.
Key Point 2: Removing the Old Cartridge and Preparing the Faucet
After gathering the tools and identifying the cartridge type, the next step involves removing the old cartridge and preparing the faucet for the new one. This typically involves several steps, requiring careful attention to detail to avoid damaging the faucet or surrounding plumbing.
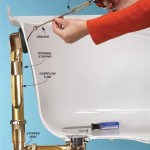
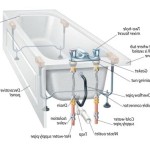
The first and most crucial step is to shut off the water supply to the faucet. Locate the shut-off valves for the hot and cold water lines leading to the bathtub faucet. These valves are often located under the sink or in an access panel behind the bathtub. Turn both valves clockwise until they are fully closed. After closing the valves, turn on the faucet to relieve any remaining pressure in the lines. Allow all the water to drain out before proceeding.
Next, protect the bathtub surface to prevent scratches or damage during the repair. Place a towel or drop cloth around the faucet base to catch any water or debris that may fall. This is particularly important for acrylic or fiberglass tubs, which are prone to scratching.
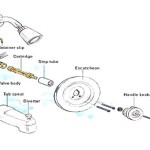
Now, begin disassembling the faucet. The exact procedure will vary depending on the faucet type. For most single-handle faucets, you'll need to remove the faucet handle. Look for a set screw, often hidden under a decorative cap on the handle. Use a flathead screwdriver or Allen wrench to loosen the set screw. Once loosened, carefully pull the handle off the faucet body. For two-handle faucets, the handles are typically attached with screws located under decorative caps or on the side of the handle. Remove the screws to detach the handles.
With the handles removed, you will gain access to the faucet sleeve or escutcheon. This decorative piece covers the faucet body and conceals the cartridge. Carefully unscrew or pry off the sleeve to expose the cartridge retaining clip or nut. Some faucets may have a retaining clip that holds the cartridge in place. Use a small screwdriver or pliers to remove the clip. Other faucets may have a retaining nut that needs to be unscrewed using an adjustable wrench. Be careful not to overtighten or damage the nut.
Once the retaining clip or nut is removed, you can attempt to remove the old cartridge. The cartridge may be stuck due to mineral buildup or corrosion. Try gently twisting and pulling the cartridge straight out of the faucet body. If the cartridge is stubborn, apply penetrating oil around the cartridge and let it sit for a few minutes. This will help loosen any corrosion or deposits that are holding it in place. If it still won't budge, use a cartridge puller. This tool is designed to grip the cartridge and provide leverage for removal. Follow the instructions that come with the cartridge puller.
Inspect the faucet body after removing the old cartridge. Clean any debris, mineral buildup, or corrosion from the inside of the faucet body using a clean rag or a small brush. Pay particular attention to the cartridge seat, as this is where the new cartridge will seal. Ensure the cartridge seat is clean and smooth for a proper seal.
Key Point 3: Installing the New Cartridge and Reassembling the Faucet
After successfully removing the old cartridge and preparing the faucet body, the final step involves installing the new cartridge and reassembling the faucet. This requires careful installation of the new cartridge and meticulous reassembly of the faucet components, following the reverse order of disassembly.
Before installing the new cartridge, apply a thin layer of plumber's grease (silicone-based) to the outside of the cartridge. This will help ensure a smooth installation and prevent future corrosion. Be sure to use silicone-based grease, as petroleum-based grease can damage rubber or plastic components.
Carefully insert the new cartridge into the faucet body. Ensure the cartridge is oriented correctly, matching the position of the old cartridge. The cartridge may have specific markings or notches that need to align with corresponding features in the faucet body. Push the cartridge firmly into place until it is fully seated.
Once the cartridge is in place, secure it with the retaining clip or nut. If using a retaining clip, ensure it is properly seated in its groove. If using a retaining nut, tighten it snugly with an adjustable wrench, but avoid over-tightening, which could damage the cartridge or the faucet body. Ensure the nut is secure enough to hold the cartridge in place without being excessively tight.
Now, reassemble the faucet sleeve or escutcheon. Screw or snap the sleeve back into place, covering the faucet body and concealing the cartridge. Ensure the sleeve is properly aligned and securely attached.
Next, reattach the faucet handles. For single-handle faucets, slide the handle onto the faucet body and tighten the set screw. Ensure the handle is properly aligned and securely attached. For two-handle faucets, attach the handles with the screws that were removed earlier. Tighten the screws securely, but avoid over-tightening.
After reassembling the faucet, slowly turn the water supply valves back on. Start with one valve and gradually increase the flow of water. Check for any leaks around the faucet body, the handle base, and the spout. If you find any leaks, immediately turn off the water supply and inspect the connections. Ensure all components are properly tightened and sealed. In some instances, a small amount of plumber's tape around threaded connections can remedy minor leaks. Reapply thread seal tape if you still notice leakage.
Once all the leaks are resolved, test the faucet to ensure it is functioning properly. Turn the faucet on and off, and check the water temperature. Ensure the water flow is smooth and consistent. If the water flow is restricted or the temperature is not correct, the cartridge may not be installed correctly, or there may be debris blocking the water lines. If there is backflow from one side to the other, the cartridge may need to be rotated 180 degrees. Double-check that the new cartridge is the correct model for your faucet. If issues persist, further investigation or professional plumbing assistance may be required.
Finally, clean up the work area. Remove any towels or drop cloths, and dispose of the old cartridge and any other waste materials. This will help prevent slip and fall hazards and keep the bathroom clean.

Bath Tub Cartridge Replacement Ifixit Repair Guide

Fixing Faucets How To Replace A Difficult Tub Faucet Cartridge

Bath Tub Cartridge Replacement Ifixit Repair Guide

Replace A Moen Shower Cartridge Fix Leaky Tub Faucet

How To Replace A Moen Cartridge And Fix Leaky Bathtub Faucet It Tutorials

Moen Bathtub Drippingfaucet Repair

Bath Tub Cartridge Replacement Ifixit Repair Guide

How To Replace A Delta Cartridge And Fix Leaky Bathtub Faucet It Tutorials

How To Replace Cartridge Assembly On Tub Or Jacuzzi Faucet

How To Fix A Leaking Bathtub Faucet Diy Family Handyman
Related Posts