How to Change a Bathtub Drain Plug
A malfunctioning bathtub drain plug can be a significant inconvenience. It can lead to a slow-draining tub, a tub that won't hold water at all, or even leaks. Several types of drain plugs are commonly found in bathtubs, including lift-and-turn, pop-up, and toe-touch models. Each type has its own unique mechanism and, consequently, slightly different procedures for removal and replacement. Understanding these differences is crucial for a successful drain plug replacement.
This article provides a comprehensive guide to changing a bathtub drain plug, covering the necessary tools, step-by-step instructions for different plug types, and tips for troubleshooting common issues. Careful attention to detail and adherence to the outlined procedures will help ensure a properly functioning drain plug and a leak-free bathtub.
Identifying the Type of Bathtub Drain Plug
Before attempting to replace a bathtub drain plug, it is essential to accurately identify its type. The mechanism for operating the drain plug dictates the tools and steps required for removal and installation. The most common types of bathtub drain plugs are:
Lift-and-Turn Drain Plug: This type features a knob or lever on the top of the drain plug. Lifting or turning the knob opens or closes the drain. The entire mechanism is often contained within the drain itself.
Pop-Up Drain Plug: This type is controlled by a lever, typically located near the overflow drain on the bathtub wall. The lever actuates a linkage that raises and lowers the drain plug. The plug itself usually has a smooth, rounded top.
Toe-Touch Drain Plug: As the name suggests, this type is operated by pressing down on the drain plug with a toe or finger. A spring-loaded mechanism locks the plug in either the open or closed position.
Push and Seal Drain Plug: This type is similar to the toe-touch plug, but instead of a spring-loaded mechanism, it uses a rubber seal that expands or contracts when pressed, creating a watertight seal. Depressing the plug a second time releases the seal.
Chain and Stopper Drain Plug: This type is a simple rubber or metal stopper attached to a chain. The stopper is manually placed into the drain opening to prevent water from escaping. While less common in modern bathtubs, it's still found in older installations.
Correctly identifying the drain plug type is the first step. Failure to do so could result in damaging the existing drain or purchasing the wrong replacement parts.
Gathering the Necessary Tools and Materials
Having the right tools and materials on hand before starting the drain plug replacement process is critical for efficiency and a successful outcome. The specific tools required may vary slightly depending on the type of drain plug being replaced, but the following list represents a comprehensive set:
Flathead Screwdriver: Used for prying, scraping, and potentially adjusting some drain plug mechanisms.
Phillips Head Screwdriver: Required for removing screws associated with certain drain plug assemblies.
Pliers (Channel-Lock or Adjustable): Used for gripping and turning drain parts, especially those that are corroded or tightly secured.
Drain Plug Wrench (Tub Drain Extractor Tool): A specialized tool designed to grip and remove the drain flange without damaging the tub. This is particularly useful for stubborn drains.
Penetrating Oil (e.g., WD-40): Applied to loosen corroded drain parts and facilitate removal.
Plumber's Putty: Used to create a watertight seal between the drain flange and the bathtub surface.
Teflon Tape (Plumber's Tape): Used to seal threaded connections and prevent leaks.
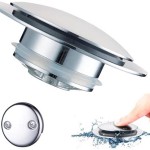
New Bathtub Drain Plug (Replacement): Ensure the replacement plug is compatible with the existing drain assembly and the bathtub. It is advisable to purchase a replacement from a reputable plumbing supply store or hardware store to guarantee quality and compatibility.
Clean Rags or Sponge: For cleaning the area around the drain and wiping up any spills.
Gloves: To protect hands from dirt and potential exposure to bacteria.
Flashlight or Work Light: To provide ample illumination while working in the often-dark area around the bathtub drain.
Gathering these tools and materials beforehand will streamline the replacement process and minimize potential disruptions.
Step-by-Step Instructions for Replacing Different Drain Plug Types
The procedure for replacing a bathtub drain plug varies depending on the type of plug in question. The following sections provide detailed instructions for replacing the most common types.
Replacing a Lift-and-Turn Drain Plug:
1. Remove the Knob or Lever: Typically, the knob or lever is attached to the drain plug stem with a small screw. Use a small screwdriver to loosen and remove the screw. Carefully pull the knob or lever off the stem.
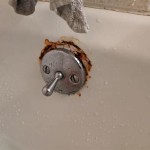
2. Unscrew the Drain Plug Body: Once the knob or lever is removed, the drain plug body can be unscrewed from the drain flange. This may require some force, especially if the drain is old or corroded. A pair of pliers or a drain plug wrench can be used to grip the drain plug body and turn it counterclockwise.
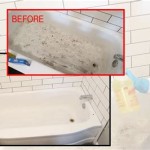
3. Clean the Drain Flange: After removing the old drain plug, thoroughly clean the drain flange inside the tub. Remove any old plumber's putty or debris. A clean surface ensures a proper seal with the new drain plug.
4. Install the New Drain Plug: Apply a fresh bead of plumber's putty around the underside of the new drain plug flange. Insert the drain plug body into the drain flange and screw it in clockwise. Tighten the drain plug securely, but avoid over-tightening, which could damage the drain or the tub.
5. Reattach the Knob or Lever: Reattach the knob or lever to the drain plug stem and secure it with the screw that was removed earlier. Test the drain plug to ensure it opens and closes properly.
Replacing a Pop-Up Drain Plug:
1. Locate the Linkage Behind the Overflow Plate: The pop-up drain plug is controlled by a linkage connected to a lever behind the overflow plate (the round cover near the top of the tub). Remove the overflow plate by unscrewing it from the bathtub wall.
2. Disconnect the Linkage: Carefully disconnect the linkage from the drain plug. This may involve loosening a screw or clip that holds the linkage in place. Observe how the linkage is connected before disconnecting it to facilitate reassembly.
3. Remove the Old Drain Plug: The old drain plug can now be lifted out of the drain opening. It may be necessary to gently wiggle the plug to loosen it. If the plug is stuck, try using a pair of pliers to grip and twist it.
4. Clean the Drain: Clean the drain opening thoroughly to remove any debris or buildup.
5. Install the New Drain Plug: Insert the new drain plug into the drain opening. Ensure that it sits flush with the drain flange.
6. Reconnect the Linkage: Reconnect the linkage to the new drain plug, ensuring that it is properly aligned and securely fastened. Test the lever to ensure that the drain plug opens and closes smoothly.
7. Reattach the Overflow Plate: Reattach the overflow plate to the bathtub wall, securing it with the screws that were removed earlier.
Replacing a Toe-Touch Drain Plug:
1. Unscrew the Old Drain Plug: Toe-touch drain plugs typically unscrew from the drain flange. Grip the top of the drain plug and turn it counterclockwise. It may be necessary to apply some force to loosen the plug.
2. Clean the Drain Flange: Clean the drain flange thoroughly to remove any debris or buildup. This ensures a proper seal with the new drain plug.
3. Install the New Drain Plug: Apply a small amount of plumber's putty to the underside of the new drain plug flange. Insert the drain plug into the drain flange and screw it in clockwise. Tighten the drain plug securely, but avoid over-tightening.
4. Test the Drain Plug: Press down on the drain plug to activate the mechanism. Ensure that the drain plug opens and closes properly.
Replacing a Push and Seal Drain Plug:
1. Remove the old Drain Plug: Many push and seal drain plugs can be removed by simply pulling them straight up. There may be a slight resistance due to the rubber seal. A gentle twisting motion while pulling can help. Other types may require unscrewing.
2. Clean the Drain Flange: Clean the drain flange thoroughly, removing any old sealant or debris. This is critical for ensuring a proper seal with the new plug.
3. Install the New Drain Plug: Insert the new push and seal drain plug into the drain opening. Ensure it is properly seated and aligned. Some models may require a twisting motion to lock into place. Check the manufacturer's instructions.
4. Test the Seal: Fill the tub with a small amount of water and test the seal by pushing down on the drain plug. Verify that the water does not leak out. If leaks are present, remove the plug and inspect both the plug and the flange for debris or damage. Readjust the plug if necessary.
Following these instructions will help ensure a successful drain plug replacement for each respective type.
Troubleshooting Common Issues
Despite following the proper procedures, certain issues may arise during the drain plug replacement process. Addressing these issues effectively can prevent further complications and ensure a properly functioning drain.
Stripped Screws: If the screws holding the overflow plate or drain plug knob are stripped, it can be difficult to remove them. Using a rubber band or steel wool between the screwdriver and the screw head can sometimes provide enough grip to remove the screw. If this fails, a screw extractor may be necessary.
Corroded Drain Parts: Corrosion can make it difficult to unscrew or remove drain parts. Applying penetrating oil (like WD-40) to the corroded area and allowing it to soak for several hours can help loosen the parts. Gentle tapping with a hammer can also assist in breaking the corrosion.
Leaks After Installation: If leaks are detected after installing the new drain plug, it could be due to an improper seal. Ensure that plumber's putty or Teflon tape was applied correctly. Re-tighten the drain plug or drain flange, but avoid over-tightening. If the leak persists, remove the drain plug, clean the sealing surfaces, and reapply fresh plumber's putty or Teflon tape.
Drain Plug Not Seating Properly: If the new drain plug is not seating properly, it could be due to debris in the drain opening or an improperly adjusted linkage (in the case of pop-up drains). Clean the drain opening thoroughly and check the linkage for proper alignment and adjustment.
Incompatible Replacement Parts: It is crucial to ensure that the replacement drain plug is compatible with the existing drain assembly. If the replacement plug is the wrong size or type, it will not function properly. Double-check the compatibility before attempting installation.
Addressing these common issues effectively will contribute to a successful and long-lasting drain plug replacement.

How To Easily Remove Bathtub Drain Plug Stopper Unclog In 1 Minute Jonny Diy

Replacing A Tub Drain Bathtub Removal And Replacement

Remove A Bathtub Drain Stopper To Unclog The Quick Easy

How To Remove A Bathtub Drain The Home Depot

How To Remove A Bathtub Drain Stopper
:max_bytes(150000):strip_icc()/remove-tub-stopper-clear-a-drain-2718786-hero-425b2598739f43718b6905767d2616d8.jpg?strip=all "How To Remove 6 Diffe Kinds Of Drain Stoppers")
How To Remove 6 Diffe Kinds Of Drain Stoppers

How To Remove Bathtub Drain Stopper That Spins Freely

How To Remove A Bathtub Drain Stopper

4 Easy Ways To Remove A Tub Drain Stopper Wikihow

How To Replace Bathtub Drain Stopper With A Lift And Turn Diy
Related Posts