How to Caulk a Bathtub Like a Pro: A Step-by-Step Guide
Caulking a bathtub is an essential maintenance task that prevents water damage, mold growth, and air leaks. By following these detailed steps, you can achieve a professional-looking, watertight seal.
Materials You'll Need:
- Caulk gun
- Caulk (silicone or latex)
- Caulk remover (optional)
- Utility knife or razor blade
- Rubbing alcohol or acetone (for cleaning)
- Painter's tape (optional)
Step 1: Clean the Surface
Remove any old caulk and dirt from the area where the new caulk will be applied. Use caulk remover if necessary, then wipe with rubbing alcohol or acetone to degrease the surface.
Step 2: Protect Surrounding Areas
If desired, apply painter's tape along the edges of the bathtub and tile to create a clean line. This will prevent caulk from getting on unwanted surfaces.
Step 3: Load the Caulk Gun
Cut the tip of the caulk tube at a 45-degree angle, about 1/4 inch from the tip. Insert the tube into the caulk gun and squeeze the trigger to release a small amount of caulk.
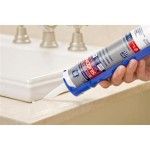
Step 4: Apply the Caulk
Hold the caulk gun at a 45-degree angle, keeping the tip in contact with the surface. Apply a continuous bead of caulk along the joint between the bathtub and the wall or tile. Work smoothly and evenly.
Step 5: Tool the Caulk
Use a damp finger or a small tool, such as a caulk tool or a wet plastic spoon, to smooth out the caulk. This will help create a neat and professional-looking finish.
Step 6: Remove the Painter's Tape
If you used painter's tape, gently remove it while the caulk is still wet. This will prevent the caulk from sticking to the tape and creating a ragged edge.
Step 7: Allow to Cure
Allow the caulk to cure according to the manufacturer's instructions. This usually takes 24 to 48 hours. Avoid using the bathtub during this time.
Tips for Success:
- Use a high-quality caulk specifically designed for bathrooms.
- Apply the caulk in small sections, about 12 inches at a time.
- Smooth out the caulk thoroughly to ensure a watertight seal.
- Replace the caulk every 2 to 5 years, or as needed.

How To Caulk A Bathtub On Sutton Place

How To Caulk A Bathtub 13 Steps With Pictures Wikihow

How To Caulk A Bathtub 13 Steps With Pictures Wikihow

How To Caulk A Bathtub On Sutton Place

How To Caulk A Shower Or Tub True Value

How To Re Caulk A Bathtub

Caulking A Bathtub Simple Steps For Successful Seal

How To Re Caulk A Bathtub

How To Use Bathroom Caulk For A Fresh New Seal

Preventing And Removing Mold On Shower Caulking