How to Apply Caulk to a Bathtub: A Comprehensive Guide
Applying caulk to a bathtub is a fundamental skill for maintaining a clean, watertight bathroom environment. Properly applied caulk prevents water damage, inhibits mold growth, and improves the aesthetic appeal of the bathtub area. This guide provides a detailed walkthrough of the process, covering preparation, application, and finishing techniques to ensure a professional-looking and long-lasting result.
Preparing for Caulking: Ensuring a Clean and Effective Seal
The success of any caulking project hinges on meticulous preparation. This stage focuses on removing any existing caulk, cleaning the surface thoroughly, and gathering the necessary tools and materials. Neglecting any of these steps can compromise the integrity and longevity of the new caulk seal.
First, gather the required tools: a utility knife or caulk removal tool, a scraper, a stiff brush, a vacuum cleaner, a clean cloth, rubbing alcohol, painter's tape, a caulk gun, and the selected caulk. The choice of caulk depends on the bathroom environment. Acrylic latex caulk is suitable for general purposes, while silicone caulk offers superior water resistance and flexibility. However, silicone caulk can be more difficult to paint over.
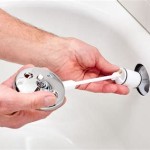
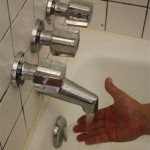
The first step in preparation is removing the old caulk. Carefully run a utility knife or caulk removal tool along both edges of the existing caulk bead. Apply consistent pressure to slice through the caulk without damaging the surrounding surfaces. For stubborn areas, multiple passes may be necessary. A dedicated caulk removal tool often features a curved blade designed to fit into the joint and lift the caulk away.
Once the caulk is scored, use a scraper or putty knife to pry it away from the surface. Work slowly and methodically, removing the caulk in sections. Avoid using excessive force, which can scratch or gouge the bathtub or surrounding tiles. A heat gun or hairdryer can soften the caulk, making it easier to remove. However, exercise caution when using heat near flammable materials or delicate surfaces.
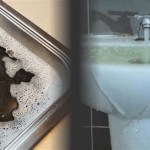
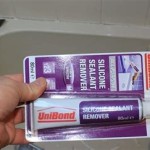
After removing the bulk of the old caulk, inspect the area for any remaining residue. Use a stiff brush and a cleaning solution to scrub away any lingering fragments. A solution of warm water and mild detergent is usually sufficient, but for stubborn residue, a specialized caulk remover solvent may be necessary. Follow the manufacturer's instructions carefully when using chemical solvents, ensuring adequate ventilation and personal protective equipment.
Thoroughly vacuum the area to remove any loose debris, dust, or caulk particles. A clean surface is essential for proper adhesion of the new caulk. After vacuuming, wipe the area with a clean cloth dampened with rubbing alcohol. Rubbing alcohol removes any remaining grease, soap scum, or other contaminants that could interfere with the caulk's bond. Allow the alcohol to evaporate completely before proceeding.
Finally, apply painter's tape along both sides of the joint where the caulk will be applied. The tape should be positioned to create a clean, even caulk line. Leave a small gap of approximately 1/8 inch between the tape and the joint. This gap will be filled with caulk. Applying painter's tape ensures a professional-looking finish with sharp, defined edges. Press the tape firmly against the surface to prevent caulk from seeping underneath.
Applying the Caulk: Achieving a Watertight and Aesthetically Pleasing Seal
With the preparation complete, the next step is to apply the caulk. This stage requires a steady hand, consistent pressure, and attention to detail to create a smooth, even bead of caulk.
Begin by preparing the caulk tube. Cut the tip of the caulk tube at a 45-degree angle, using a utility knife or the integrated cutter on the caulk gun. The size of the opening determines the width of the caulk bead. Start with a small opening and gradually increase it if necessary. Puncture the inner seal of the tube with a long nail or wire. Some caulk guns have a built-in puncture tool. Inserting the tube into the caulk gun is usually straight forward, after placing the plunger at the back of the gun. However, different types of caulk guns will have different mechanisms.
Position the caulk gun at a 45-degree angle to the joint. Apply consistent pressure to the trigger and move the gun slowly and steadily along the joint. Maintain a uniform speed to create a consistent bead of caulk. Overlap the bead slightly where you start and stop each section to ensure a continuous seal. Avoid applying too much caulk at once, as it will be more difficult to smooth and control.
For long seams, it may be necessary to pause and reposition the caulk gun. When pausing, release the pressure on the trigger to prevent the caulk from continuing to flow. Before resuming, wipe the tip of the caulk tube with a damp cloth to remove any excess caulk. Overlapping slightly when resuming the bead will help to create a seamless transition.
Inspect the caulk bead as you apply it. Look for any gaps, air bubbles, or inconsistencies in the thickness. If any imperfections are detected, stop and correct them immediately. A small, pointed tool can be used to remove air bubbles or smooth out rough spots. Maintaining a consistent angle and pressure is crucial for achieving a uniform and professional-looking caulk line.
If the caulk is allowed to cure, issues arising from an imperfect application becomes harder to fix. So after application the following step should be done as soon as possible.
Finishing and Cleanup: Ensuring a Professional and Durable Result
The final step in caulking a bathtub is finishing and cleanup. This stage involves smoothing the caulk bead, removing the painter's tape, and cleaning up any excess caulk or residue. Proper finishing and cleanup are essential for achieving a professional-looking and durable result.
Immediately after applying the caulk, smooth the bead with a wet finger or a specialized caulk smoothing tool. Dip your finger in a cup of water with a few drops of dish soap to prevent the caulk from sticking. Run your finger along the caulk bead with consistent pressure to create a smooth, concave surface. Wipe your finger frequently with a clean cloth to remove any excess caulk.
A caulk smoothing tool provides a more consistent and professional finish. These tools come in various shapes and sizes to accommodate different joint widths and profiles. Select a tool that matches the desired caulk bead shape and run it along the bead with gentle pressure. Wipe the tool frequently to prevent caulk buildup.
Once the caulk bead is smoothed, carefully remove the painter's tape. Pull the tape away from the joint at a 45-degree angle. This technique helps to prevent the caulk from tearing or pulling away from the surface. Remove the tape while the caulk is still wet to avoid any damage to the finish. If any caulk seeps under the tape, wipe it away immediately with a damp cloth.
Inspect the finished caulk line for any imperfections. Use a damp cloth or a small, pointed tool to touch up any areas that require attention. Ensure that the caulk is smooth and evenly applied along the entire joint. Remove any excess caulk from the surrounding surfaces with a damp cloth or a mild cleaning solution.
Allow the caulk to cure completely before exposing it to water. The curing time varies depending on the type of caulk and the ambient temperature and humidity. Consult the manufacturer's instructions for the recommended curing time. Generally, it is advisable to wait at least 24 hours before using the bathtub or shower. This allows the caulk to fully harden and form a watertight seal. After the caulk has cured, inspect it again for any cracks or gaps. If any are found, apply a small amount of caulk to fill the gaps and smooth it out with a wet finger.
Proper ventilation is important throughout the caulking process. Open windows or use a fan to circulate air and dissipate any fumes from the caulk or cleaning solutions. Dispose of used caulk tubes, rags, and other materials properly. Store leftover caulk in a cool, dry place, tightly sealed, for future use.

How To Caulk A Bathtub 13 Steps With Pictures Wikihow

How To Caulk A Bathtub On Sutton Place

How To Caulk A Bathtub 13 Steps With Pictures Wikihow

Caulking A Bathtub Simple Steps For Successful Seal

How To Caulk A Shower Or Tub True Value

How To Caulk A Bathtub On Sutton Place

How To Caulk A Bathtub Like Pro

How To Caulk A Bathtub Cautionary Tale Designertrapped Com

15 Genius Tips For Caulking The Bathtub

How To Re Caulk A Bathtub
Related Posts